Task API (3 of 3) - Monitoring HTTP POST operations
- Introduction
- Background - threads 101
- Architecture - how?
- Example - HTTP POST Operation
- Download - I want the code now!
Introduction #
For a brief introduction on what the Task API is and how to quickly get started using it, read the first tutorial in the series - Task API - Quick Start Guide. Also read the second tutorial in the series - Task API - In-depth Guide, to get a better understanding of the Task API details. This tutorial will highlight a sample app that performs an HTTP POST operation; both the request and response portions of this network I/O operation can be monitored, and canceled at any time.
Background - threads 101 #
If you are not familiar with threading or EDT, then you can learn more about threads in the Concurrency in Practice book. You can learn more about the Event Dispatch Thread (EDT) in the Filthy Rich Clients book.
Architecture - how? #
If you are familiar with SwingWorker, then you will know that you work with it by creating a subclass (or anonymous inner class implementation) in which you define a doInBackground() method. Then you execute the task, and you have the option of canceling it. Instead of taking this approach of making inner class implementations in-line, the Task API works via a set of handlers and functors that you simply attach to a Task to tell it:
-
what to execute in the background
-
what to do when the task completes successfully, or fails, or gets interrupted.
You can also listen to bound properties (JavaBeans style properties) that will report status changes, progress updates, etc. It makes it very easy to work with the API, and if you’re used to writing event driven code, then this approach is very natural. There is a whole host of support classes that are provided to make your life really easy when working with these tasks - their functors, handlers, and listeners. I’ve worked very hard to make this API easy to use… it’s not a ‘lazy’ implementation on my part… I’ve worked very hard so that you don’t have to! :) . Another nice feature the API has is that it auto-cleans up resources, and auto-stops things, making it relatively easy to manage the lifecycle of these tasks and the resources & hooks (listeners, etc) that they consume. More on this in the other tutorials.
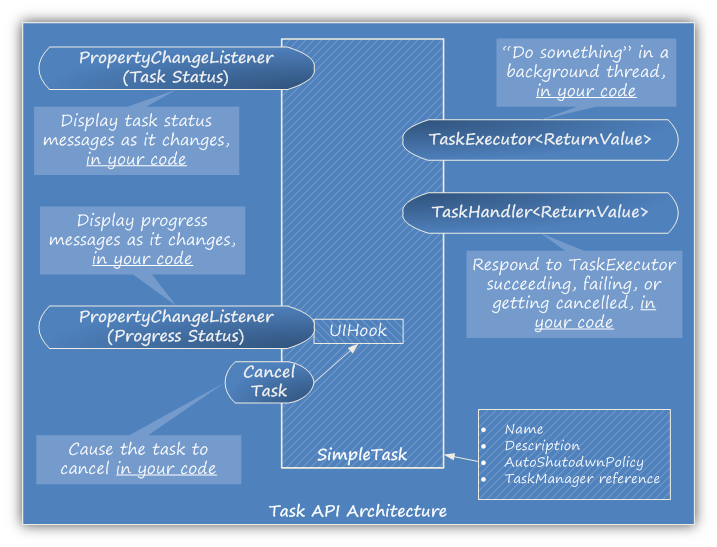
The following diagram illustrates the basic architecture of the API:
Example - HTTP POST Operation #
As part of the Task API distribution, there are a set of sample applications included to demonstrate the usage of the API. The one we are going to cover in this tutorial is titled - “Part 3 - Sample Application using Task API. Using SimpleTask and HTTP POST”. If you’ve downloaded the code, you can find this class here - Samples.Part3.SampleApp. This class has a main() method that you can run. Use your favorite IDE to load this class up and follow along below. If you have IDEA 7, then the you can just open the taskapi.ipr project file and run it from the Run menu on your toolbar.
What does the SampleApp do? #
What does this app do? It simply performs an HTTP POST operation on the given URI (in the text field) and it shows you the progress of the network IO operation and it allows you to cancel it in flight. The URI is set to a Google service that accepts HTTP POST operations. In the codebase of the Task API, a Servlet is provided that allows you to test your GET and POST operations, it’s called SampleService.DataPingServlet. If you deploy the Test.war file to a Servlet container, then you can just put the URI of that servlet into the text field and run this test app. If you do use this DataPingServlet, it’s servlet mapping is “/Ping”, so a URI might look like - http://localhost:8080/Test/Ping. The IDEA project included with the source code has a web facet that you can use to generate the Test.war file.
Also, if the URI resolves to an image, it tries to display it in a JFrame, that you can dispose simply by clicking on it anywhere. You can provide URI’s that resolve to other files, that aren’t images, and they won’t be displayed.
Here’s a screenshot of this sample app in action:
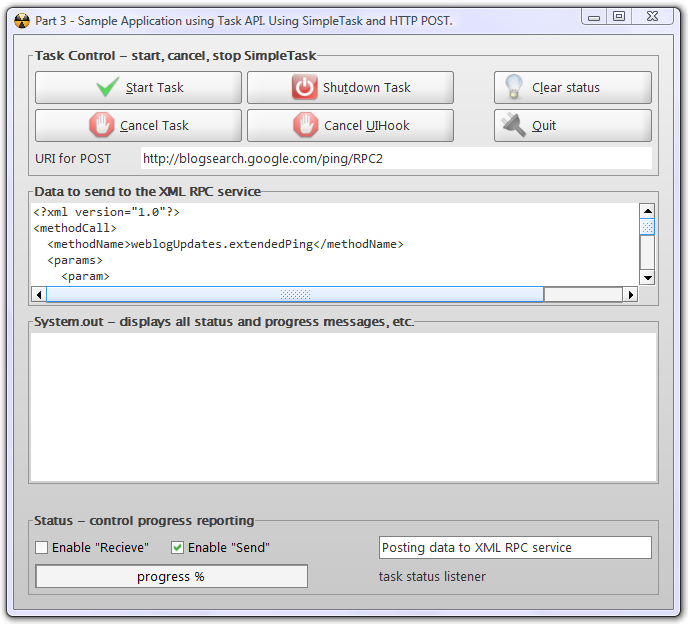
Once you start the application (and you’re connected to the Internet), check both Enable “Receive” and Enable “Send” checkboxes, and then click on “Start Task”, you get the following:
Performing HTTP POST operation #
Here’s the code in the TaskExecutor functor that does the HTTP POST:
TaskExecutorIF<ByteBuffer> functor = new TaskExecutorAdapter<ByteBuffer>() {
  public ByteBuffer doInBackground(Future<ByteBuffer> swingWorker,
                                   SwingUIHookAdapter hook) throws Exception {

    try {

      _initHook(hook);

      PostMethod post = HttpUtils.sendMonitoredPOSTRequest(
          ttfURI.getText(),
          hook,
          new ByteBuffer(ttaInput.getText().getBytes()),
          "text/xml"
      );

      ByteBuffer data = HttpUtils.getMonitoredResponse(hook, post);

      return data;

    }
    catch (Exception e){
      e.printStackTrace();
      throw e;
    }

  }

  @Override public String getName() {
    return _task.getName();
  }
};
Here are some notes on the code:
-
The HttpUtils class makes it a breeze to hook up the POST operation for monitoring. For more information on HTTP POST using the Apache HTTP Client API, click here. Both the request and response can be monitored. To enable monitoring of the request, set “Enable Send”. To enable monitoring of the response, set “Enable Receive”.
-
The data for the request just has to be a ByteBuffer. As the data from this ByteBuffer gets sent over the network, the UIHook gets updated with status updates.
-
The data from the response is retrieved by using HttpUtils.getMonitoredResponse(…). As the data is received from the POST operation, the UIHook gets updated.
The _initHook(hook) operation does the following:
private SwingUIHookAdapter _initHook(SwingUIHookAdapter hook) {
  hook.enableRecieveStatusNotification(checkboxRecvStatus.isSelected());
  hook.enableSendStatusNotification(checkboxSendStatus.isSelected());

  hook.setProgressMessage(ttfProgressMsg.getText());

  PropertyChangeListener listener = new PropertyChangeListener() {
    public void propertyChange(PropertyChangeEvent evt) {
      SwingUIHookAdapter.PropertyList type = ProgressMonitorUtils.parseTypeFrom(evt);
      int progress = ProgressMonitorUtils.parsePercentFrom(evt);
      String msg = ProgressMonitorUtils.parseMessageFrom(evt);

      progressBar.setValue(progress);
      progressBar.setString(type.toString());

      sout(msg);
    }
  };

  hook.addRecieveStatusListener(listener);
  hook.addSendStatusListener(listener);
  hook.addUnderlyingIOStreamInterruptedOrClosed(new PropertyChangeListener() {
    public void propertyChange(PropertyChangeEvent evt) {
      sout(evt.getPropertyName() + " fired!!!");
    }
  });

  return hook;
}
Download - I want the code now! #
You can download the source code distribution here. Included are sources, libraries that are needed, and javadocs. The sample applications are included in the source as well. Please read the javadocs - I have copious amounts of documentation about the lifecycle stages of Tasks in there, along with all the other classes in the Task API. The best place to see what’s going on is in the javadocs. I took the time to write them for your benefit, as well as mine, so please use them :) .
After you download the zip file, you will find all the compiled JARs that you will need in the /taskapi/dist/ folder. All the source code is in the /taskapi/src/ folder. The javadocs are in the /taskapi/javadoc/ folder.