Introduction to Android Architecture Components
- Put the magic back into Android development
- What is it?
- Example
- The Kotlin version
- Further exploration
Put the magic back into Android development #
In Nov 2017 Architecture Components v1 was launched. This is a big deal because for the longest time it was very difficult to deal with certain use cases which would crop up all the time in mobile app development.
Things like dealing with configuration changes when rotating a screen, and sharing app state data between fragments and activities were difficult.
While these difficulties are not insurmountable, the fact that they crop up in so many common scenarios have had a negative impact on the developer experience on Android and didn’t make it feel magical. 😠
Architecture Components puts the magic back into Android development! 🎩✨ This article has both Java and Kotlin versions of a sample project that I build to illustrate the use of Architecture Components.
What is it? #
There are quite a few patterns out there for app architectures, such as MVP, MVVM, and
unidirectional. I’m a huge fan of
unidirectional, and I
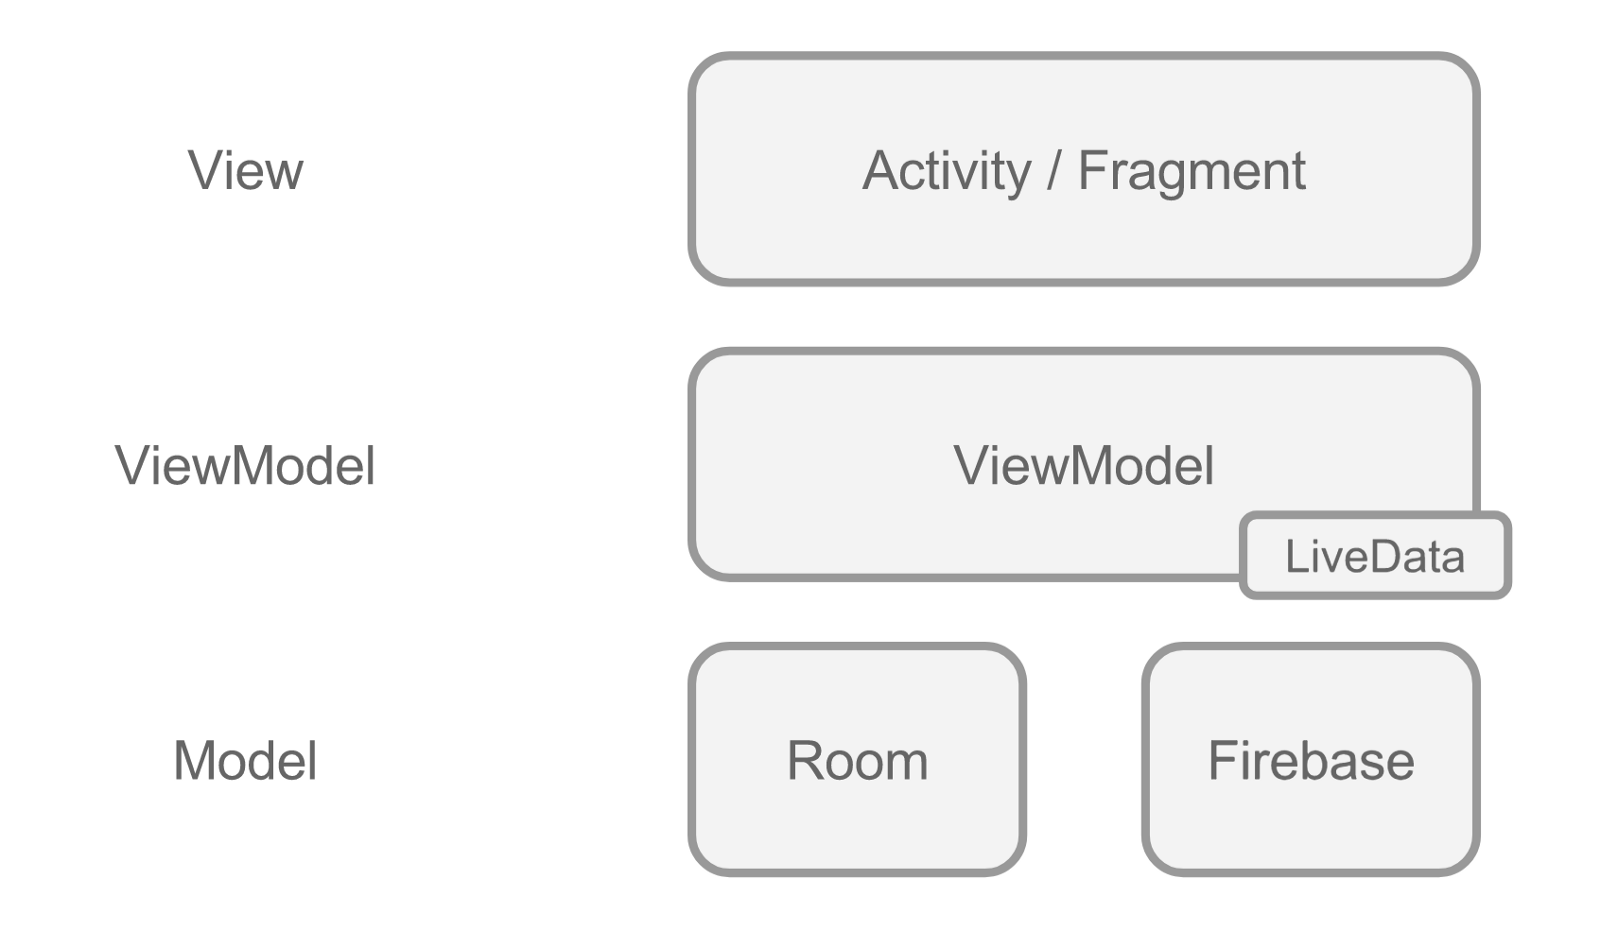
like MVVM too. There are 3 parts of M-V-VM, the Model, View, and ViewModel. Let’s take a look
at what each of these are.
View #
This is the UI component that is in a layout and rendered on the display.
ViewModel #
Views subscribe to the data they are interested in from the ViewModel. So when this data changes
it can be broadcast to any interested observers.
- The
ViewModelis responsible for prearing data for consumption by the View. - The
ViewModel’sstate is stable across the lifecycle ofActivitiesandFragments. So as an Activity is torn down and rebuilt (on an orientation change) it can use the sameViewModel. And you can scope the lifetime of theseViewModelsto theActivitylifetime as well, so that when theActivityis finished (not destroyed), then theViewModelcan be cleaned up. LiveDatais an interesting piece of aViewModelthat you can wrap any data that changes quite rapidly and these changes have to be reflected in UI components.ViewModelsshould not hold references to anyViews. And if they need anApplicationContext, then you can useAndroidViewModelwhich supplies this.- You don’t directly create a
ViewModel, instead you ask the system to find you one. And the system ends up creating theViewModeland managing what it’s scope is based on this. Basically you have to use a factory method to get a reference to aViewModelinstead of just creating one yourself using a constructor.
Model #
This is where your underlying data is actually stored. The model can be backed by local persistence
stores, and synchronized with remote data sources. You can use Room to make it easier to work with
SQLLite (on device) and have Room generate the ORM layer for you. Or you can use Firebase for
persistence, which automagically syncs its state across multiple platforms. You have a lot of
flexibility in what you choose. You can even use something like Redux in addition to Firebase to
be your Model.
This article is focused on the
ViewModel
and LiveData parts of
the Architecture Components. I will be covering
Lifecycle awareness and
Models in other articles.
Example #
I’ve created a simple app that showcases how you might use a ViewModel and LiveData in your
apps. You can get this sample on GitHub.
The sample just has 1 Java file —
MainActivity.java.
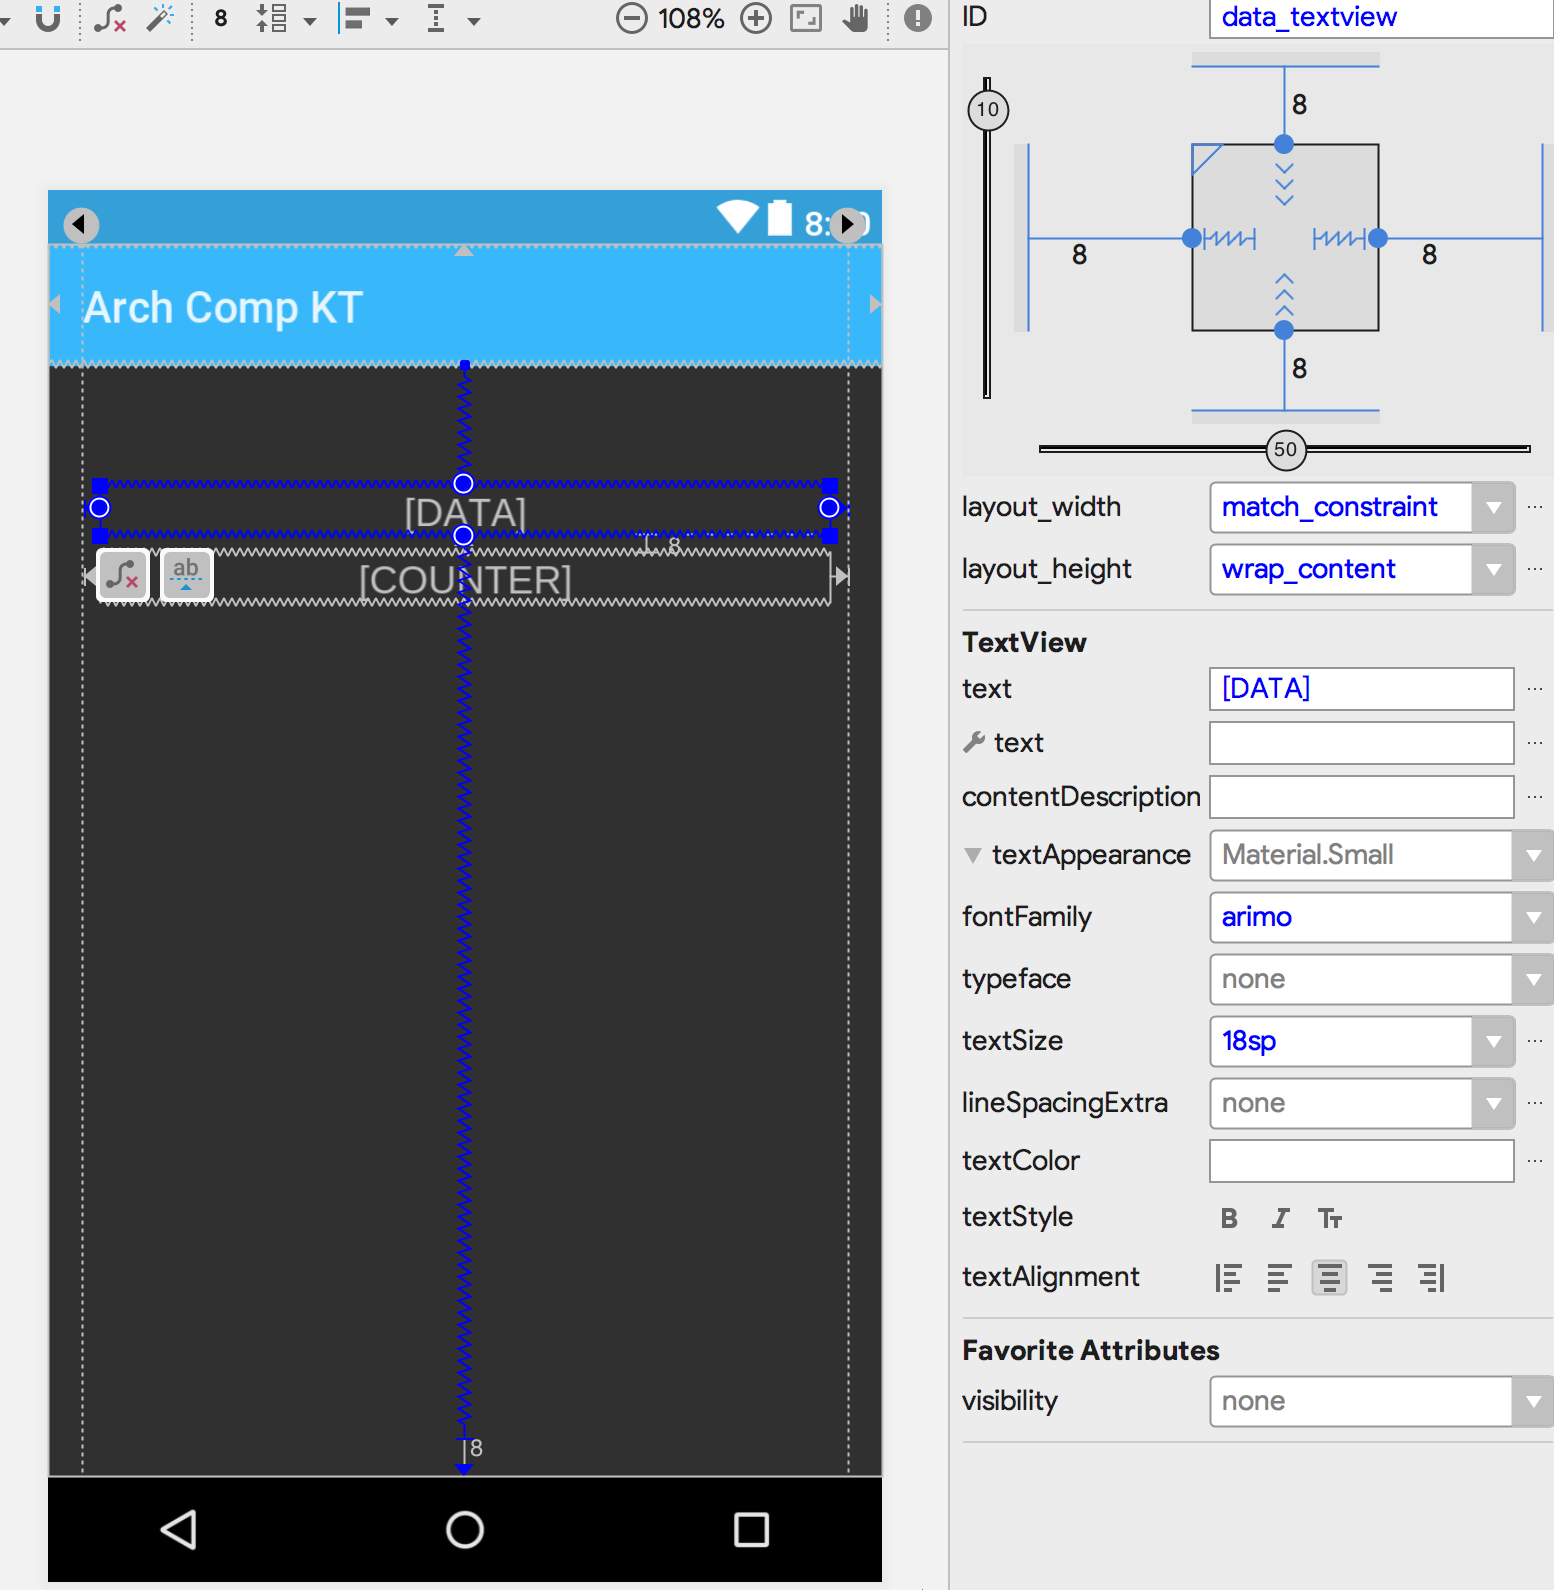
This Activity loads its state from a StateViewModel, which contains two pieces of data. Here’s
the entire Activity.
public class MainActivity extends AppCompatActivity {
    private TextView dataTextView;
    private TextView counterTextView;
    private StateViewModel stateViewModel;

    @Override
    protected void onCreate(Bundle savedInstanceState) {
        super.onCreate(savedInstanceState);
        setContentView(R.layout.activity_main);
        dataTextView = findViewById(R.id.data_textview);
        counterTextView = findViewById(R.id.counter_textview);
        setupModelView();
        attachObservers();
    }

    // Deal with loading state from ViewModel
    private void setupModelView() {
        stateViewModel =
            ViewModelProviders.of(this).get(StateViewModel.class);
        dataTextView.setText(
                String.format("Data: %s", stateViewModel.getData()));
    }

    private void attachObservers() {
        stateViewModel
                .getCounter()
                .observe(
                        this,
                        count -> {
                            counterTextView.setText(
                                    String.format("Count: %s",
                                    Long.toString(count)));
                        });
    }
}
Data # 1 #
There’s a UUID String that is generate the first time this StateViewModel is created and this
is displayed in the UI. This String does not change for the lifetime of the Activity. It is
stable across configuration changes. So as you rotate the screen, and the Activity is destroyed and
then recreated (but not finished), the same UUID String will be displayed in the UI. When you
finish the Activity by pressing the back button, or by going to the task switcher and swiping the
Activity away, then the ViewModel will be destroyed and onCleared() will be called.
class StateViewModel extends AndroidViewModel {
    private final ScheduledExecutorService myExecutor;
    // This value doesn't change after it is initialized
    private String mData;
    // This value changes over time
    private CounterLiveData mCounter = new CounterLiveData();

    public StateViewModel(Application context) {
        super(context);
        myExecutor = Executors.newSingleThreadScheduledExecutor();
        myExecutor.scheduleWithFixedDelay(
                this::recurringTask, 0, 1, TimeUnit.SECONDS);
        Log.d(Tags.viewmodel.name(),
            "ViewModel constructor: created executor");
    }

    // Counter
    public void recurringTask() {
        long counter = mCounter.get();
        Log.d(Tags.viewmodel.name(),
            counter % 2 == 0 ? "task: tick" : "task: tock");
        mCounter.set(counter + 1);
    }

    public CounterLiveData getCounter() {
        return mCounter;
    }

    // Data
    public void setData(String mData) {
        this.mData = mData;
    }

    public String getData() {
        if (isDataSet()) {
            Toast.makeText(getApplication(),
                "Re-using ViewModel", Toast.LENGTH_SHORT).show();
        } else {
            setData(UUID.randomUUID().toString());
            Toast.makeText(getApplication(),
                "This is a new ViewModel", Toast.LENGTH_SHORT).show();
        }
        return mData;
    }

    public boolean isDataSet() {
        return mData != null;
    }

    @Override
    protected void onCleared() {
        super.onCleared();
        myExecutor.shutdown();
        Log.d(Tags.viewmodel.name(), mCounter.toString());
        Log.d(Tags.viewmodel.name(),
            "onCleared: lifecycle of activity finished");
    }
}
Data # 2 #
The ViewModel also creates a ScheduledExecutor that runs a simple task every second. This task
simply updates a counter, and it generates a log message (“tick”, or “tock”). This Executor also
sets the value of this counter in a CounterLiveData object. The UI actually subscribes to this
LiveData object and when it changes the UI gets updated with the current count. This too is stable
across configuration changes. When the Activity is finally finished, the onCleared() method
actually shuts the executor down. Also, you have to be mindful of which thread the
CounterLiveData’s value is set.
class CounterLiveData extends MutableLiveData<Long> {
    public String toString() {
        return String.format("count=%d", getValue());
    }

    public Long get() {
        return getValue() == null ? 0L : getValue();
    }

    public void set(Long value) {
        if (Looper.getMainLooper().equals(Looper.myLooper())) {
            // UI thread
            setValue(value);
        } else {
            // Non UI thread
            postValue(value);
        }
    }
}
Adding Architecture Components to your project #
Read more about how to modify your build.gradle file on
developer.android.com.
Here’s a simple build.gradle file snippet just for Lifecycles, ViewModel, and LiveData.
dependencies {
    implementation fileTree(include: ['*.jar'], dir: 'libs')
    // Support lib
    implementation 'com.android.support:appcompat-v7:27.0.2'

    // Lifecycles
    implementation "android.arch.lifecycle:runtime:1.0.3"
    annotationProcessor "android.arch.lifecycle:compiler:1.0.0"
    implementation "android.arch.lifecycle:common-java8:1.0.0"

    // ViewModel, LiveData
    implementation "android.arch.lifecycle:extensions:1.0.0"
}
The Kotlin version #
You can find the Kotlin version of this project on GitHub. The Kotlin version is similar in spirit, but the code is very very different. I recently learned Kotlin (in Dec 2017) and have used it so far in Android, Web, and JavaScript projects.
Kotlin is a very different project from Java or JavaScript, and it took me a while to become fluent “thinking in Kotlin”. In this project, I used both Kotlin for Android and Anko. Anko is a delightful library that made so much mundane boilerplate disappear from the codebase. I am going to highlight some of the major changes between the Java version and Kotlin version of the projects below.
UI - ConstraintLayout #
This really has nothing to do with Kotlin. I decided to go with
ConstraintLayout
for the Kotlin version. The biggest learning about ConstraintLayout came from using
guidelines
to position my components and setting width/height to 0dp for match_constraint.
UI - Downloadable Fonts #
I’m a big fan of
downloadable fonts. The Kotlin
version of the code is quite different from the Java version in many ways. I also use Anko to take
care of some nasty view traversal (to set the Typeface on the Toolbar). AnkoLogger is also a
great thing to avoid having to create a TAG for log message generation.
To use Anko logger, you have to make your class implement the AnkoLoggerinterface. Then you can
just call info() or wft(), etc to generate logs without using a TAG.
class FontObserver(val mContext: Context, val mToolbar: Toolbar) :
    LifecycleObserver, AnkoLogger {
  @OnLifecycleEvent(Lifecycle.Event.ON_CREATE)
  fun downloadFont() {
      info("${::downloadFont.name}(): Running") ... }
... }
You can use Anko to take care of some gnarly view traversal.
fun styleToolbar(typeface: Typeface) {
    mToolbar.applyRecursively {
        when (it) {
            is TextView -> it.typeface = typeface
        }
    }
}
And with the lazy delegate, you can create heavy objects with ease (without having to deal with
null checking). The with extension function makes things neat so that I don’t have to create
clumsy local variables.
val mFontHandler: Handler by lazy {
    with(HandlerThread("fonts")) {
        start()
        Handler(looper)
    }
}
UI - No more findViewById #
This is one of my favorite
Kotlin for Android extensions! You can
reference the id of your Views directly in your code without doing clunky and possibly leaky
findViewById() calls (Kotlin maintains a
view cache for you to make
this syntactic sugar performant and reliable as well).
// No need to use findViewById() anymore!
fun viewBinding() {
    // Use synthetic properties on views!
    data_textview.text = "Data!!!"
    counter_textview.text = "Counter!!!"
}
UI - Toasts #
Anko makes it a breeze to work with Toasts, with the extension function toast(String). You will
be glad to know that you don’t have to call show()for this Toast to actually be visible! Only
caveat is that this function is defined on a Context object, so if you’re not in a Context, or
Fragment, etc then you have to call this function on a Context reference. Here’s an example of
calling a toast() from the StateViewModel class.
var mData: Data
    get() {
        if (!::_data.isInitialized) {
            getApplication<Application>()
                .toast("Creating new ViewModel")
            _data = Data(Random().nextInt(1000).toString(), Date())
        }
        return _data
    }
    set(mData) {
        _data = mData
    }
UI - Snackbar #
Anko makes it easy to work with Snackbars with the extension function snackbar(View, String).
It’s very similar to toast() except that you need to provide one View in the layout in which you
want the Snackbar to appear. IN order to get a View that you can use, call
findViewById(**android.R.id.content**). This will get you the top level view in whatever View
hierarchy you’ve inflated. You can then use this View to create a Snackbar.
val rootView: View = findViewById(android.R.id.content)
snackbar(rootView, "MainActivity created")
UI - Alert #
Anko makes it easy to work with Dialogs as well with the alert() extension function. Here’s an
example of this.
fun showDialog(rootView: View) {
    if (::mStateViewModel.isInitialized)
        if (!mStateViewModel.mData.clicked)
            alert(
                    Appcompat,
                    title = "Welcome 🤗",
                    message = "Make sure to rotate screen ...",
                    init = {
                        okButton {
                            mStateViewModel.mData.clicked = true
                            snackbar(rootView, "👍")
                            info("👍 was selected")
                        }
                        noButton {
                            mStateViewModel.mData.clicked = true
                            snackbar(rootView, "👎")
                            info("👎 was selected")
                        }
                        onCancelled {
                            mStateViewModel.mData.clicked = true
                            snackbar(rootView, "👊")
                            info("👊 dialog was dismissed")
                        }
                    }
            ).show()
}
ViewModel - StateViewModel #
When your Activity is created, you can call the following to get a reference to the ViewModel.
Note that we are using a AndroidViewModel in this case (which comes with a reference to the
Application Context). Also remember that you can’t directly instantiate the ViewModel, Android
will do this for you.
mStateViewModel = ViewModelProviders
     .of(this)
     .get(StateViewModel::class.java)
Once you’ve got the ViewModel, you can use the properties it exposes — mData: Data and
mCounter: Counter.
Here’s an example of setting the text of mData’s toString() to a TextView.
data_textview.text = mStateViewModel.mData.toString()
Here’s are examples of attaching Observers to mData and mCounter. Both Data and Counter
classes are subclasses of LiveData.
mStateViewModel.mCounter.observe(
            this,
            Observer {
                counter_textview.text = "Count: ${it.toString()}"
            })
mStateViewModel.mData.observe(
            this,
            Observer {
                data_textview.text = it.toString()
            }
    )
LiveData - Counter #
The Counter subclass of LiveData exposes one public property count and one function
increment(). These are used in order to increment the count by 1 every second, by the Executor
thread that’s started in the StateViewModel. You can pass an initial value of the counter via the
constructor. There’s also an init block that takes this value and sets it on the LiveData.
init {
    setValue(value)
}
The count property is backed by private value: Int. This means that the count itself doesn’t
really store the Int value. However it’s setter and getter are used in order to expose the value
of count to other classes. Additionally, when the setter is used, this causes the LiveData
setValue()/postValue()to be called as well.
var count: Long
    get() {
        return value
    }
    set(value) {
        if (Looper.getMainLooper() == Looper.myLooper()) {
            // UI thread
            setValue(value)
        } else {
            // Non UI thread
            postValue(value)
        }
    }
The increment() method actually increments the value and then sets it on the count property
itself. This results in a call to setValue() / postValue()as shown above, which is what makes
this an Observable.
fun increment() {
    count = value++
}
LiveData - Data #
The Data subclass of LiveData exposes one property — clicked. This property is set when the
user interacts with the alert / dialog shown above.
data class Data(val id: String, val time: Date) :
        MutableLiveData<Data>() {

    private var _clicked: Boolean = false
    var clicked: Boolean
        get() {
            return _clicked
        }
        set(value) {
            _clicked = value
            setValue(this)
        }
... }
Further exploration #
- Codelab to get started with Android lifecycle-aware components
- “Model View ViewModel on Android” article on medium
- “Deep dive into Data Loading with Architecture Components” on medium
- Tutorial on Architecture Components — part 1, part 2