Customizing Ubuntu UI
![]()

- Introduction
- Fonts
- Terminal and shell UI customization
- GNOME tweaks and extensions
- Customize Chrome and Firefox
- IDEA theming
- Mouse customization
- Gestures
Introduction #
I am a big fan of Ubuntu, and a big fan of fonts and UI tweaks and customizations to make the UX of interacting w/ a desktop OS as fun and productive as possible (for me). I’ve compiled a list of change that I’ve made to my Ubuntu desktop environment to make it a pleasure for me to use and I’m sharing them here. YMMV 🙂.
Fonts #
I tend to install a collection of fonts that I’ve been curating over the years on every system that I have. This is a collection of Google Fonts, open source fonts, and even some macOS fonts (since I’ve also used macOS).
Installing fonts #
The following 3 approaches all install fonts for your current user.
-
In order to install fonts, the easiest thing to do is get Font Manager. You can simply install it by running
sudo apt install -y font-manager. You can then use Font Manager app to install whatever fonts you have on your computer. -
If you don’t want to use this app, you can simply copy all your fonts to the following folder
~/.local/share/fonts. And then runsudo fc-cache -fvto flush the font cache. -
Alternatively, you can just copy all your fonts into the
~/.fonts/folder and then runsudo fc-cache -fv.
You can also see which fonts you have installed on your system by running
fc-list | grep "<FONT_NAME>", where <FONT_NAME> is whatever font you have, eg: Monaco or
Hack Nerd Font.
Note that you should only use one of the three approaches. For example if you do both steps 2 and 3, then it will result in some really strange behaviours in Ubuntu! In that case just undo one of the steps.
Some of my favorite fonts are:
- JetBrains Mono
- macOS fonts: Monaco, Helvetica Neue, SF Mono
- Fira Sans, Medium variant is good for UI font like Pop!_OS
- An assortment of Nerd Fonts: Hack, CodeNewRoman, VictorMono
- Google Fonts: Google Sans, Open Sans
- Cascadia Code
Nerd Fonts #
You can get all the Nerd Fonts here. There are so many!🎉 Here are some rules to make it easy to install fonts you download from there. You can see what these fonts look like here before downloading them.
- The font file name ending in “Code” has ligatures. The file names ending in “Mono” do not have ligatures.
- There are Windows compatible fonts that are provided in there too.
- For a given font family, I just delete the Windows compatible fonts, and the files ending in “Mono”. And that just leaves the files ending in “Code”. I then install these fonts as show above.
These fonts have ligatures added, font awesome glyps, and even powerline support (which we will get into below), and more.
Configure default Linux fonts #
This is where things are going to get good. It is possible to map the defaults on Linux to whatever type face you choose. This article does an incredible job of explaining font aliases on Linux.
Here’s a fish script that will list the current defaults you have on your system.
set families serif sans-serif monospace Arial Helvetica Verdana "Times New Roman" "Courier New"
for family in $families
  echo -n "$family: "
  fc-match "$family"
end
In order to change these defaults, you can edit (or create) the ~/.config/fontconfig/fonts.conf
file. Here you can specify actual font files at these families will map to. This gives you a
tremendous amount of flexibility to change things like the default font that Google Chrome uses
(which is Arimo). If you’ve ever wanted to use something other than Arimo in Gmail, then this is the
way in which you can change it.
Here’s an example of my fonts.conf file.
<?xml version='1.0'?>
<!DOCTYPE fontconfig SYSTEM 'fonts.dtd'>

<!-- https://jichu4n.com/posts/how-to-set-default-fonts-and-font-aliases-on-linux/ -->

<fontconfig>

  <!-- Set preferred serif, sans serif, and monospace fonts. -->
  <alias>
    <family>serif</family>
    <prefer><family>Helvetica Neue</family></prefer>
  </alias>
  <alias>
    <family>sans-serif</family>
    <prefer><family>Helvetica Neue</family></prefer>
  </alias>
  <alias>
    <family>sans</family>
    <prefer><family>Helvetica Neue</family></prefer>
  </alias>
  <alias>
    <family>monospace</family>
    <prefer><family>JetBrains Mono</family></prefer>
  </alias>

  <!-- Aliases for commonly used MS fonts. -->
  <match>
    <test name="family"><string>Segoe UI</string></test>
    <edit name="family" mode="assign" binding="strong">
      <string>Helvetica Neue</string>
    </edit>
  </match>
  <match>
    <test name="family"><string>SegoeUI</string></test>
    <edit name="family" mode="assign" binding="strong">
      <string>Helvetica Neue</string>
    </edit>
  </match>
  <match>
    <test name="family"><string>SegoeUI-Light</string></test>
    <edit name="family" mode="assign" binding="strong">
      <string>Helvetica Neue</string>
    </edit>
  </match>
  <match>
    <test name="family"><string>SegoeUI-SemiBold</string></test>
    <edit name="family" mode="assign" binding="strong">
      <string>Helvetica Neue</string>
    </edit>
  </match>

  <match>
    <test name="family"><string>Arial</string></test>
    <edit name="family" mode="assign" binding="strong">
      <string>Helvetica Neue</string>
    </edit>
  </match>
  <match>
    <test name="family"><string>Helvetica</string></test>
    <edit name="family" mode="assign" binding="strong">
      <string>Helvetica Neue</string>
    </edit>
  </match>
  <match>
    <test name="family"><string>Verdana</string></test>
    <edit name="family" mode="assign" binding="strong">
      <string>Helvetica Neue</string>
    </edit>
  </match>
  <match>
    <test name="family"><string>Tahoma</string></test>
    <edit name="family" mode="assign" binding="strong">
      <string>Helvetica Neue</string>
    </edit>
  </match>
  <match>
    <test name="family"><string>Comic Sans MS</string></test>
    <edit name="family" mode="assign" binding="strong">
      <string>Helvetica Neue</string>
    </edit>
  </match>
  <match>
    <test name="family"><string>Times New Roman</string></test>
    <edit name="family" mode="assign" binding="strong">
      <string>Helvetica Neue</string>
    </edit>
  </match>
  <match>
    <test name="family"><string>Times</string></test>
    <edit name="family" mode="assign" binding="strong">
      <string>Helvetica Neue</string>
    </edit>
  </match>
  <match>
    <test name="family"><string>Courier New</string></test>
    <edit name="family" mode="assign" binding="strong">
      <string>JetBrains Mono</string>
    </edit>
  </match>

  <!-- Cambria -> Caladea, Calibri -> Carlito -->
  <!-- Microsoft -->
  <alias binding="same">
    <family>Cambria</family>
    <accept>
      <family>Caladea</family>
    </accept>
  </alias>
  <alias binding="same">
    <family>Caladea</family>
    <default>
      <family>Cambria</family>
    </default>
  </alias>
  <!-- Microsoft -->
  <alias binding="same">
    <family>Calibri</family>
    <accept>
      <family>Carlito</family>
    </accept>
  </alias>
  <alias binding="same">
    <family>Carlito</family>
    <default>
      <family>Calibri</family>
    </default>
  </alias>

</fontconfig>
And this is what my terminal output from that fish script above looks like.
serif: Helvetica_Neue_Regular.ttc: "Helvetica Neue" "Regular"
sans-serif: Helvetica_Neue_Regular.ttc: "Helvetica Neue" "Regular"
monospace: Hack Regular Nerd Font Complete.ttf: "Hack Nerd Font" "Regular"
Arial: Helvetica_Neue_Regular.ttc: "Helvetica Neue" "Regular"
Helvetica: Helvetica_Neue_Regular.ttc: "Helvetica Neue" "Regular"
Verdana: Helvetica_Neue_Regular.ttc: "Helvetica Neue" "Regular"
Times New Roman: Helvetica_Neue_Regular.ttc: "Helvetica Neue" "Regular"
Courier New: Hack Regular Nerd Font Complete.ttf: "Hack Nerd Font" "Regular"
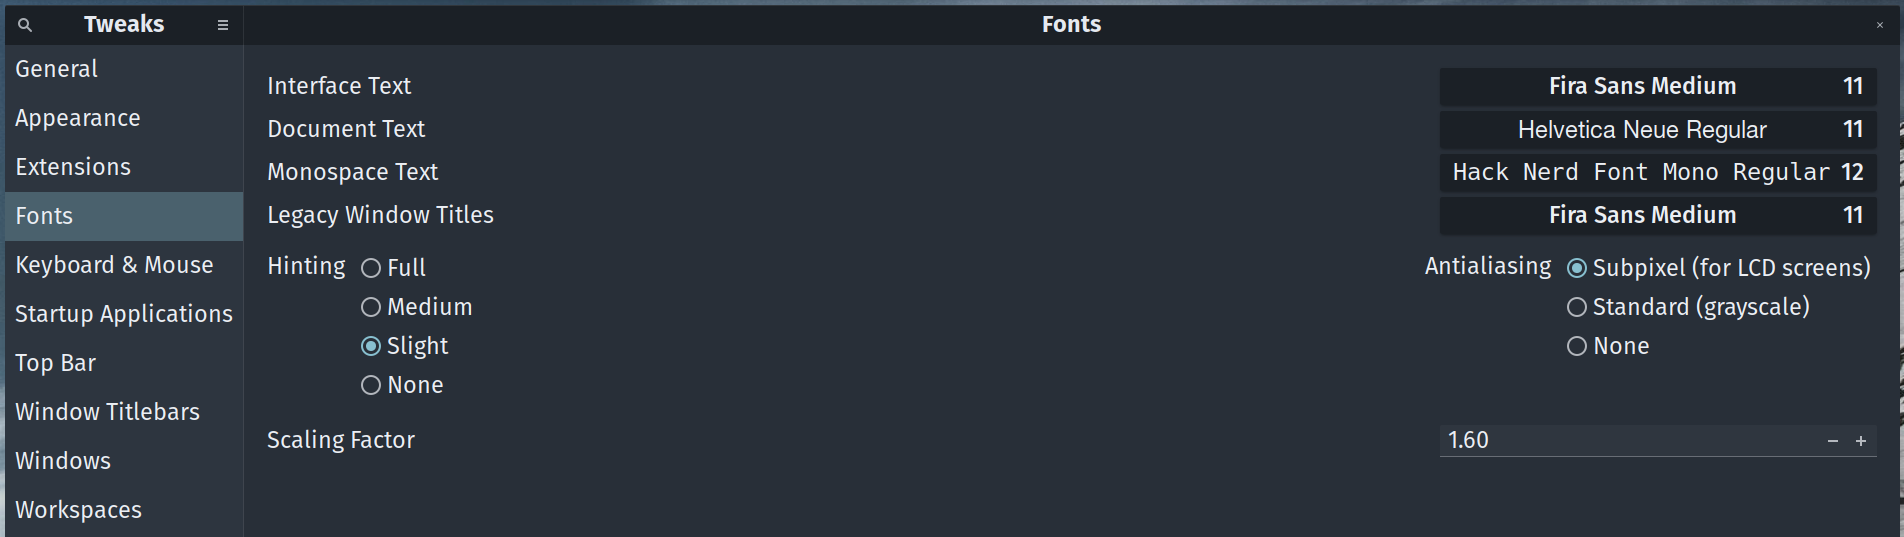
Additionally, you can get gnome-tweaks in order to change some of the defaults that Gnome uses. Here’s an example of what I have under “Fonts”.
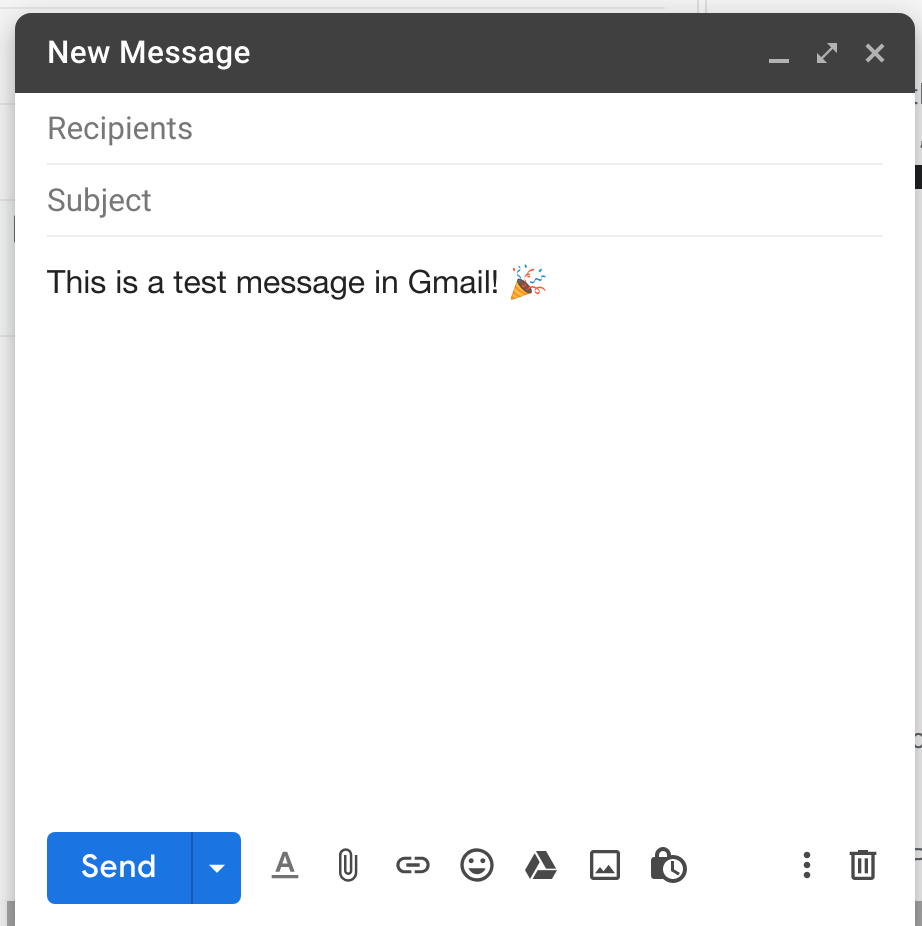
Finally, this is what my Gmail looks like in Google Chrome.
Terminal and shell UI customization #
Here are some of my choices for terminal and shell selection and configuration.
- I use tilix as my main terminal emulator, as I love the ability to tile sessions inside the main window so easily.
- I use fish shell, and I’ve also written a tutorial that I have on advanced fish scripting.
- I also use
powerlinein order to get the prompt for my shell. Here are two ways to install it.
Step 1 - Install fish, and powerline using bash #
# Install the latest version of fish v3 (apt has older versions).
sudo apt-add-repository -y ppa:fish-shell/release-3
sudo apt update
sudo apt -y install fish powerline
# Make fish your default shell.
sudo chsh --shell /usr/bin/fish
Then you have to add the following lines to ~/.config/fish/config.fish in order to use powerline
in your fish prompt. Then restart the shell, or just run source ~/.config/fish/config.fish in your
current session to apply these settings.
function fish_prompt
  powerline-shell --shell bare $status
end
Step 2 - Use a custom theme for tilix #
There are some great themes that are already available which you can easily use in your terminal when you use tilix.
This github repo has a lot of
themes that are available for tilix. You can run the commands on that repo get a theme and have it
installed on your computer. They are saved in ~/.config/tilix/schemes folder.
In order to use it, you have to go into tilix -> edit profile -> color -> color scheme. Then you can see all the currently installed themes in the drop down. Select whichever you like and you are good to go.
Using Nord #
Nord is a nice theme. Not only is it supported in Tilix, and Gnome
Terminal, but you can get this theme for IntelliJ IDEA, Sublime Text 3, and most other developer
facing apps.
You can download “ports” of Nord for various apps here:
In order to get this theme installed in each of these applications, just visit the link for the “port” for that app and follow the instructions to get it installed. Most of these instructions are very simple.
Step 3 - (Optional) Use a custom theme for tilix #
If you don’t want to use a preexisting theme like Nord in your terminal, then you can create your
own. Here’s an example of a custom configuration that I had created in the past.
You can use a font like Hack Nerd Font in your terminal or something else. Here’s what my terminal
configuration looks like (you can save it to a file named tilix.prefs).
[/]
quake-specific-monitor=0
tab-position='bottom'
terminal-title-style='none'
theme-variant='dark'
warn-vte-config-issue=false
window-style='disable-csd-hide-toolbar'

[keybindings]
app-preferences='<Primary><Shift>p'
session-add-down='<Primary>d'
session-add-right='<Primary>r'

[profiles/2b7c4080-0ddd-46c5-8f23-563fd3ba789d]
background-color='#161719'
background-transparency-percent=9
badge-color='#AC7EA8'
badge-color-set=false
bold-color-set=false
cursor-colors-set=false
cursor-shape='block'
custom-command='fish'
default-size-columns=120
dim-transparency-percent=0
font='Monaco 12'
foreground-color='#C5C8C6'
highlight-colors-set=false
palette=['#000000', '#FD5FF1', '#323265650404', '#FFD7B1', '#85BEFD', '#B9B6FC', '#85BEFD', '#E0E0E0', '#000000', '#FD5FF1', '#333365650404', '#F5FFA8', '#96CBFE', '#B9B6FC', '#85BEFD', '#E0E0E0']
terminal-bell='icon-sound'
use-custom-command=true
use-system-font=true
use-theme-colors=false
visible-name='Default'
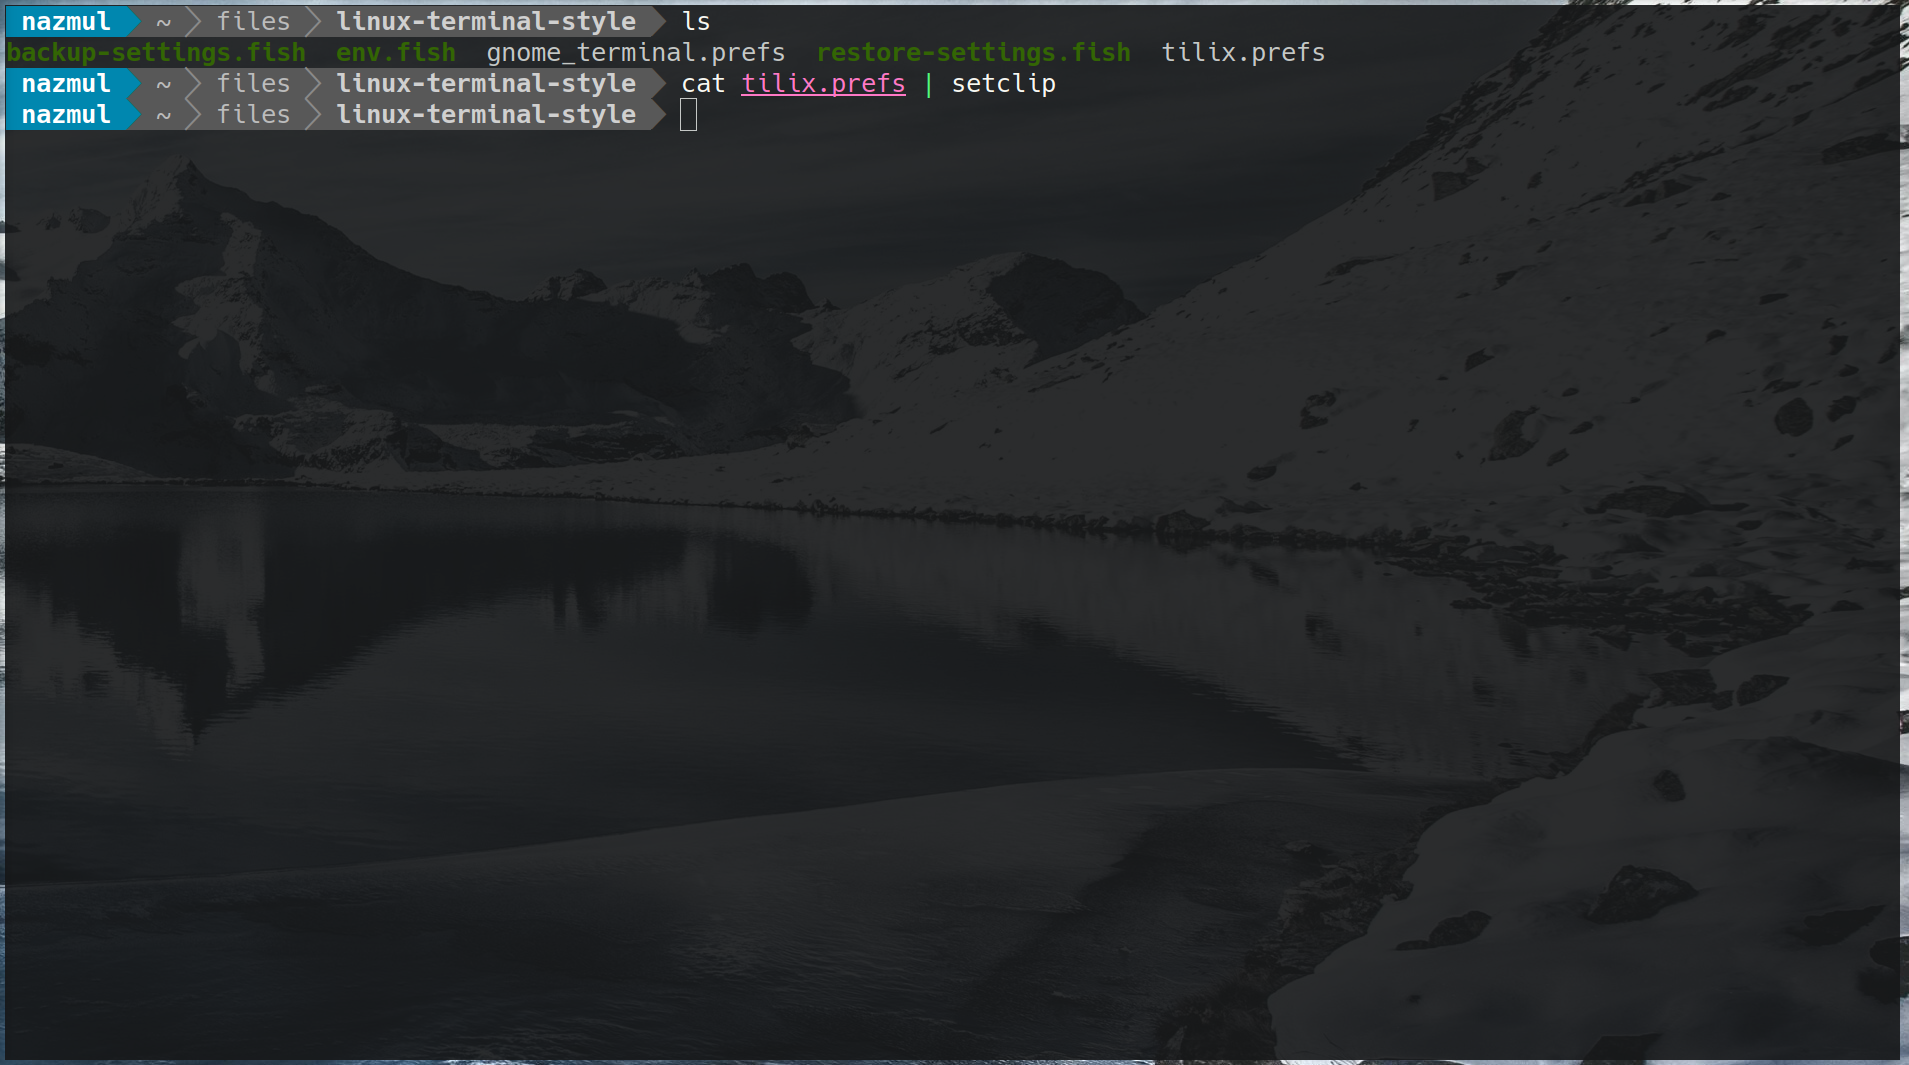
These can be loaded into tilix (via GNOME dconf) using the following command.
# More info: https://askubuntu.com/a/1241849/872482
cat tilix.prefs | dconf load /com/gexperts/Tilix/
Here’s what this configuration looks like.
GNOME tweaks and extensions #
GNOME has a lot of amazing extensions that can radically transform the way it looks and behaves.
I’ve found a few really useful extensions that make some radical changes to both the form and
function of GNOME. In order to use them you have make sure that you install gnome-tweaks on your
computer, and an extension for Chrome or Firefox.
- Install this on your computer:
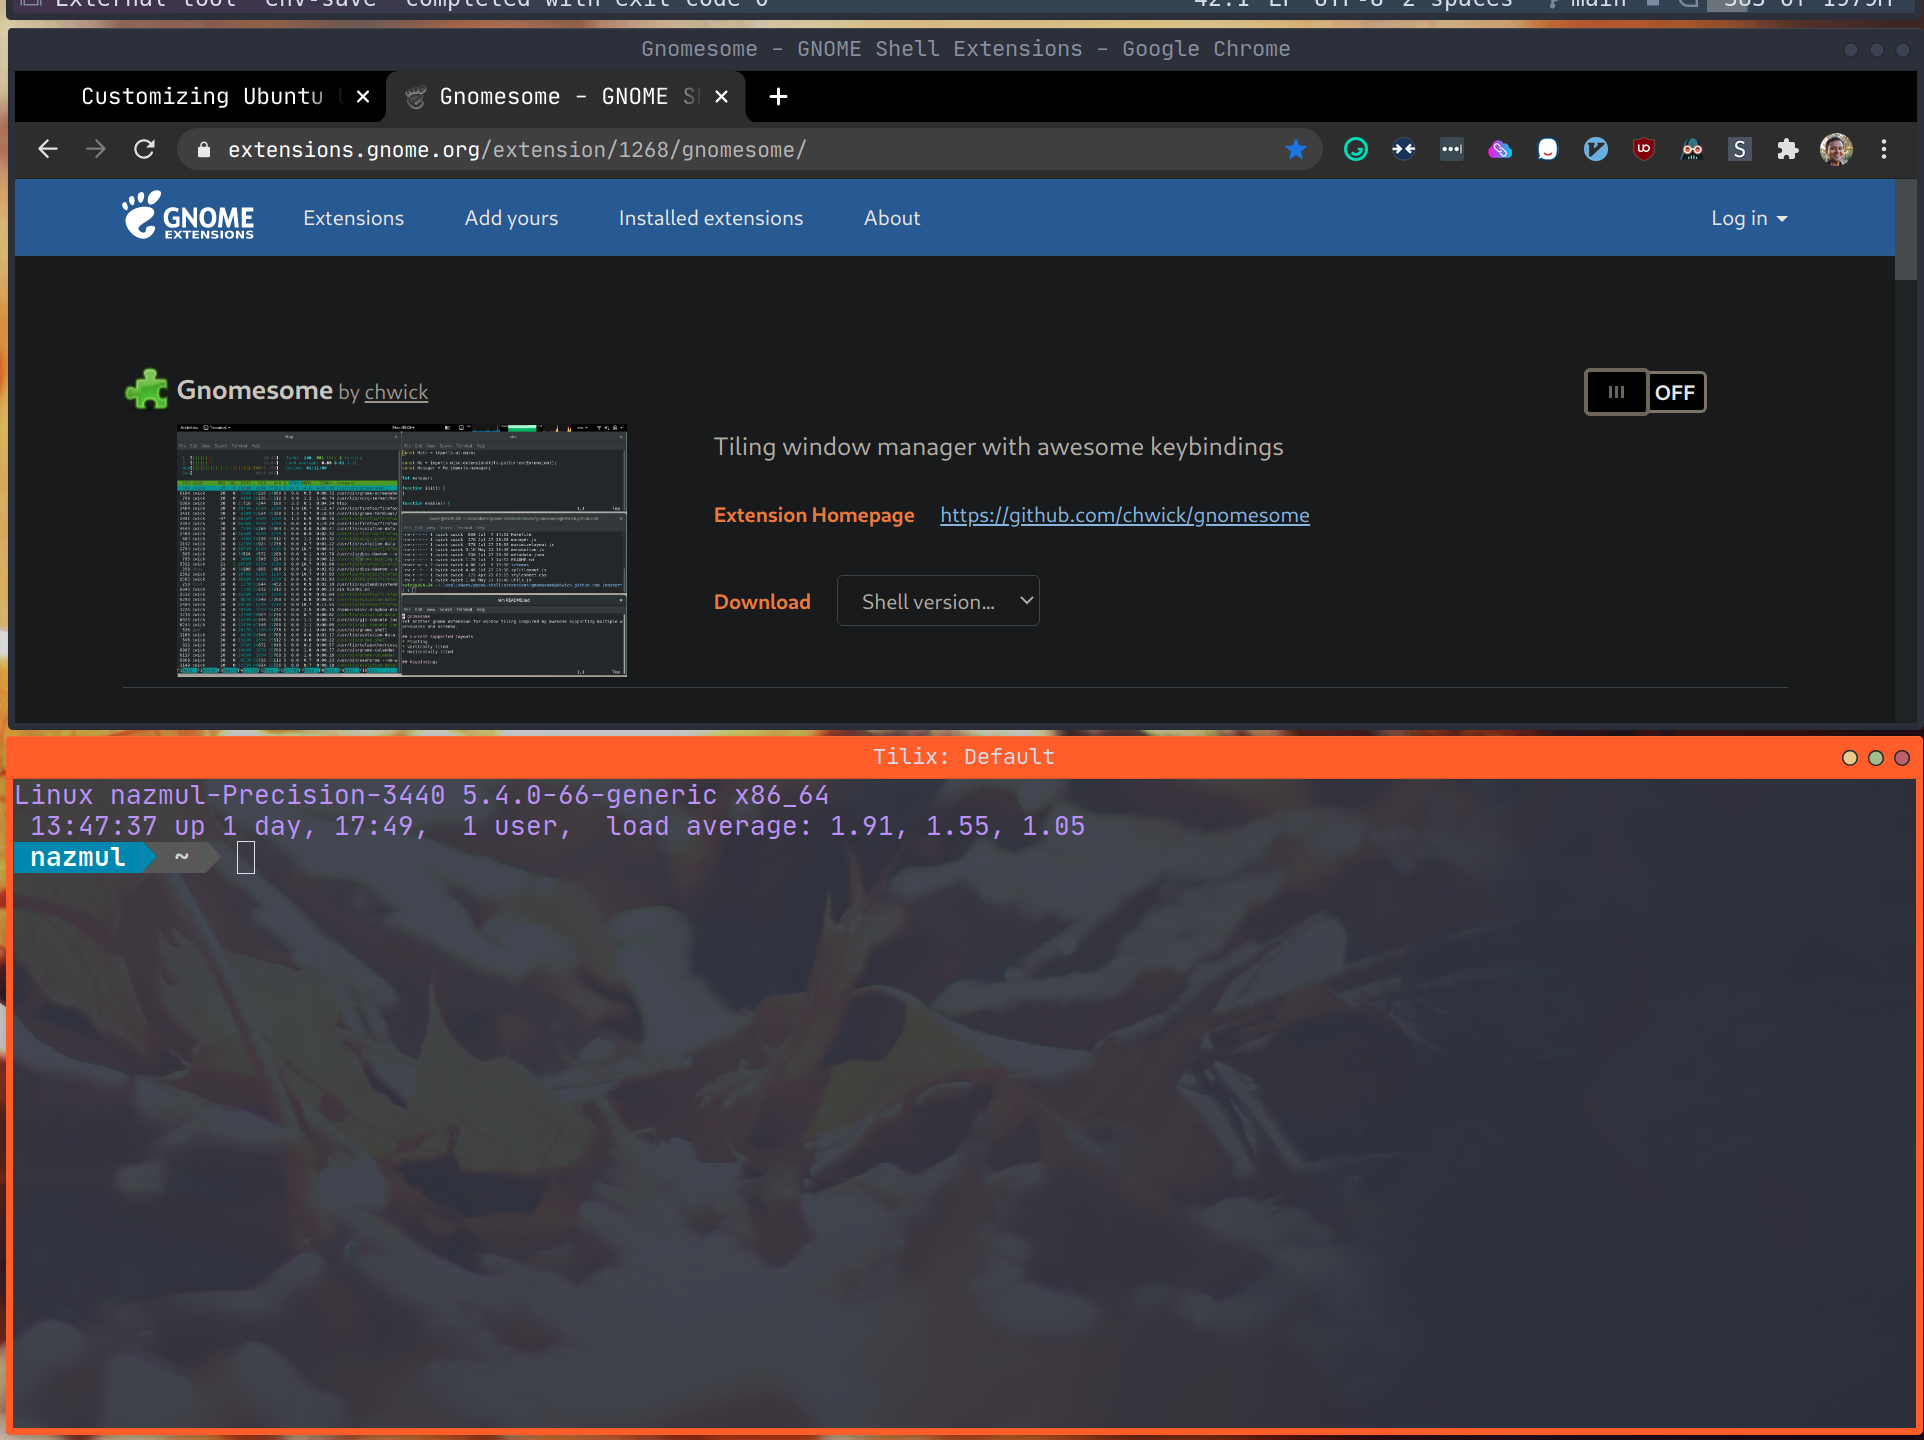
sudo apt install -y gnome-tweaks - Install this GNOME Shell integration extension browser extension for:
After this is done, you can visit the GNOME extensions site and navigate to any extension and simply install it from the your browser of choice.
1. Window tiling #
I love tiling window managers. This is another reason that I use Tilix as my main terminal emulator of choice. tmux is great for doing this if you don’t use Tilix, since it is terminal app agnostic. I haven’t switched to i3 or awesomewm yet, but I have found some nice tiling window extensions that I use.
- Gnomesome works on Ubuntu 20
- Tilinggnome works on Ubuntu 18
Both these window managers are very similar, and they have similar keyboard shortcuts. One thing
that I had to tweak after using either of these extensions is to change the highlight on the
currently focused window. Normally, I would use “Alt+Tab” to switch between windows, however, with
these tiling extensions I just end up using “Super+J/K”. By default it isn’t clear which window is
currently focused. Using the following
article on how to decorate the currently focused window on gtk
I was able to devise a solution. Here’s the gtk.css file that I created, which has to be placed in
the $HOME/.config/gtk-3.0 folder. Make sure to logout and back in again for this to take effect.
Here’s what the gtk.css file looks like.
/* More info: https://tinyurl.com/y75aen2n */
@define-color backdrop_color #2B303A;
@define-color highlight_color #FF5D2A;

/* Border around windows. */
/* Focused. */
decoration {
  border: 7px solid @highlight_color;
  background: @highlight_color;
  border-radius: 5px;
}
/* Unfocused. */
decoration:backdrop {
  border: 7px solid @backdrop_color;
  background: @backdrop_color;
  border-radius: 5px;
}

/* Title/headerbar colors. */
headerbar.titlebar {
  background: @highlight_color;
}
headerbar.titlebar:backdrop {
  background: @backdrop_color;
}
Here’s a screenshot of what this looks like.
I have since remapped my “Alt+Tab” to “Super+J” since I use UHK keyboard. I actually remapped “Mod+Tab” to invoke “Super+J” instead of “Alt+Tab”. Here is a my review of the UHK v1.
2. Gnome User Themes #
Another big change that you can make in GNOME is changing the theme. This changes the look and feel of the entire operating system. You can also change icon sets as well.
One of my favorite theme and icon sets is Nordic. The following are the steps you have to follow to install it. You can repeat similar steps for any other themes that you like. You can download the theme and icon set from here.
- Download the theme file
Nordic-darker.tar.xzand extract it to$HOME/.themes. - Download the icon pack
Nordic-Folders.tar.xzand extract it to$HOME/.icons. - Install the GNOME User Themes extension.
- Launch
gnome-tweaksand then select the Themes from the various drop downs in the “Appearance” section.
My current favorite is Material-Black-Frost-3.36.

3. Saving and restoring all gnome settings #
Now that so much work has been put into GNOME settings it is prudent to back these settings up. This
is really easy. Make sure that you have dconf-editor installed.
Then run the following to backup.
dconf dump / > gnome.all.prefs
And run the following to restore.
cat gnome.all.prefs | dconf load /
These commands will save and restore all your GNOME settings. So if you have keyboard shortcuts that you created for GNOME, these will be saved too, along with gnome-terminal app settings.
Customize Chrome and Firefox #
I have the following extensions installed for Chrome (and Firefox for most of them) to enhance my browsing experience.
- R3BL Shorty URL link shortener - chrome
- Lastpass password manager - chrome, firefox
- Vimium (VIM shortcuts in browsers) - chrome, firefox
- Dark Reader dark mode for browsers - chrome, firefox
- New tab extension (featuring unsplash images) - chrome, firefox
- UBlock Origin ad blocker - chrome, firefox
- Shortlink custom shortlinks - chrome
- Emoji Keyboard - chrome, firefox
IDEA theming #
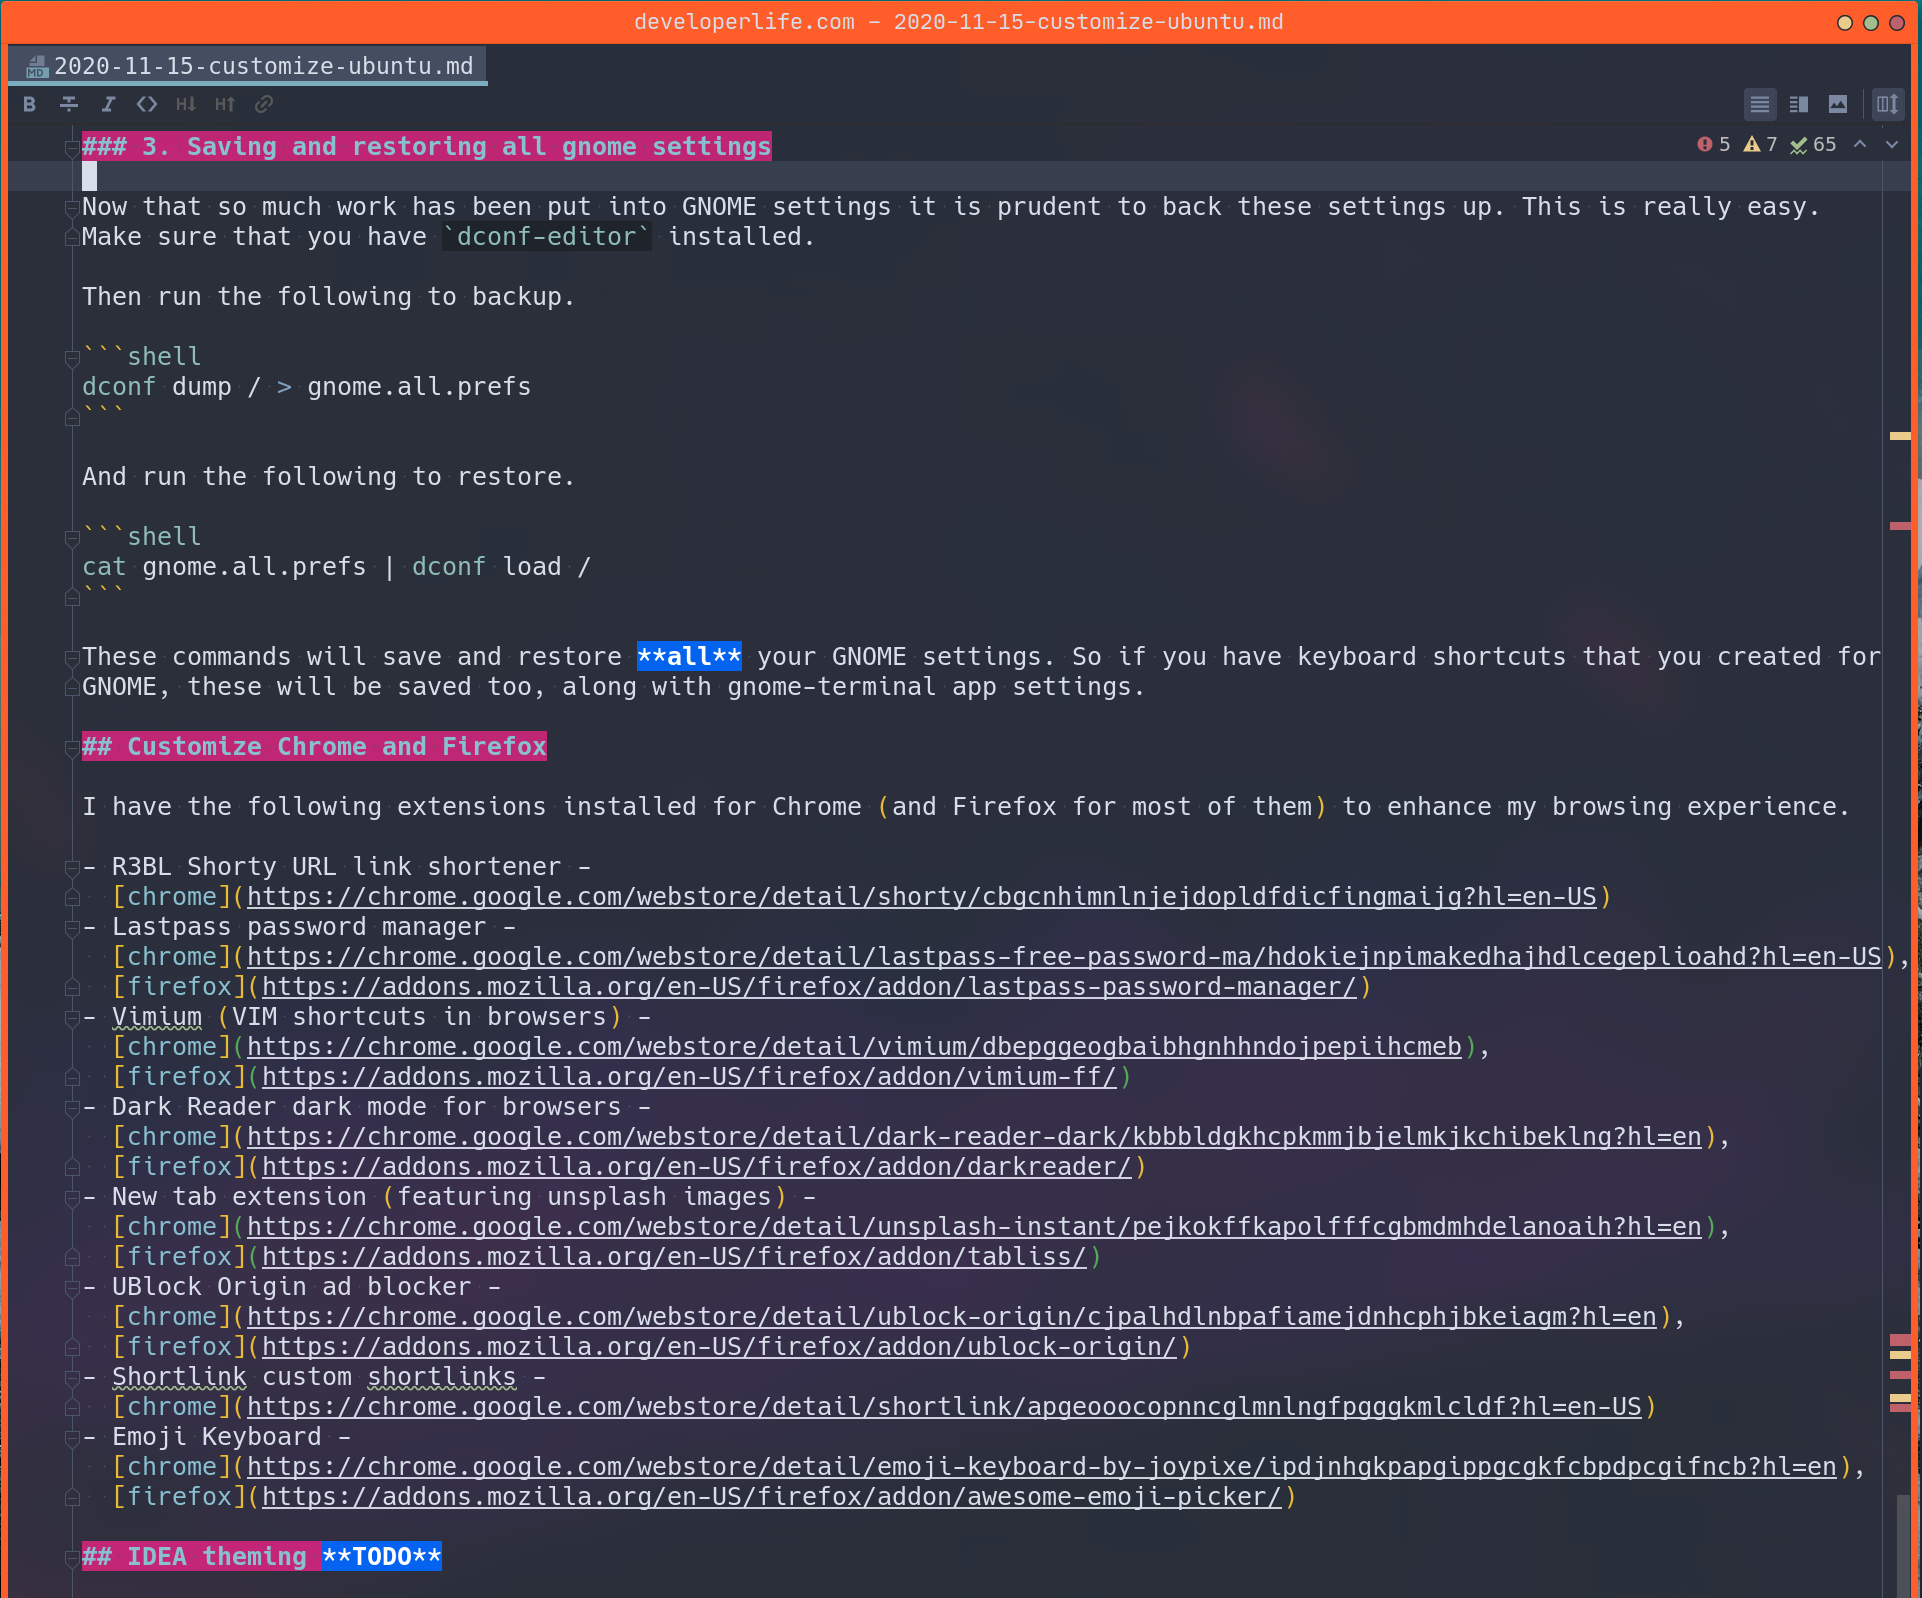
In order to theme JetBrains IDEA with Nord, you can simply download the “Nord” plugin from the
JetBrains Marketplace. However, I’ve created some changes to the default theme to make Markdown
documents “pop” more and be more readable while editing. You can download the
Nord-NazmulModifiedIDEAColorScheme.icls file
here. You can set this color
scheme by opening Settings in IDEA and going to “Color Scheme” to import it. Here’s a screenshot of
this.
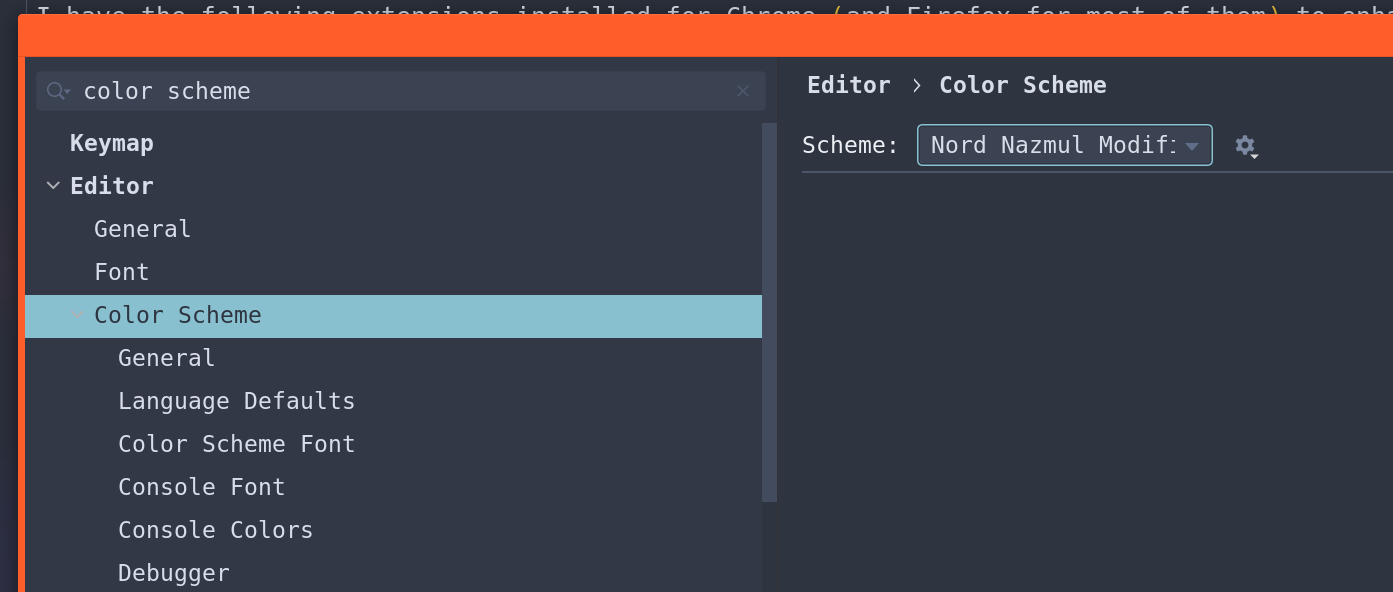
Here’s a screenshot of what this theme modification does (notice the stuff highlighted in pink and blue).
Mouse customization #
I use a Logitech MX3 Master mouse, and it works really well out of the box. One of the interesting
features of this mouse is that the button on the bottom left actually presses Alt + Tab. So if you
press and release quickly it will just type Alt + Tab and if you hold the button down then it will
press and hold Alt + Tab 🎉. There are ways to customize this behavior in case you don’t like it.
And that is where solaar and piper / ratbag come into play.
Minimum customization - solaar #
Solaar allows you to
configure your Logitec Unifying Receiver (in case you don’t use Bluetooth, which I don’t). You can’t
customize very much, but you can tweak the DPI settings and the scroll threshold. You can install
solaar using sudo apt install -y solaar.
Maximum customization - ratbag and piper #
So if you want to
customize all the things
on your mouse, the ratbag is your friend, and piper is the GUI on top of it.
The version of piper in the universal apt repo is quite
old, so it is best to get the latest version from the official PPA.
sudo add-apt-repository -y ppa:libratbag-piper/piper-libratbag-git
sudo apt update
sudo apt install -y piper
piper has a nice GUI that you can use to customize just about everything on your mouse.
Note - As of Mar 2021,
ratbagdoes not support adding macros to Logitech MX3 Master mouse buttons; hopefully it will be added in the future. This limitation preventspiperfrom assigning macros to buttons.
In case you wanted to use ratbag without piper you can use the command line to control it.
ratbag comes preinstalled with Ubuntu 20.04, so you won’t need to install it. You can use
ratbagctl in your terminal
to control ratbagd. The documentation is sparse, and here’s an
article w/ some information on
how to add macros.
Gestures #
If you have a touchpad and want to use some of the familiar gestures from macOS, then this article has some great information to get you started. Here are the steps.
sudo apt-get install -y libinput-tools xdotool python3-setuptools
sudo gpasswd -a $USER input

cd ~/Downloads
git clone https://github.com/bulletmark/libinput-gestures.git
cd libinput-gestures
sudo make install
sudo ./libinput-gestures-setup install
libinput-gestures-setup start
libinput-gestures-setup autostart

cd ~/Downloads
git clone https://gitlab.com/cunidev/gestures
cd gestures
sudo python3 setup.py install
At this point you will have installed libinput-tools, xdotool, and gestures. You can run the
gestures app to configure your gestures. Here’s a
list of
xdotool keycodes that you
will need to type into your app. The following is a sample of my configuration for this app.
# Generated by Gestures 0.2.3  -->  https://gitlab.com/cunidev/gestures
# Manual editing might result in data loss!


# Invalid lines


# Unsupported lines

# Swipe threshold (0-100)
swipe_threshold 0

# Gestures
gesture swipe right 4 xdotool key 'Super_L+Page_Down'
gesture swipe left 4 xdotool key 'Super_L+Page_Up'
gesture swipe up 4 xdotool key 'Super_L'
gesture pinch in 2 xdotool key 'Control_L+minus'
gesture pinch out 2 xdotool key 'Control_L+plus'
If you look at the first gesture it does the following: Swipe left w/ 4 fingers results in
“Super + Page Down” keys to be pressed by xdotool. You can configure these gestures to map to key
presses that you have configured on your system to do whatever it is that you want. For me, I use
Ultimate Hacking Keyboards v1 and have my keyboard mapped to do lots of workspace
management things (like switch workspaces, switch windows between workspaces, etc) and I use my
custom key mappings for these xdotool commands. Here is a my review of the UHK
v1.
👀 Watch Rust 🦀 live coding videos on our YouTube Channel.
📦 Install our useful Rust command line apps usingcargo install r3bl-cmdr(they are from the r3bl-open-core project):
- 🐱
giti: run interactive git commands with confidence in your terminal- 🦜
edi: edit Markdown with style in your terminalgiti in action
edi in action