Mechanical keyboard review - Dygma Raise
- The search for the best programmer’s keyboard (continued)
- Keyboard companions - trackpad and mouse
- Ergonomic mechanical keyboard - Dygma Raise
- Remapping keys and configuring keyboards
The search for the best programmer’s keyboard (continued) #
I type a lot, every day. And I need a keyboard that can help me take care of my hands and body, so as not to wear anything them out, or cause needless fatigue or repetitive stress injuries. I also want to maximize speed and accuracy so that I can get my thoughts out very quickly into whatever Markdown file or source file that I am working on, or effortlessly and quickly navigate around my apps and consume content.
I used to use the Kinesis Advantage keyboard for almost a decade from 2000 to 2010. After that I switched to the Kinesis Freestyle and finally to Kinesis Freestyle Edge mechanical RGB backlit keyboard after that came out. So I’ve had a long history with Kinesis 😀.
All that came to an end when I found the Ultimate Hacking Keyboard v1 (which I’ve been using for almost a year now). Programmer friendly in the sense that I wanted to remap my keys to be whatever I choose, whether that means swapping keys for other keys, or creating macros, or even working with multiple keyboard layers.
You can find my complete review of the UHK v1 here along with detailed information on my thought process around my programmer friendly keymaps.
A few weeks ago, I found out about the Dygma Raise keyboard. And there were two things that were attractive about it: 1) programmable RGB backlighting, and 2) space bar split into 8 keys. So I ordered one in the white color with MX Blue switches. And I was blown away. And then I ordered another one with Kailh bronze speed switches (also in white)!
Currently Dygma ships their keyboards very quickly. I got mine within 3 days of placing an order. Unfortunately UHK has been facing some temporary issues.
- Production has been delayed for some time now with the launch of the v2 to ensure that when products ship they meet their exacting quality standards. I’ve been waiting for the UHK v2 and the new modules for a few months now (I pre-ordered mine in early Nov 2020) 😥.
- However, these issues seem to have been addressed and when the pending pre-orders for the v2 and modules have been fulfilled, UHK should also ship in a matter of days like the Dygma Raise. This was the case when I got my UHK v1 last year.
I’ve been using the Dygma Raise keyboard and configuration software (called Bazecor) for a few weeks now, and am using the Dygma Raise as my primary keyboard (on my primary machine a Thinkpad P15), and my UHK v1 as my secondary keyboard (on my secondary machine). I like them both for different reasons. There is no clear winner between the two. The following table shows the comparison between the two for my programming workflow.
| Keyboard | Dygma Raise | UHK v1 |
|---|---|---|
| Customer service | Amazing | Amazing |
| Availability | 3 day shipping | No longer available, but shipped in a matter of days (v2 is on its way and once pre-orders are handled, it should ship in days) |
| Programmability | Limited; Bazecor is clunky to use (and is buggy) | Very advanced; Agent is a joy to use |
| Build quality | Amazing | Amazing |
| Hardware design | Space bar split comfortably into 8 keys | Space bar split into 6 keys (cramped); need to buy module to get more keys |
| Palm rest | Comes with the keyboard | Needs to be ordered separately |
| Price | Expensive | Expensive |
Bazecor is actually a forked from keyboardio/Chrysalis. You can actually use Python script that comes with Kaleidoscope to control the LEDs on your keyboard! Here’s an old video on controlling the backlighting from scripts created by Dygma’s CTO.
Keyboard companions - trackpad and mouse #
Before getting into the keyboard review, I wanted to cover the other input devices I use with them. I have two input devices that I use with these keyboards. This keyboard does support mouse movement, but this is not so good for complex mouse movements (great for short movements).
- Logitech MX3 Master - This is the best mouse that I have ever used. Everything about it is amazing. Sadly on Linux customization options are limited, but you can do a lot on Windows or macOS w/ customizing the mouse itself.
- Apple Magic Trackpad 2 - Since the UHK has a big gap in the middle, I usually have a trackpad there so that I don’t have to reach for the mouse to for scrolling a page or some small movements to click on a UI element on screen. When using drawing apps, then I definitely use the mouse. But this can be cumbersome for mundane operations like clicking on buttons in IDEA dialog boxes, or just browser operation (I try to use Vimium to minimize mouse / trackpad interaction in general). You might also try this trackpad.
Ergonomic mechanical keyboard - Dygma Raise #
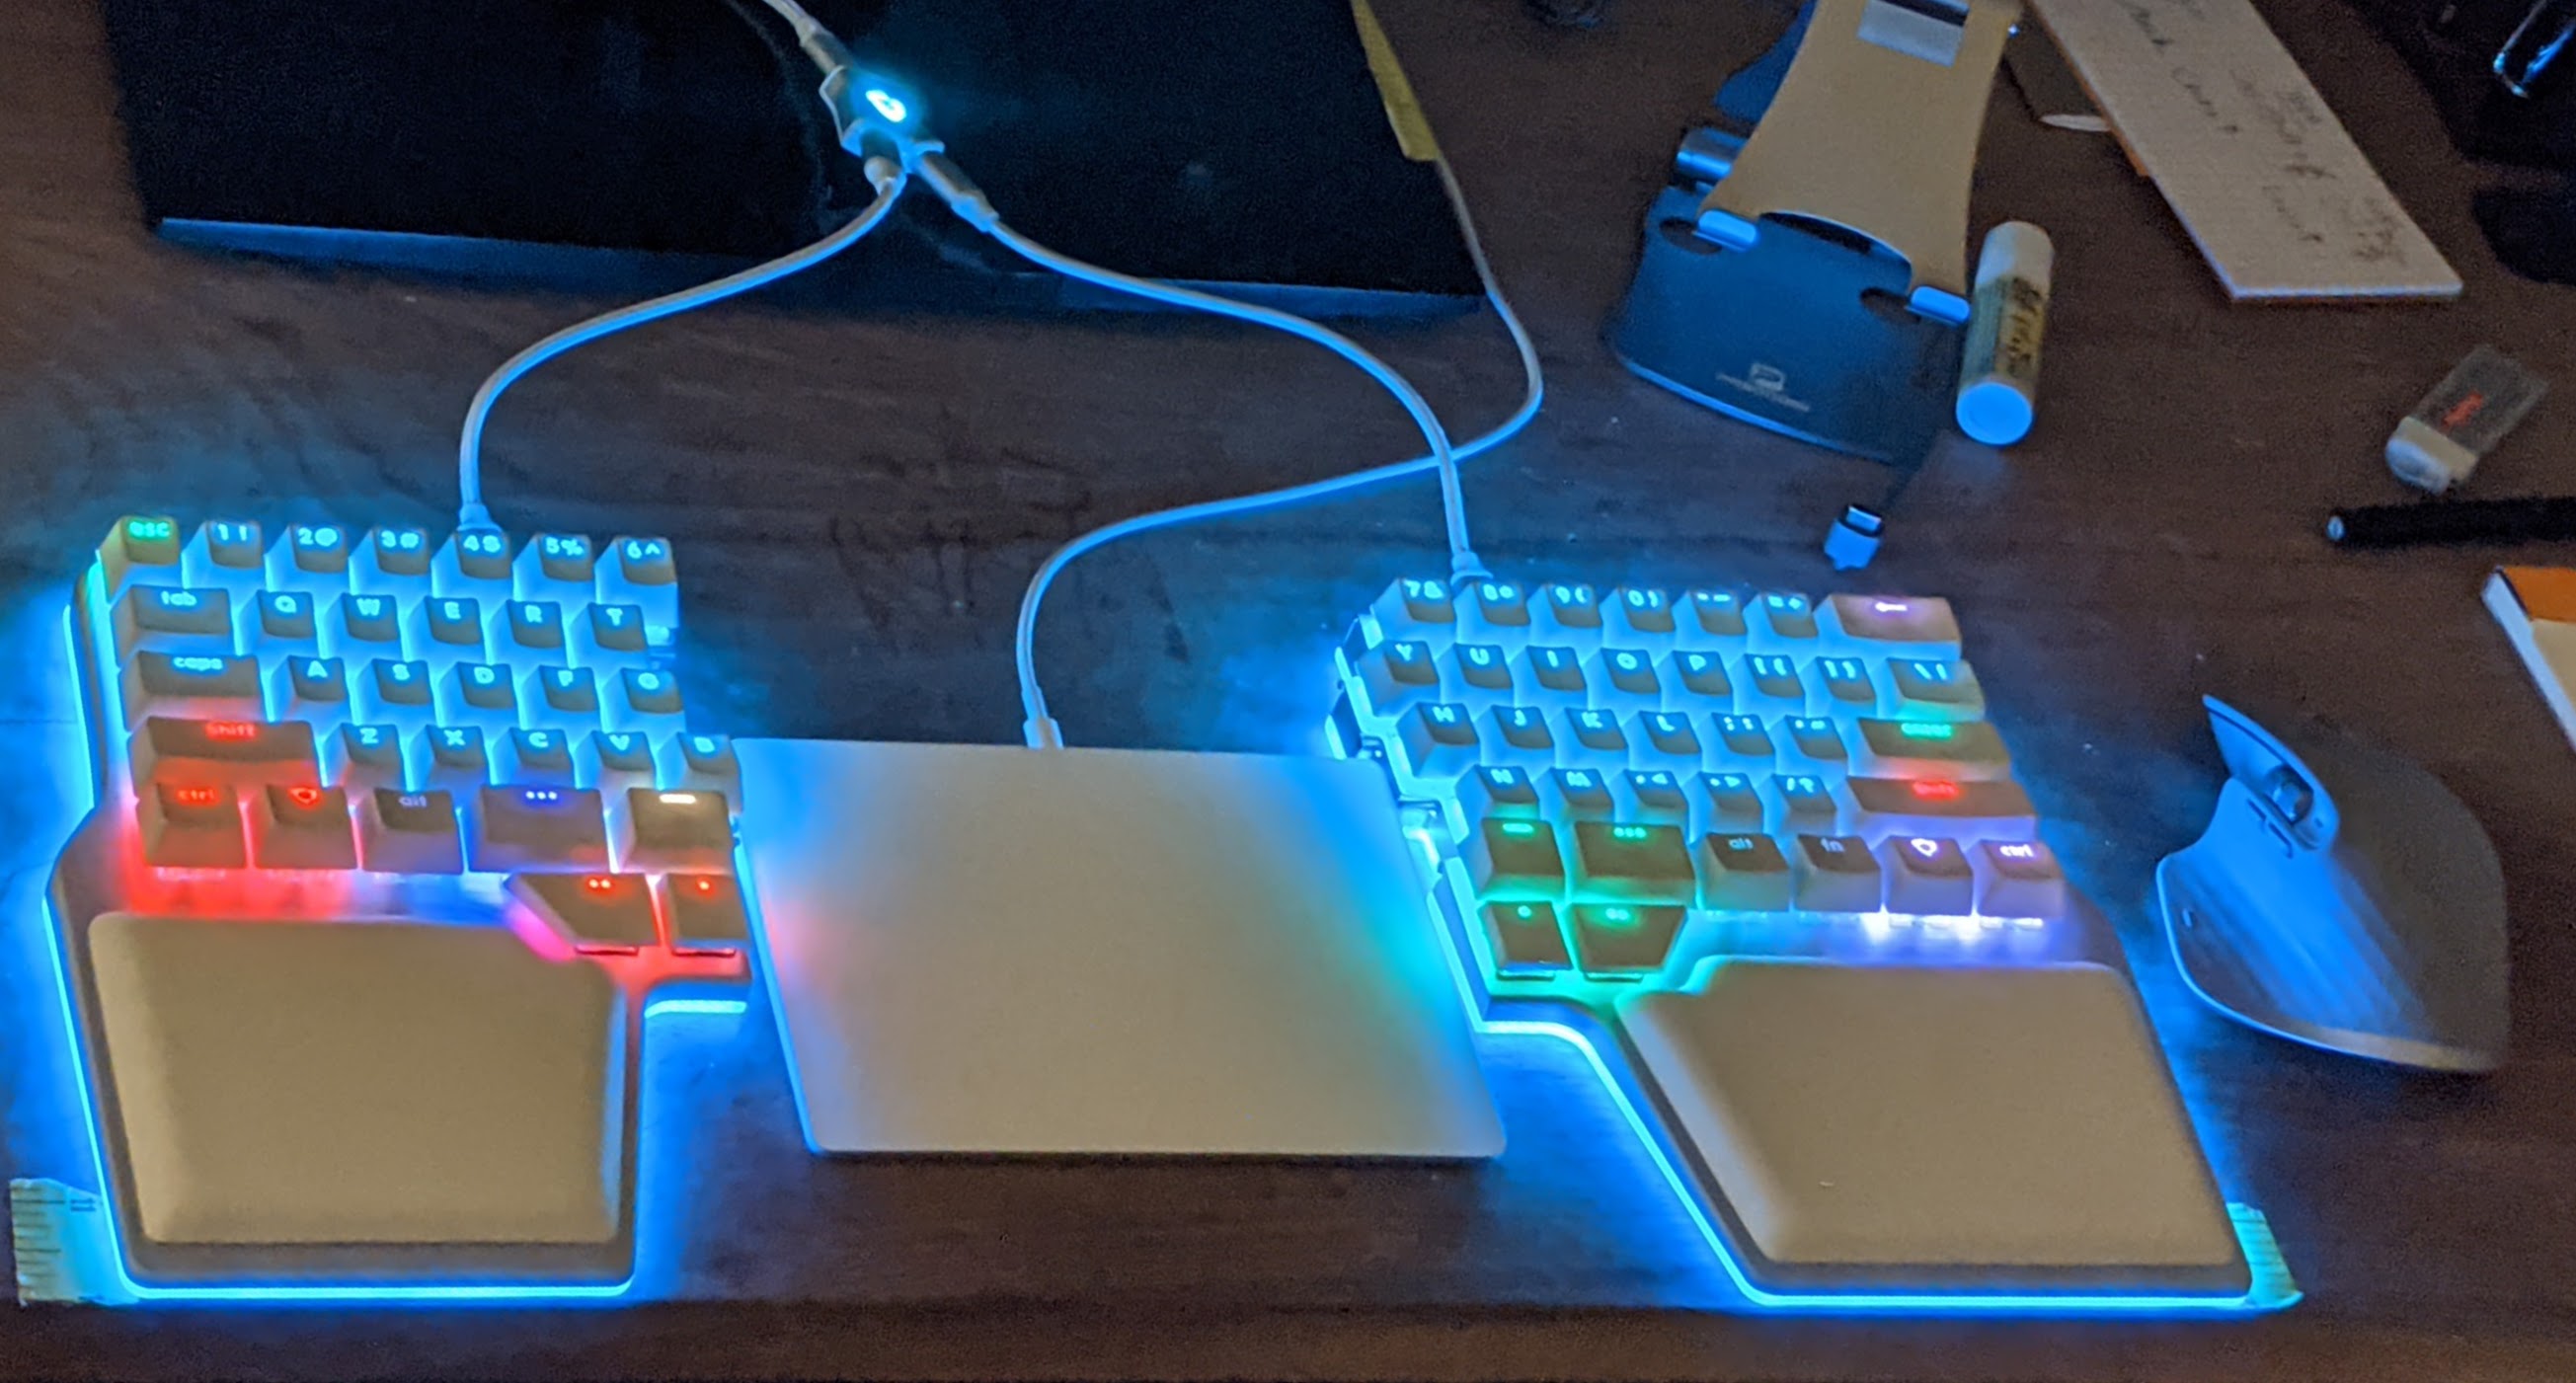
I ordered my Dygma Raise in white with MX Blue switches. They are a delight to type on.
The palm rests are actually detachable, and you can take them off, wash them, and put them back on without losing adhesion on the bottom.
One nit I have with the palm rests is that they come attached to the keyboard with a very light adhesive. It doesn’t say in the unpacking instructions, but you have to remove the plastic film covering the bottom of the palm rests in order to expose the actual adhesive, and then stick that to the keyboard.
The build quality is excellent. The RGB lighting is very subtle (which I actually prefer).
Pros #
The space bar being split into 8 keys is a magnificent design choice that leads to a huge ergonomic win for this keyboard! 🎉👏 It is a design triumph that reduces fatigue, and increases accuracy and speed! What is not to like about this keyboard?
The build quality is outstanding! Everything you need comes out of the box with this keyboard. The materials used are premium. The keys look, sound, and feel amazing. This keyboard is just a joy to type on!
The RGB backlighting is done absolutely wonderfully on this keyboard. These lights actually help you understand what keys will be activated in your layers. So when you have Layer 1 selected for example, the colors on the keyboard can change to let you know that, and only highlight the keys on that layer that are active. You can even group these keys using the same color, so that you get visual feedback about the types of functions that each group is related to! This is another fantastic ergonomic win for the Dygma Raise. One of the most difficult things about programmable keyboards is the learning curve to memorize your custom keymaps, and color coding these keymaps directly helps mitigate that difficulty!
The support and development teams are really responsive and helpful. See the Linux installation issue below to see how they turned a Con into a Pro. Bazecor makes it easy to update firmware on the keyboard. When you order the keyboard, it will arrive in a matter of days, so kudos to Dygma for being on top of their supply chain, inventory management, operations, and shipping.
Cons #
The lighting isn’t actually color accurate with the colors that you can pick in Bazecor, which is a somewhat misleading. You can create your own colors, but they don’t really translate accurately at all to the RGB lighting on the keyboard. Here are some examples:
- If you create a custom color that is dark gray, it will show up on the keyboard as dull blue.
- Also, white color in Bazecor is a really light purple color on the keyboard.
The firmware itself isn’t that great. When you use secondary roles for keys, it can be very slow typing key combinations. Also macro support is very limited, and not really good. And the firmware is very limited in things like secondary key functions when compared to the UHK firmware.
When compared to UHK Agent, Bazecor is the weakest link in the Dygma Raise experience 😥.
- Bazecor has very limited features and it is buggy. Oftentimes when using it for long periods to remap keys, the backlight colors on the base layer just turn off. Other times the symbols used for the keys like up arrow, get replaced with their key code number in the UI. It is also missing features like constantly snapshotting changes to the layers, to allow easy rollback.
- Bazecor is very clunky to use for complex things. There are no keyboard accelerators at all in the software (ironically) which makes it a pain to customize the keyboard. And there is no drag and drop support, so it isn’t possible to swap keys (like UHK Agent). It is very tedious to apply color changes to multiple keys at once, since the UI does not have any concept for multiple selects. You have to click on each key one at a time. And this is just painful when you are modifying many keys on many layers.
- The Linux installation experience of Bazecor (on Ubuntu 20.04) was broken when I got my keyboard a
few weeks ago 😥. However this should be fixed soon. The app had some permissions issues with
granting access to the keyboard (which is a USB connected device) since my user is non-root and
didn’t have permissions to access the keyboard to configure it. This is because a
udevrule was missing that grants my non-root user permission to access this keyboard. UHK Agent takes care of this automatically. However, the support and development teams at Dygma are awesome. When I reached out to them about this issue, they created a PR and worked with me to commit a fix for this Linux issue in a matter of days!
Remapping keys and configuring keyboards #
The Dygma Raise is so configurable that outside of being happy with the build quality, I really had to think through how I was going to customize the keyboard to suit my programming needs. It really helped me expand my mind about how to go about optimizing my keyboard usage, since I now had 8 keys replacing one space bar that I can easily reach and use using both thumbs!!! 🤯 Why everyone does not copy this is beyond me!
I’ve had some experience at this point using UHK v1 and configuring it using Agent, so I wasn’t starting from square one. However, having the extra keys that I can use my thumbs gave me the “luxury” of mapping my most frequently used shortcuts to these bottom 8 keys!
So I kept things simple by using 2 layers (Layer 1 and Layer 2) in addition to the base layer
(Layer 0). In the UHK, I had used the Mod and Fn layers, so these all mapped very nicely on
top of each other. So I have created compatible keymaps between the two! And I go back and forth
between the Dygma Raise and UHK v1 on different machines.
There are some limitations that Dygma Raise has in its firmware that the UHK v1 does not, so I had to tweak my UHK keymaps to be more Dygma Raise friendly (not the other way around).
Understanding layers, secondary roles for keys, mouse keys, and macros #
A new concept that comes with this keyboard (when compared to non programmable keyboards) is the ability to not only create your own layers, but also create create secondary roles for keys. You can also control your mouse pointer with the keyboard if you like.
Secondary roles for keys #
Normally we think of a modifier key (like Shift) as something we press and hold down in addition
to pressing another key. However, in the Dygma Raise, if you just tap (press once) the modifier key
you can have it type any other key or combination of keys or a macro!
In this review, I am just going to number the 8 thumb keys as T1-T8, going from left to right on the first row, and then the second row.
The following table has two examples for the Space key and the T2 key. The Space key behaves
like a normal key, while the T2 key is a modifier key that behaves differently if you just press
it once (launches Alfred), vs hold it down while pressing another key (switches to the T2 layer).
| Key | Tap (press once) | Hold (long press / press with another key) | Notes |
|---|---|---|---|
| Space | Space | Space | Don’t add a secondary role |
| T2 | NUM LOCK (launch Albert) | Activate Layer 2 (secondary role) | Good example of adding a secondary role |
Taking the example of a key mapped to “Space” you can only just have one function. If you touch the key once you expect it to add a space. If you hold it down, you expect it to type many spaces. So this key is a poor candidate to have any secondary role assigned to it for the following reasons.
- If you assign a modifier key to its secondary role, then you will lose the ability to hold it down and have it type a bunch of spaces; it will just wait for you to type another key.
- And if you don’t type another key and release the “Space” key, then it will type just one space.
Here’s a screenshot of what this looks like in Bazecor.
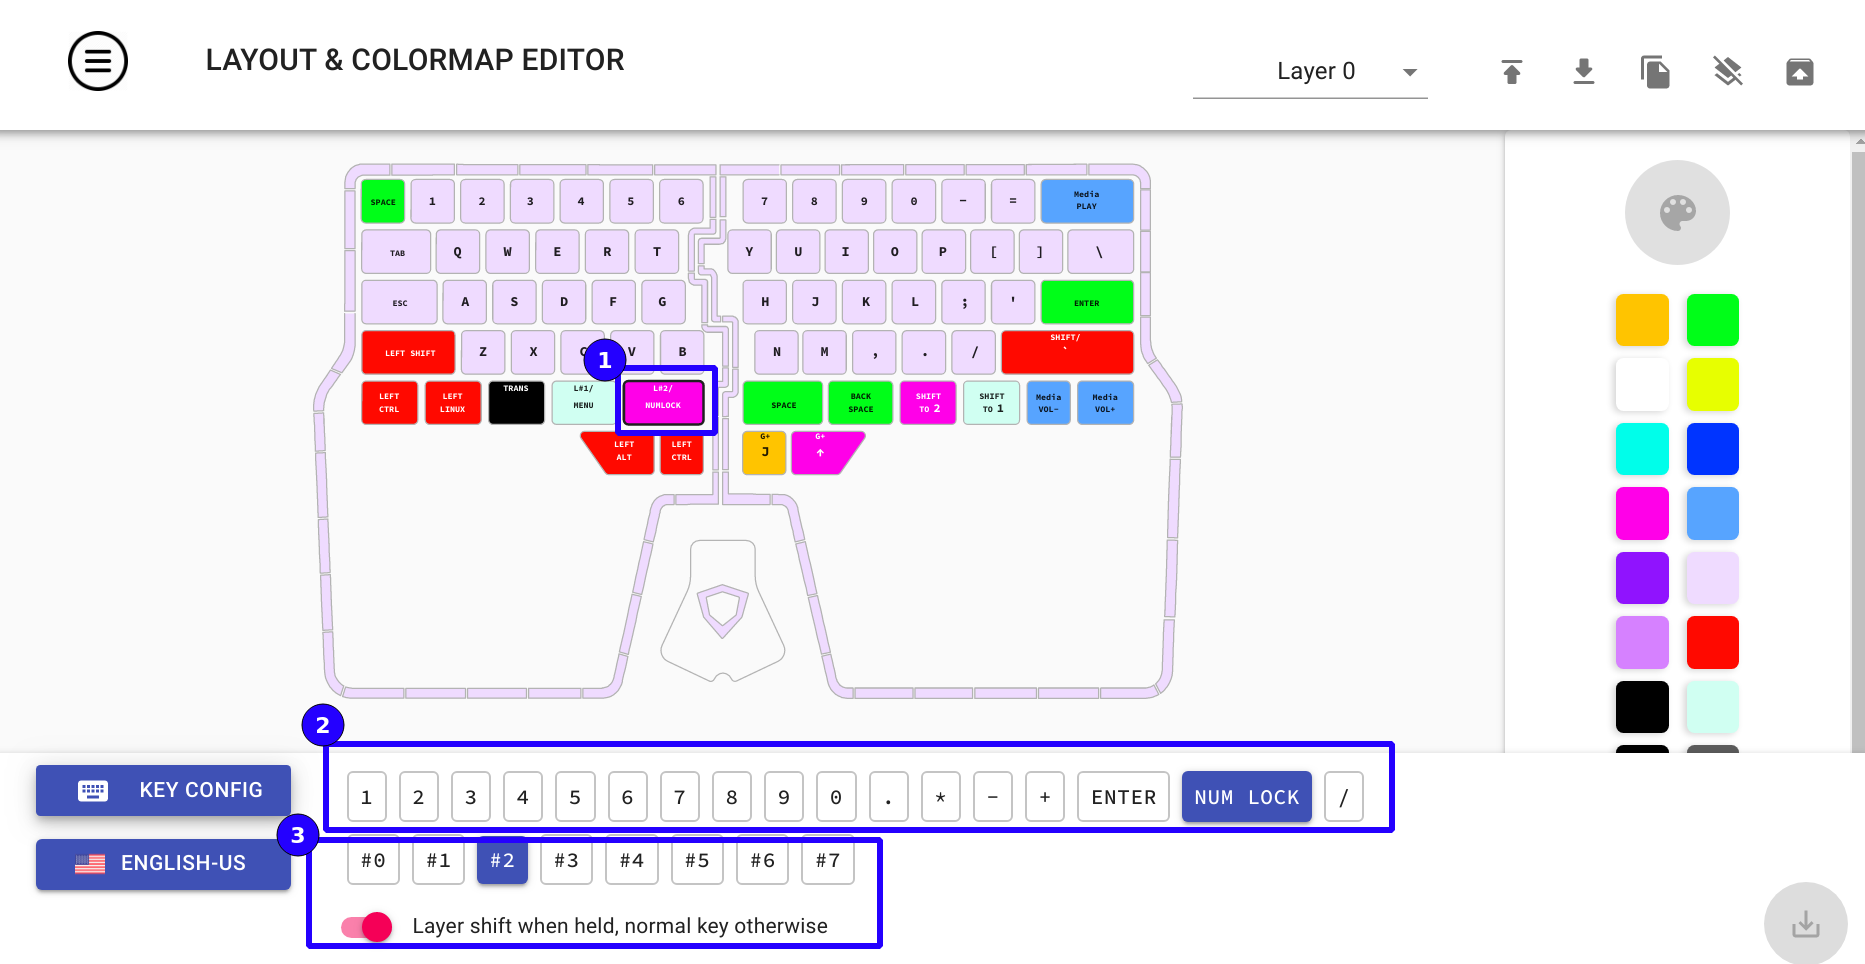
- The
T2key is selected in Bazecor. - The primary role of this key is
NUM LOCK(which activates Albert). - The secondary role of this key is activate
Layer 2(which is the equivalent of myModlayer on UHK.
One limitation is that you can’t have secondary roles activate if you use any modifier keys 😥.
Here’s an example to illustrate. Originally, I had Alt+Space mapped to the T2 key. This launched
Albert on my machine. However, I also wanted a secondary role for this key, so when long pressed, I
wanted to activate my Layer 2 (which is the equivalent of my Mod layer on
UHK). This is not
possible. So I had to remap my Albert shortcut to be the NUM LOCK key (which I never use). And
then I was able to assign the primary role of the T2 key to press NUM LOCK and the secondary
role to activate Layer 2.
Here’s another example of secondary roles using both the Shift keys on the keyboard. I press
backtick and tilde quite a bit (when editing markdown or when using the terminal to switch folders).
The backtick key is on the top left corner of the keyboard making it quite unergonomic to reach. So
I devised the following keymap to make things ergonomic.
| Key | Tap (press once) | Hold (long press / press with another key) |
|---|---|---|
| Left Shift | Left Shift | 🚫 |
| Right Shift | Type Backtick | Left Shift (secondary role) |
| Both Left and Right Shift | Type Tilde | 🚫 |
Layers, mouse keys, and macros #
Not only can you create your own layers, you can also have some layer switching keys lock (rather than just shift into a layer and back out again when all the keys are released). You can also activate the mouse pointer in its own mouse layer, or you can just assign these mouse control functions to any keys in any layer.
One thing that I do is map T1+O to scroll the mouse down, and T1+P to scroll the mouse up. I
also had to create a macro in order to move the mouse pointer to the center of whatever window that
is currently focused. When activated, a macro simply generates a sequence of key events, with delays
if you need them. So for me to move my mouse pointer to the center of whatever window has focus, I
have to press Alt+F7 (GNOME shortcut to move a window), and then press Enter. So I created a
macro for this, and mapped it to the T1 layer for the M key.
| Key | Tap (press once) |
|---|---|
| T1+O | Mouse scroll up |
| T1+P | Mouse scroll down |
| T1+M | Move cursor to center of window with focus via macro |
Another limitation of Dygma Firmware and Bazecor is that unlike the UHK, it can’t switch entire keymaps. They have compensated for this by providing 10 layers that you can switch to on the keyboard, so this isn’t a showstopper.
Summary #
Put all this together and you can make some incredibly powerful keyboard shortcuts that you simply can’t do with a “normal” keyboard. However, it isn’t easy to get this “right” and here are some caveats (make sure to test your changes):
- While you might come up with something really useful, without testing it with yourself, it isn’t really possible to know whether this is something that will make you more productive, or just get in your way.
- If you have extensive prior experience with touch typing on normal keyboards, it will be difficult to break old habits and form new ones.
- There are some use cases for which it is best to think about not having one half of the keyboard. For example if you wanted to pan around in Figma you will need to press the space key and drag the mouse. If you space key is on the right half of the keyboard, and you use the mouse w/ your right hand, then this is problematic. So there are situations where you can’t assume that both hands will be on the keyboard halves.
Bazecor makes it possible to load exported versions of layers in case something goes horribly wrong. So I recommend creating snapshots by regularly exporting settings to a JSON file as an insurance policy to rollback if anything goes horribly wrong.
Hierarchy of needs (know your hands) #
The most important thing to keep in mind is understand your hands and how they move. Every time you have to move your hands to reach for the mouse, that slows you down, probably reduces your accuracy for a moment while you readjust your hand position, and it also will end up causing fatigue. Given that there are so many new thumb keys, this meant that I was thinking about how to move all my most commonly used keyboard shortcuts to these 8 thumb keys (which are actually even more when you account for layers!).
So it is really important for you to know beforehand what are the most common keys and key
combinations that you are typing in your daily workflow. This will really drive the keymaps that you
end up with. For me, it was really important to move the Backspace and Tilde keys away from the top
edges of the keyboard down to the very bottom closest to my thumbs. I also try to use 4 keys on the
bottom center of the keyboard as much as possible for commonly used things like switching
workspaces, switching focus between windows (Alt+Tab). But I have my cursor keys on Layer 2
(activated by T2), and I really had to practice this for many weeks before it started feeling
natural.
When you make big changes to the way you use your keyboard, try and make one big change at a time.
- It is incredibly demoralizing to have a keyboard that you simply can’t use. So make one big
change, like moving all the cursor keys to
Layer 2and practice to get that to be natural, before making some other massive change - like moving theEnterkey orBackspacekey. - So your keymaps will evolve over time and its best not to have the expectation that you will be able to nail this on your first try.
- And you will end up changing keyboard shortcuts in your favorite apps (if they allow this) in addition to the keyboard keymaps themselves.
So I broke it down into a few major categories, which are either just individual apps that I use or just tasks that can be clumped together. And this is what I came up with (the most important stuff is on top):
- Coding
- JetBrains IDEA based IDEs
- Sublime Text 3
- System level things
- Terminal (Tilix)
- Albert
- CopyQ
- GNOME workspace control
- GNOME tiling window extension control
- Browsers (tab management)
- App specific
- Figma
- Google Sheets
You can actually put all the apps and keyboard shortcuts that you need in a spreadsheet to figure out how to see everything in one place. Here’s an example of that.
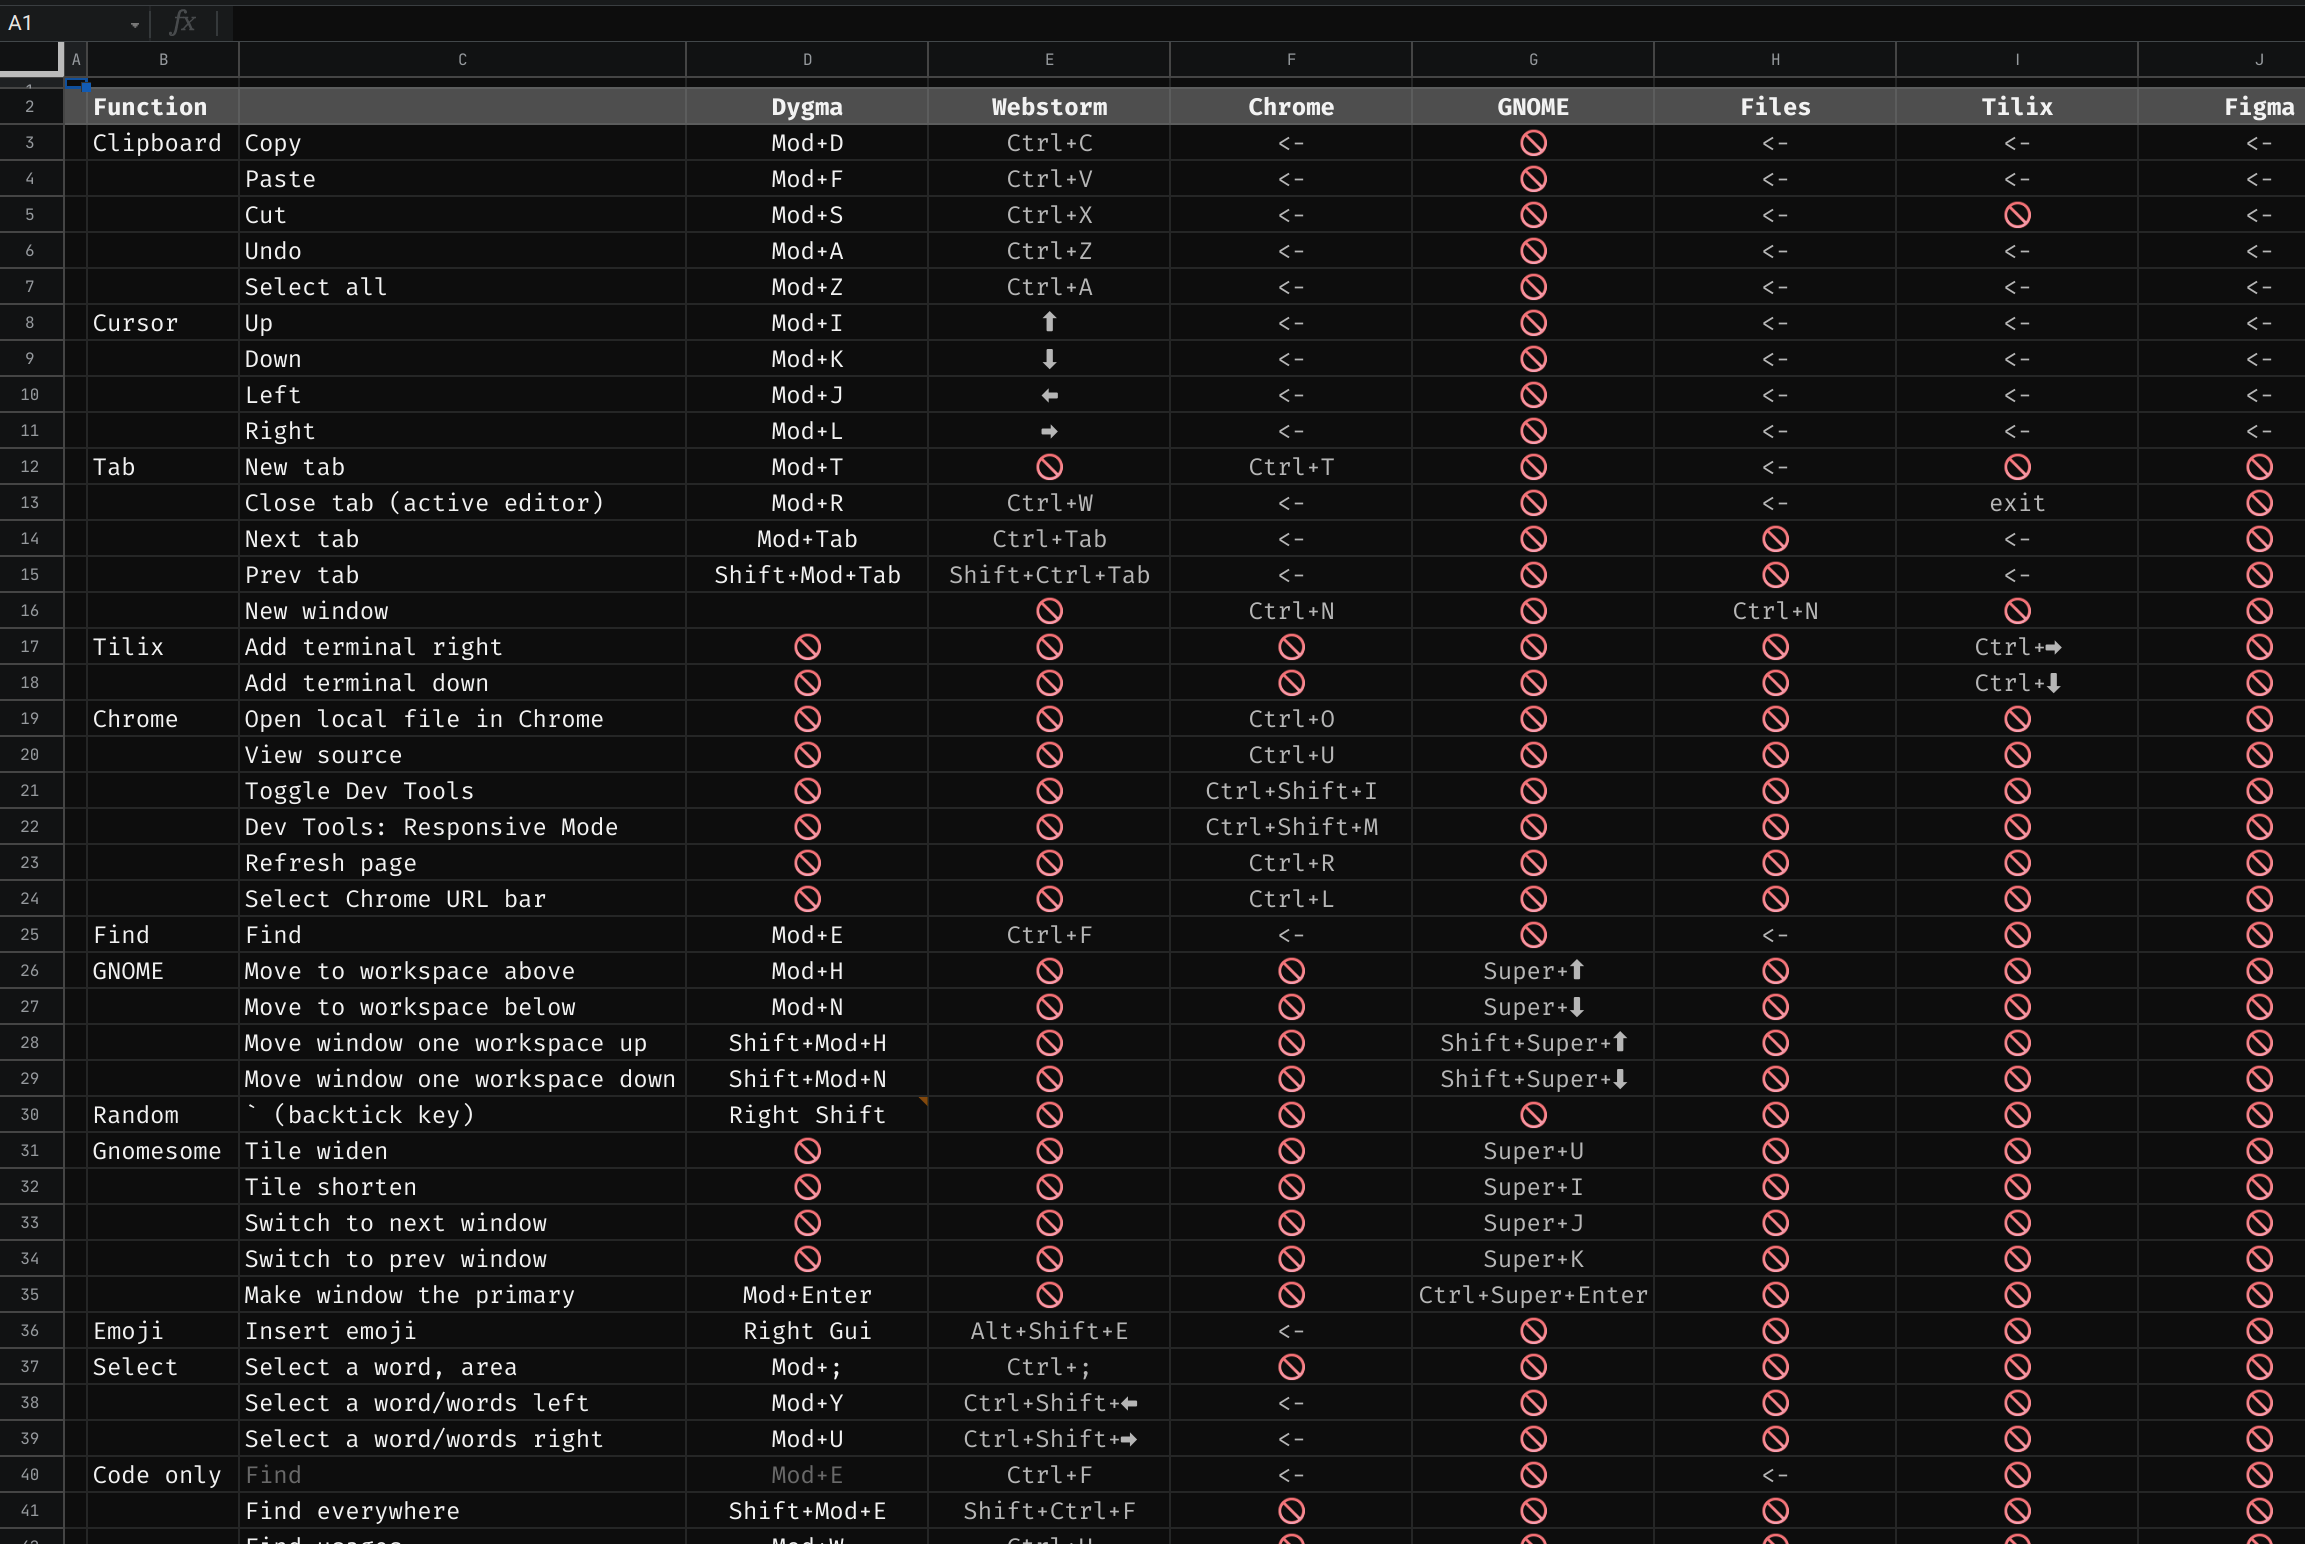
You can download this spreadsheet here as an XLSX file.
Don’t shoot self in foot #
Some historical context is in order. I used to code on laptops, and Kinesis keyboards on desktops, and neither are really programmable. So in order to keep from using the cursor key cluster (Up, Down, Left, Right) on the bottom right of the keyboard, I had developed my own crazy shortcuts in Sublime Text and IDEA so that I would not have to move my hands when I wanted to navigate around in code, UIs, etc.
Also I had to accommodate using macOS as well as Linux, and macOS is terrible about keyboard
customization (I still don’t understand how Meta, Ctrl, Alt don’t always work). This led to some
gnarly key combinations (like Alt + ; for left, and Alt + ' for right, etc). This also required
some heavy customizations to both products, which was very time consuming and difficult to keep in
sync (between apps and across OSes).
I have systematically removed these “overly complex” and “custom” workarounds and replaced them w/ the defaults, along with moving any major customizations into the Dygma Raise keyboard itself.
These are the insights that I gained to making this work effectively and simply using IDEA and Sublime Text as examples.
- Don’t create Dygma Bazecor keymaps for keys that you don’t really need. Eg: there’s no need to
make a keymap for
Ctrl + Yin IDEA. - Keep the keyboard shortcuts as close to the defaults as possible. Eg: there is no need to change
what
Ctrl + Downdoes in either Sublime or IDEA. - If not then, pick a shortcut (and add it to IDEA and Sublime) that is consistent between the two
apps. Here are some examples:
- Add
Ctrl + Shift + Pin IDEA to open Settings (this is a Sublime shortcut that is created for IDEA). - Cloning the caret, and clone selection in both IDEA and Sublime mapped to
Ctrl + JandAlt + Jrespectively. - Expand selection is
Ctrl + Win both.
- Add
- When modifying IDEA keymaps, and Sublime Text key bindings, make sure that each action works well
with other modifier keys. A great example in IDEA is
Ctrl + Down, and its usage withShift,Alt, andShift + Alt, etc.
By following these steps first, there are 2 advantages:
- The Dygma Raise mapping can be minimal, so it makes it easy to use Bazecor to create these in the first place, and to have multiple keymaps for various OSes (you can have a macOS specific layer, Linux specific one, and Windows specific one).
- These mappings will just work on other keyboards.
Examples for Dygma Bazecor layers #
Here are a list of files you can download.
This is a visual representation of what these keymaps look like.
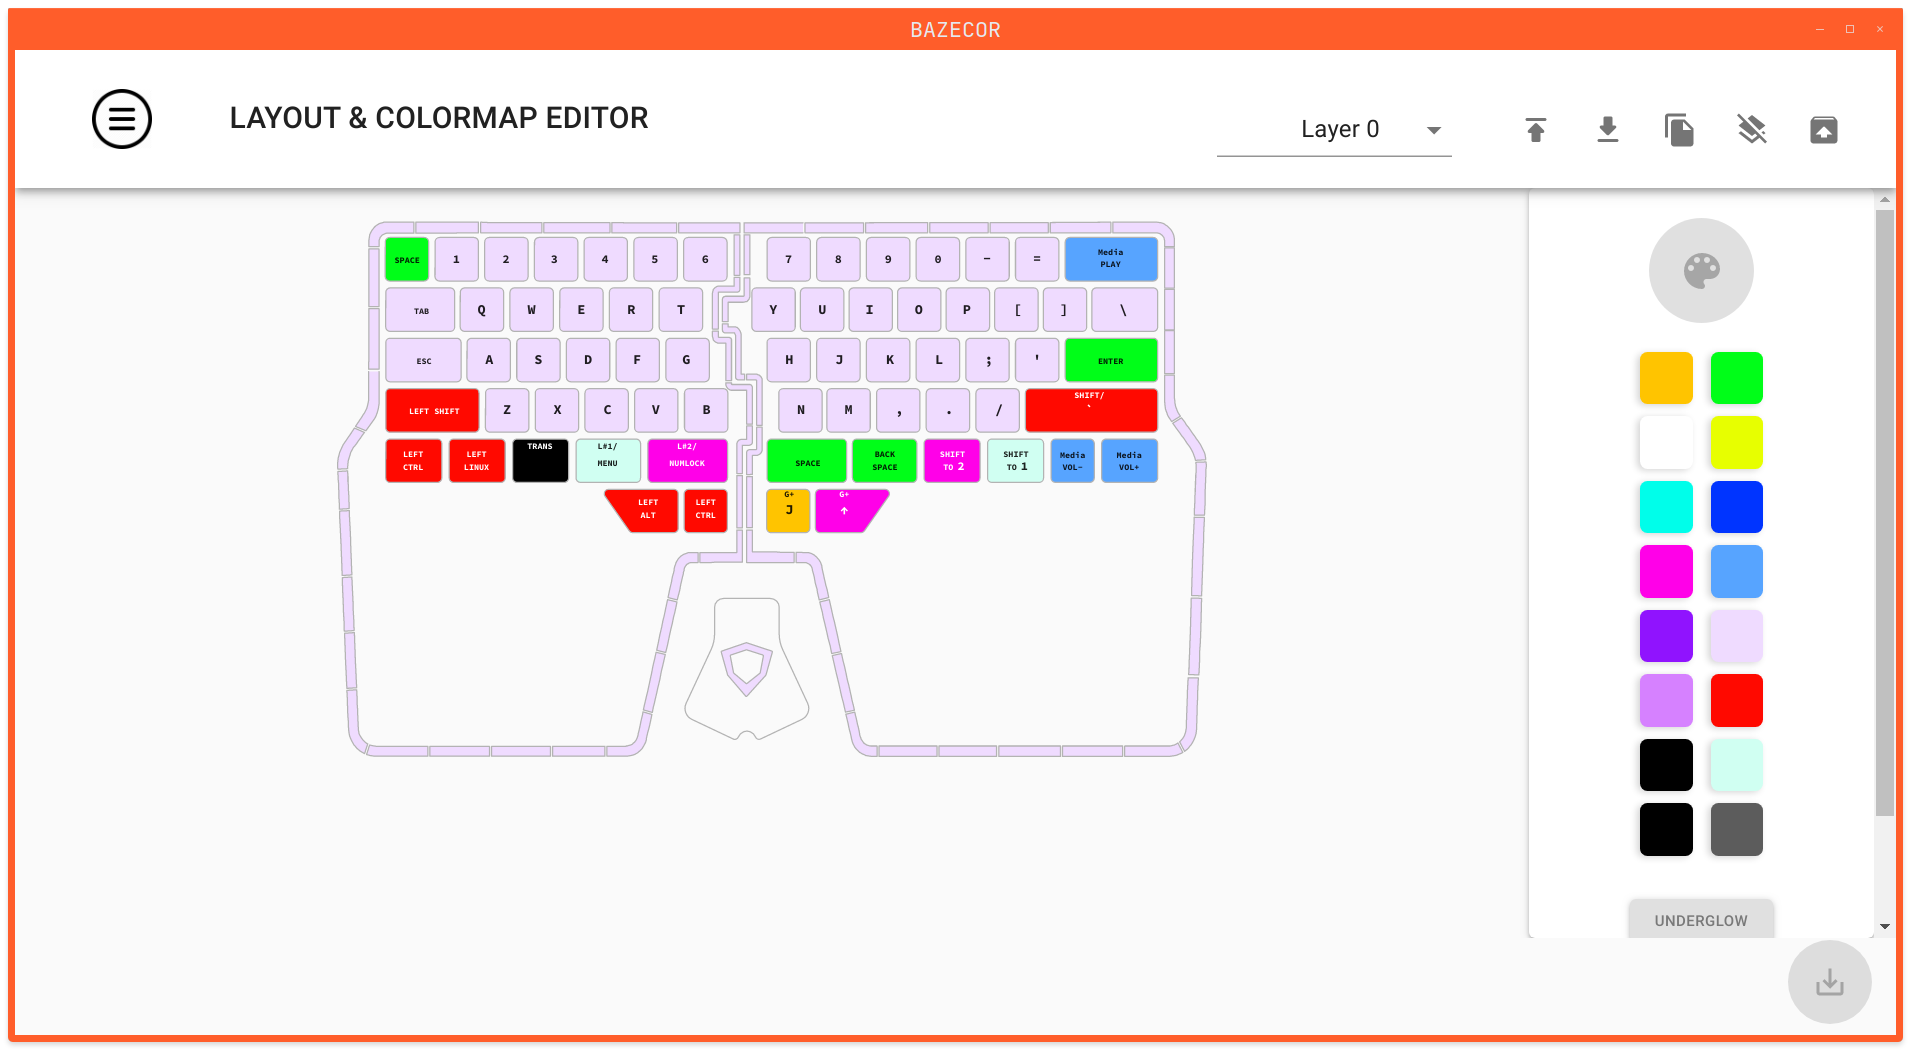
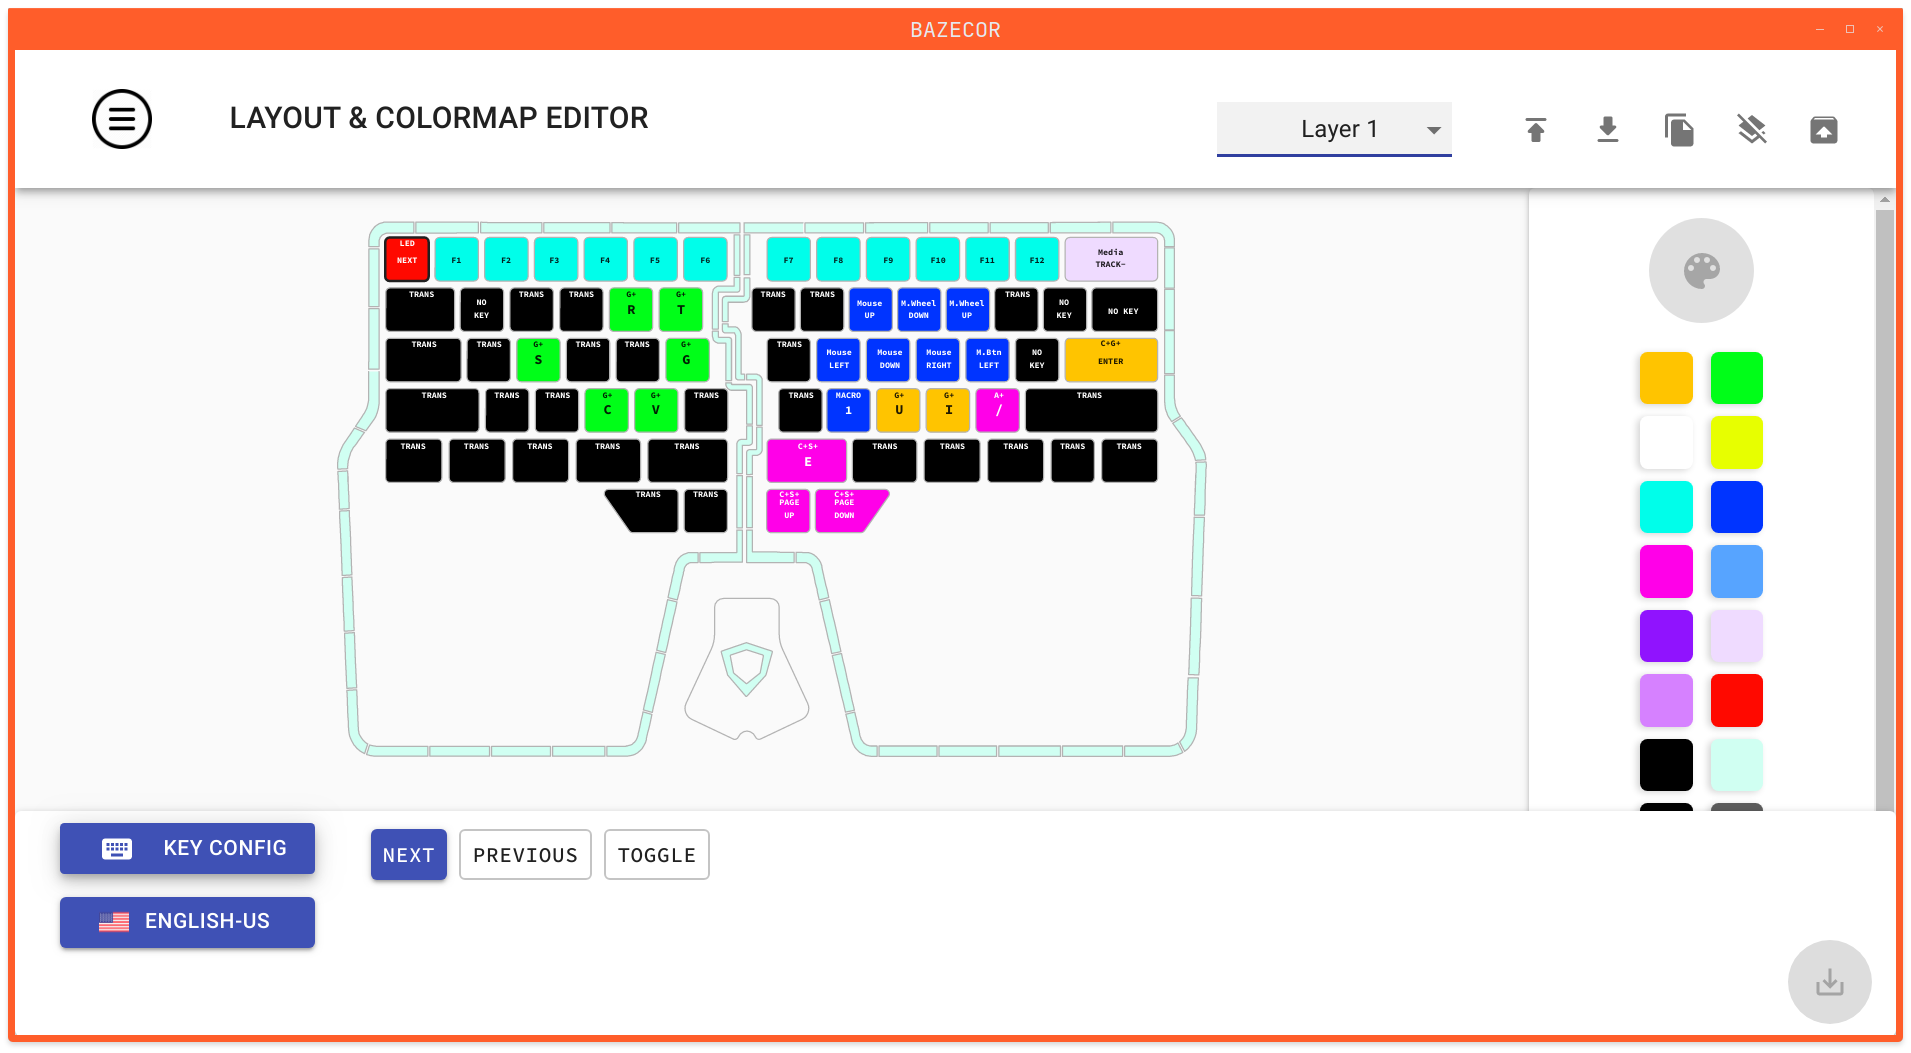
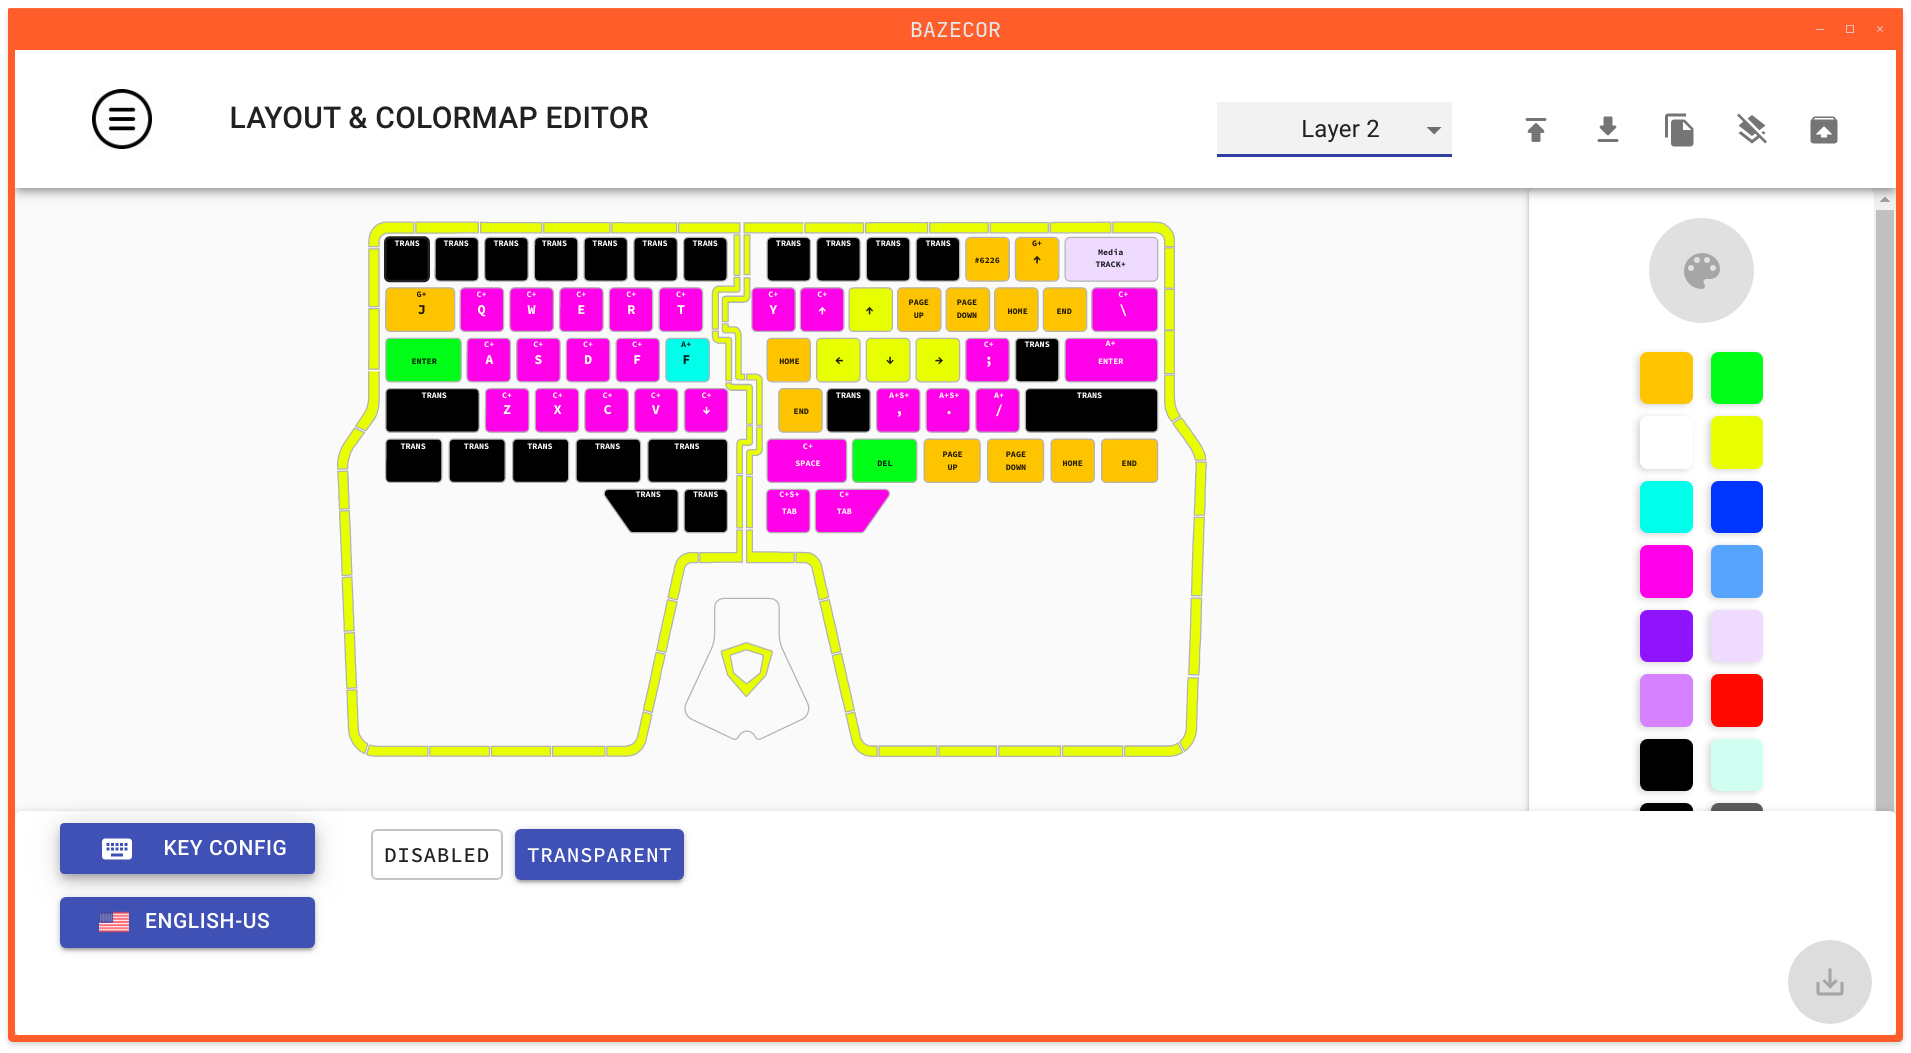
Layer control #
- T1 : Shift to Layer 1
- T2 : Shift to Layer 2
Cursor control #
- T2 + J : Left
- T2 + K : Down
- T2 + L : Right
- T2 + I : Up
- T2 + H : Home
- T2 + ; : End
- T2 + O : Page up
- T2 + P : Page down
- T2 + H : Home
- T2 + J : End
- T4 : Backspace
- T2 (Layer 2) + T4 : Delete
Modifier keys #
- T5 : Alt
- T6 : Ctrl
Mouse control #
- T1 + O : Mouse scroll up
- T1 + P : Mouse scroll down
- T1 + M : Macro to center mouse on currently focused window
- T1 + I : Mouse up
- T1 + J : Mouse left
- T1 + K : Mouse down
- T1 + L : Mouse right
- T1 + ; : Mouse click
GNOME workspace control (with window tiling extension) #
- T7 : Super + J (like alt-tab)
- Secondary role : Ctrl
- Bonus - Press with Shift to move windows around
- T8 : Move workspace next
- Secondary role : Alt
- Bonus - Press with shift to do all this on workspace previous
- Mod + Tab : Super + J (works w/ GNOME window tiling extension)
- Add Shift and you can actually move the windows rather than switch focus!
- Super + Up, Super + Shift + Up : Move workspace previous and next
- Add Alt to move a window to the prev or next workspace
IDEA and Sublime Text 3 #
- Space
- T2 + Space : code complete (Ctrl+Space)
- T1 + Space : Alt + /
- Enter
- T2 + Enter : Alt + Enter
- T1 + Enter : Ctrl + Enter
- T2 + B : code navigation (go to declaration, jump to source)
- Maps to Ctrl + Down, which works in both IDEA and Sublime.
- Shift+T2 + B : code navigation (go to implementation in IDEA)
- T2 + U : code navigation (back)
- Maps to Ctrl + Up, which works in both IDEA and Sublime.
- T2 + Y : show structure
- In IDEA this maps to Ctrl + Y
- In Sublime Text this maps to Ctrl + R
- Alt + left, Alt + right : tab navigation (move tab to next / prev)
- T2 + T7, T2 + T8 : tab navigation (switch to tab next / prev)
- T2 + <, T2 + > : move current tab to the left / right
- Ctrl+Shift + P : Settings…
- T2 + F : find usages in files
- T2 + R : run config
- T2 + D, T2 + S : shift + shift
- T2 + H : Home
- T2 + N : End
- T2 + Esc : Reformat code
- T1 + Esc : Optimize imports
Clipboard history, emoji, albert/alfred #
- T2 (single touch) : Albert
- T2 (long press / secondary role) : Activate Layer 2
- T1 (single touch) : CopyQ
- T1 (long press / secondary role) : Activate Layer 1
- T2 + T3 : emoji picker
- T2 + C : copy
- T2 + V : paste
- T2 + X : delete line (cut)
- T2 + Z : undo
Browser tab management #
- T2 + T5, T2 + T6 : switch to next / prev tab
- These simply type
Ctrl + TabandCtrl + Shift + Tabrespectively - gnome issue fix for terminal
- These simply type
- T1 + T5, T1 + T6 : move current tab to next / prev
- These simply type
Ctrl + Shift + Page UpandCtrl + Shift + Page Down
- These simply type
Function keys #
- T1 + 1-0, -, + : F1 - F12
Figma, LucidSpark #
- Esc : Space (While Space is pressed, dragging the mouse allows panning to happen in many graphical apps)
👀 Watch Rust 🦀 live coding videos on our YouTube Channel.
📦 Install our useful Rust command line apps usingcargo install r3bl-cmdr(they are from the r3bl-open-core project):
- 🐱
giti: run interactive git commands with confidence in your terminal- 🦜
edi: edit Markdown with style in your terminalgiti in action
edi in action
