Task API (1 of 3) - Quick Start Guide
- Motivation - why?
- Introduction - what is it?
- Background - threads 101
- Welcome to The Task API
- Architecture - how?
- Example - getting your hands dirty
- More details
- Misc notes
- Download - I want the code now!
Motivation - why? #
I’ve been building a RIA (Rich Internet Application) platform for the past year, which delivers applications and services to the desktop, web, and mobile environments. While building a service enabled desktop application container, that’s capable of connecting to 10’s of services simultaneously, I encountered some challenges with keeping the user interface responsive. As you know, if you execute long running tasks on the EDT, then your UI will freeze up. SwingWorker does help a lot, but I found myself writing too much boilerplate code when using SwingWorker to create tasks. SwingWorker is too “low-level” for my requirements, but it’s a great starting point. Also, I needed to be able to monitor the progress of these long running tasks, and I needed the ability to cancel/abort any task at any time. For long running tasks that perform a lot of network I/O, I wanted this interruption/cancellation to be immediate as well. I also needed the ability to easily stop/start these tasks and manage lots of them. As I worked with SwingWorker to implement these types of functionality it quickly became apparent to me that there’s a need for a background task API. So I wrote one for my platform in the last year, and I’ve decided to open source it on developerlife.com.
I evaluated the use of JSR 296, but it didn’t offer me enough functionality over SwingWorker, and the API is too simplistic for my requirements. SwingWorker is too simplistic as well, so I wanted a ‘higher level’ API that makes it REALLY EASY for a novice programmer to create tasks that don’t hang up the EDT. Another reason for me NOT to choose JSR 296 is my requirement to have the Task API ported to Android and Java ME. I will release these implementations on developerlife.com in the future, once they’ve been tested adequately.
Introduction - what is it? #
This tutorial is the first of a 5 part series to introduce the Task API. The goal of this tutorial is to get you up to speed as soon as possible with the API. The other 4 tutorials go into great detail on various aspects of the Task API. The Task API delivers a lot of functionality, and I feel that you will find it to be an easy, intuitive, and powerful API to work with. One of my challenges was to keep the API simple enough for novices, while not removing any of the power. The API has changed quite a bit since it was first conceived, and we at ScreamingToaster use it in all our desktop apps, and based on that usage the API has matured. Please feel free to add to the API or point out flaws or improvements, since it is open source (Apache 2.0 license).
Background - threads 101 #
If you are not familiar with threading or EDT, then you can learn more about threads in the Concurrency in Practice book. You can learn more about the Event Dispatch Thread (EDT) in the Filthy Rich Clients book.
Welcome to The Task API #
Here is a quick introduction to what the API allows you to do:
-
The Task API allows a novice programmer to quickly write code that executes in the ‘background’, and not the EDT. You don’t have to be a multithreading expert to work with this API - that’s the whole point! 😃
-
Additionally it allows you to monitor the progress of these background tasks, and allows you to interrupt their operation at any time. It can monitor any network I/O for you, automatically. So if you have a task perform any HTTP operations, then the Task API will report the progress of data being sent/received over the network, without you having to write any code!
-
It allows you to create “network aware” tasks, which will only run if network access is enabled. Think of ‘offline mode’ in Microsoft Outlook or Mozilla Firefox. You can put theses tasks in offline mode, and these tasks won’t run; then when you put them in online mode, they will execute again.
-
It allows you to create “recurring” tasks. These are tasks that execute some code every couple of minutes or seconds, and you can specify what this delay is.
-
It allows you to manage multiple tasks. You can start a lot of different tasks and have their progress and status monitored at all times. You can even shut them down selectively, by sending a ‘kill signal’ to a subset of the tasks, or you can shut the “whole thing” down. This allows you to create applications in which you can report background tasks being executed, like Outlook, Mac Mail, and most IDEs.
These are just some of the high level features/functionality provided to you by the Task API. I wanted to make sure that there was copious documentation in the source code of the API itself, but not just stop there, and create detailed tutorials with real world examples that you can use as a starting point for your projects that use this API. These tutorials will explain the Task API functionality via rich examples that are included as samples in the API distribution itself. On that note, let’s dive right into the API!
Architecture - how? #
If you are familiar with SwingWorker, then you will know that you work with it by creating a subclass (or anonymous inner class implementation) in which you define a doInBackground() method. Then you execute the task, and you have the option of canceling it. Instead of taking this approach of making inner class implementations in-line, the Task API works via a set of handlers and functors that you simply attach to a Task to tell it:
-
what to execute in the background
-
what to do when the task completes successfully, or fails, or gets interrupted.
You can also listen to bound properties (JavaBeans style properties) that will report status changes, progress updates, etc. It makes it very easy to work with the API, and if you’re used to writing event driven code, then this approach is very natural. There is a whole host of support classes that are provided to make your life really easy when working with these tasks - their functors, handlers, and listeners. I’ve worked very hard to make this API easy to use… it’s not a ‘lazy’ implementation on my part… I’ve worked very hard so that you don’t have to! 😃 . Another nice feature the API has is that it auto-cleans up resources, and auto-stops things, making it relatively easy to manage the lifecycle of these tasks and the resources & hooks (listeners, etc) that they consume. More on this in the other tutorials.
The following diagram illustrates the basic architecture of the API:
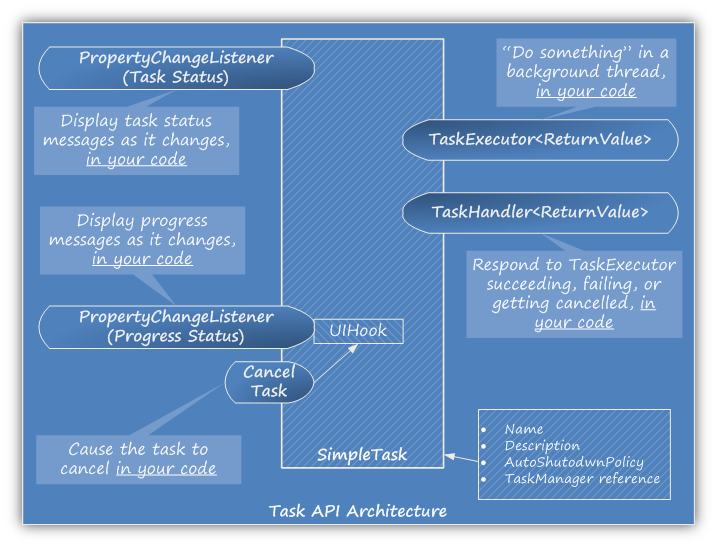
SimpleTask, simply #
The simplest way to use the Task API is to use the SimpleTask class. You simply create a SimpleTask, give it a name and description, and specify which signal it should stop on (more on this later). However, the SimpleTask will do nothing at this stage, if it’s started, stopped, restarted, or shutdown. You must now provide a functor (TaskExecutor implementation) that performs your background operation - the Task API will take care of running this on a non EDT thread - you don’t have to create a SwingWorker implementation. This functor requires you to provide an implementation of the doInBackground(…) method just like SwingWorker. This is the bare minimum that you need to do in order to create a background task. Then you simply tell your SimpleTask to execute(). That’s it! If you want to abort it, then you just call cancel(). If you want to kill it permanently, then call shutdown(). I tried to keep the feel of the API very SwingWorker-esque.
SimpleTask, more control #
This is where the Task API sets itself apart from the SwingWorker and JSR 296. In order to exert more control on how to respond to your background operation, you can create a TaskHandler, which is a collection of callbacks from the Task API into your code. These callbacks are where you get to specify what your code should do in response to certain events:
-
Any prep work before the background task actually starts executing
-
Notification that the task has stopped executing (may have been interrupted, successfully completed, or been interrupted)
-
What to do when the task completes successfully - both the functor (TaskExecutor) and handler (TaskHandler) support generics, and you can specify a type that will be returned by the background functor (TaskExecutor) and passed to the handler (TaskHandler).
-
What to do when the task produces an exception - you can provide code here to respond to an error condition.
-
What to do when the task is canceled by the user - you can provide code here to hand user cancellation/interruptions.
To make your life easy, adapters are provided for writing these handlers, so you only have to implement the methods that you need!
You can also attach property change listeners to your SimpleTask to get notified when status messages are created. You can even provide what these messages should be in the functor (TaskExecutor) implementation. Additionally, you can track the progress of any network operations performed in the functor via a SwingUIHookAdapter object. You can also interrupt network IO at any time, along with background task execution (for non network IO tasks).
There’s even more that you can do with the Task API, like autoshutdown and task management, and network aware, and recurring tasks. More on these features in the other tutorials.
Example - getting your hands dirty #
As part of the Task API distribution, there are a set of sample applications included to demonstrate the usage of the API. The first one is “Part 1 - Sample Application using Task API. Using SimpleTask and HTTP GET.” If you’ve downloaded the code, you can find this class here - Samples.Part1.SampleApp. This class has a main() method that you can run. Use your favorite IDE to load this class up and follow along below. If you have IDEA 7, then the you can just open the taskapi.ipr project file and run it from the Run menu on your toolbar.
What does the SampleApp do? #
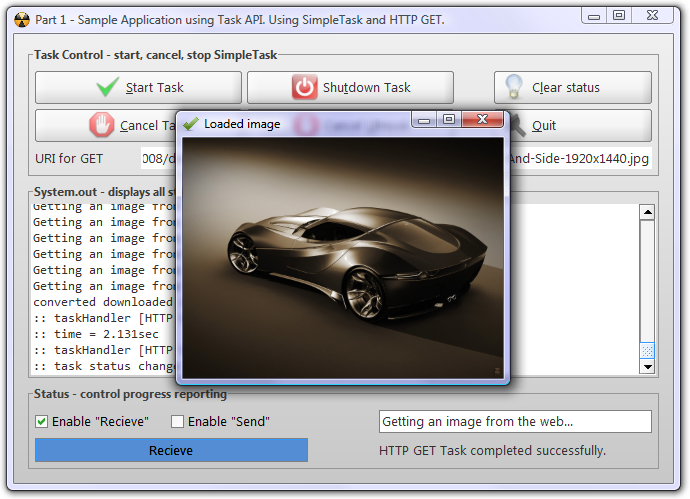
What does this app do? It simply performs an HTTP GET operation on the given URI (in the text field) and it shows you the progress of the network IO operation and it allows you to cancel it in flight. Also, if the URI resolves to an image, it tries to display it in a JFrame, that you can dispose simply by clicking on it anywhere. You can provide URI’s that resolve to other files, that aren’t images, and they won’t be displayed.
Here’s a screenshot of this sample app in action:
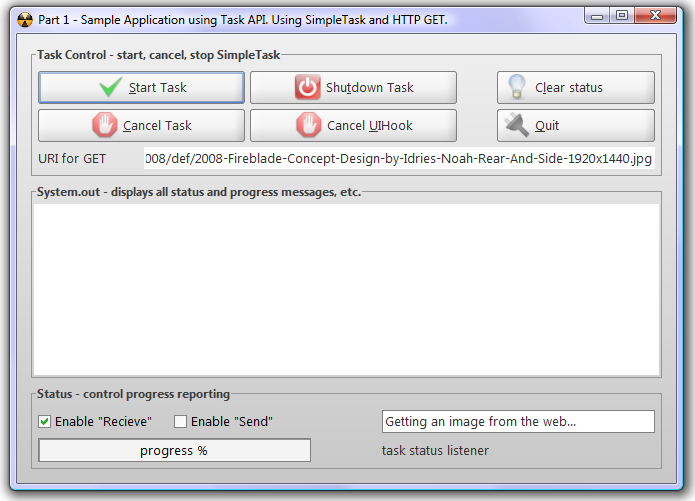
Once you start the application (and you’re connected to the Internet), you get the following:
Learning the API… play with this app #
Pretty cool app, eh? 😃 . I suggest that you play with the application to learn the API. You can download it here. Try doing the following:
-
Click on Start Task, then Cancel, and see what it does.
-
Try and start multiple tasks.
-
Try to click on Cancel Task and see how it’s different from clicking on Cancel UIHook.
-
Click on Shutdown Task while a task is running and see what happens. Try starting a task once it’s been shutdown to see what happens.
-
Change the various check boxes (Enable Send/Enable Receive, and start the task again.
-
Change the task progress message “Getting an image from the web…”, and start a task to see what happens.
As you’re learning how to use the SimpleTask class be sure to play with this sample app, as it will show you what the API does graphically… Mouse over any part of the interface and tooltips are provided to give you more details about what each UI element actually does. Try typing in a different URI and see what happens, etc. Playing with this SampleApp will allow you to learn lots of nuances of the Task API. There are a lot of support classes provided to enable the rich graphical interface that you see - I will not cover them in this tutorial, but keep your eyes peeled for more tutorials on developerlife.com on this subject.
Let’s step through the Task API related classes that make this demo tick.
Instantiating a SimpleTask #
Here’s the code to actually instantiate a SimpleTask:
_task = new SimpleTask(
    new TaskManager(),
    functor,
    "HTTP GET Task",
    "Download an image from a URL",
    AutoShutdownSignals.Daemon
);
Here’s what’s going on in this code:
-
In order to create the SimpleTask, you need provide a functor (TaskExecutor) object that runs your code in the background.
-
You will need a reference to a TaskManager, so just create one for now.
-
You need to give the task a name - this is good to do, so that when you see status and/or debug messages, they make more sense. Also, for management/monitoring purposes, this name will be reported by the TaskManager.
-
You need to give the task a description.
-
The last parameter is one more more AutoShutdownSignals enumeration. This is where you tell the Task API what “signal” you want the task to respond to, for selective shutdown (as opposed to shutting down ALL the tasks that are running). You are free to extend this enumeration and add your own signals. More on this in future tutorials.
The functor (TaskExecutor) #
When you click the “Start Task” button, it simply runs execute() on a SimpleTask that’s been created in this application. Here’s the functor that does the ‘actual work’.
TaskExecutorIF<ByteBuffer> functor = new TaskExecutorAdapter<ByteBuffer>() {
  public ByteBuffer doInBackground(Future<ByteBuffer> swingWorker,
                                   SwingUIHookAdapter hook) throws Exception
  {

    _initHook(hook);

    GetMethod get = new GetMethod(ttfURI.getText());
    new HttpClient().executeMethod(get);

    ByteBuffer data = HttpUtils.getMonitoredResponse(hook, get);

    try {
      _img = ImageUtils.toCompatibleImage(ImageIO.read(data.getInputStream()));
      sout("converted downloaded data to image...");
    }
    catch (Exception e) {
      _img = null;
      sout("The URI is not an image. Data is downloaded, " +
           "can't display it as an image.");
    }

    return data;
  }

  @Override public String getName() {
    return _task.getName();
  }
};
Here’s what’s going on in the code:
-
The actual work is performed by the GetMethod and HttpClient classes of Apache HttpClient library. For more information on how HttpClient works, check this out. The HttpUtils class that’s part of the Task API takes care of ‘wiring up’ the HttpClient API to provide progress updates. More details on how this works are provided in a different tutorial.
-
There are 2 parameters passed to the doInBackground(…) method, and the SwingUIHookAdapter is what you can use to cancel underlying IO operations performed by tasks.
That’s pretty much it. This is how simple it is to perform a non-trivial network IO operation in the background using the Task API.
The handler (TaskHandler) #
Let’s take a look at the TaskHandler implementation - this is the callback from the SimpleTask into your code.
_task.setTaskHandler(new
    SimpleTaskHandler<ByteBuffer>() {
      @Override public void beforeStart(AbstractTask task) {
        sout(":: taskHandler - beforeStart");
      }
      @Override public void started(AbstractTask task) {
        sout(":: taskHandler - started ");
      }
      /**
      * {@link SampleApp#_initHook} adds the task status listener,
      * which is removed here
      */
      @Override public void stopped(long time, AbstractTask task) {
        sout(":: taskHandler [" + task.getName() + "]- stopped");
        sout(":: time = " + time / 1000f + "sec");
        task.getUIHook().clearAllStatusListeners();
      }
      @Override public void interrupted(Throwable e, AbstractTask task) {
        sout(":: taskHandler [" +
             task.getName() +
             "]- interrupted - " +
             e.toString());
      }
      @Override public void ok(ByteBuffer value, long time, AbstractTask task) {
        sout(":: taskHandler [" +
             task.getName() +
             "]- ok - size=" + (value == null
                                ? "null"
                                : value.toString()));
        if (_img != null) {
          _displayImgInFrame();
        }

      }
      @Override public void error(Throwable e, long time, AbstractTask task) {
        sout(":: taskHandler [" + task.getName() + "]- error - " + e.toString());
      }
      @Override public void cancelled(long time, AbstractTask task) {
        sout(" :: taskHandler [" + task.getName() + "]- cancelled");
      }
    }
);
The most important methods in the code are:
-
ok() is called when the task completes execution, without throwing any exceptions, and has a result, in this case a ByteBuffer. The time the task took to execute is reported, along with a reference to the task object itself, in case you need to call some methods on it (provided as a convenience), eg: if you want to display the task’s name in a debug message.
-
error() is called when the task completes execution by throwing an exception. Again, the time it takes for the task to exception out is provided, along with a reference to the task object, that you can use to get information from for your debug messages.
-
cancelled() is called when the user cancels the task. Again, the time it takes for the task to be canceled is provided, along with a reference to the task object itself.
Here’s what’s going on in the rest of the code:
-
beforeStart() is called before the task is actually executed. This gives you a chance to perform any prep that you need to do in our code.
-
started() is called just after the background thread is executed, before your TaskExecutor is run.
-
stopped() is called just after the background thread finishes execution (either with a result or error or cancellation).
-
interrupted() is called if the background thread is interrupted.
You can choose to implement as many or as few of the methods in the TaskHandler that you choose. So you can make your TaskHandler as simple or as complex as you need it to be!
Reporting Task Status #
Tasks can report their status messages to property change listeners. Here’s the code to do this:
_task.addStatusListener(new PropertyChangeListener() {
  public void propertyChange(PropertyChangeEvent evt) {
    sout(":: task status change - " +
            ProgressMonitorUtils.parseStatusMessageFrom(evt));
    lblProgressStatus.setText(
            ProgressMonitorUtils.parseStatusMessageFrom(evt));
  }
});
Reporting Progress Status (via UIHook) #
It’s possible to get progress status updates from Tasks as well. In order to do this, you have to
get a UIHook object from the Task. A reference to this object is automatically passed by the API to
your functor (TaskExecutor) code. However, you can explicitly request one from the task as well, at
any time. The following code “wires up” the Task to provide progress status updates in the functor
(TaskExecutor) itself, by calling the _initHook() method. Here’s the code:
private SwingUIHookAdapter _initHook(SwingUIHookAdapter hook) {
  hook.enableRecieveStatusNotification(checkboxRecvStatus.isSelected());
  hook.enableSendStatusNotification(checkboxSendStatus.isSelected());

  hook.setProgressMessage(ttfProgressMsg.getText());

  PropertyChangeListener listener = new PropertyChangeListener() {
    public void propertyChange(PropertyChangeEvent evt) {
      SwingUIHookAdapter.PropertyList type =
            ProgressMonitorUtils.parseTypeFrom(evt);
      int progress = ProgressMonitorUtils.parsePercentFrom(evt);
      String msg = ProgressMonitorUtils.parseMessageFrom(evt);

      progressBar.setValue(progress);
      progressBar.setString(type.toString());

      sout(msg);
    }
  };

  hook.addRecieveStatusListener(listener);
  hook.addSendStatusListener(listener);
  hook.addUnderlyingIOStreamInterruptedOrClosed(new PropertyChangeListener() {
    public void propertyChange(PropertyChangeEvent evt) {
      sout(evt.getPropertyName() + " fired!!!");
    }
  });

  return hook;
}
Here’s what’s happening in this code:
-
The SwingUIHookAdapter object is initialized by telling it to report Send and Recieve updates. You can select whether to enable these in the SampleApp UI.
-
This UIHook is then initialized with a “progress message” - this can be set the SampleApp UI as well.
-
A property change listener is then registered with the UIHook, to get RecieveStatus and SendStatus updates, along with UnderlyingIOStreamInterruptedOrClosed updates. The latter is to let you know when the user has interrupted any underlying background IO operation. You can choose to ignore this if you want and just the issue in your handler (TaskHandler). If you use the UIHook to cancel the task, then this will get fired.
There is another thing to note. In the handler (TaskHandler) used in this SampleApp, all listeners to the task’s progress messages are removed in the stopped() method of the handler. Here’s the code to do so:
/** {@link SampleApp#_initHook} adds the task status listener, which is removed here */
@Override public void stopped(long time, AbstractTask task) {
  sout(":: taskHandler [" + task.getName() + "]- stopped");
  sout(":: time = " + time / 1000f + "sec");
  task.getUIHook().clearAllStatusListeners();
}
Don’t forget to do this in your code, it’s just good practice. It’s really up to you when you clean up resources. In this example, the UIHook is initialized in the functor, but you don’t have to do it this way. You can add listeners at anytime, and remove them at anytime.
Cancel Task (via UIHook) #
The SwingUIHookAdapter used to get progress status updates can also be used to cancel any underlying IO operations. Here again, the Task API gives you more than one way to do something. If you simply call cancel() on the task, it will do the same thing. However, if you want to explicitly interrupt IO that a task is executing, then you can use the UIHook to stop this IO. If you call this method then the UnderlyingIOStreamInterruptedOrClosed property is fired. Why would you want to use this over just canceling the task? I will explain in depth in the next tutorial.
private void canceUIHookAction() {
  _task.getUIHook().cancel();
}
More details #
This quick start guide shows you some highlights of the API, to get a much more detailed analysis of the API and what’s going on in the SampleApp, read the next tutorial - Task API (2 of 3) - Task API in-depth.
Misc notes #
The Task API is written in Java 6, and it uses the SwingWorker implementation from Java6. If you aren’t using Java6, then you will get exceptions.
Additionally, the Apache HttpClient library doesn’t make it easy to monitor the progress of the GET request itself (when key/value pairs are sent to the servlet, in the first part of the HTTP GET protocol). It is possible to monitor the response, but not the request. It’s possible on the other hand to monitor both the request and response of a POST operation. So if you need the request to be monitored, use POST (if this is possible). More details on doing this are going to be provided in another tutorial.
Download - I want the code now! #
You can download the source code distribution here. Included are sources, libraries that are needed, and javadocs. The sample applications are included in the source as well. Please read the javadocs - I have copious amounts of documentation about the lifecycle stages of Tasks in there, along with all the other classes in the Task API. The best place to see what’s going on is in the javadocs. I took the time to write them for your benefit, as well as mine, so please use them 😃 .
After you download the zip file, you will find all the compiled JARs that you will need in the /taskapi/dist/ folder. All the source code is in the /taskapi/src/ folder. The javadocs are in the /taskapi/javadoc/ folder.
👀 Watch Rust 🦀 live coding videos on our YouTube Channel.
📦 Install our useful Rust command line apps usingcargo install r3bl-cmdr(they are from the r3bl-open-core project):
- 🐱
giti: run interactive git commands with confidence in your terminal- 🦜
edi: edit Markdown with style in your terminalgiti in action
edi in action