Algorithms in Kotlin, Binary Trees, Part 6/7
![]()

- Introduction
- Binary Trees
- Node data structure
- Building the tree
- Pre-order, in-order, and post-order recursive traversal
- BFS (breadth first search) using a Queue
- BFS (pretty print)
- DFS (depth first search) using a Stack
- Console output from running the code
- Resources
Introduction #
This tutorial is part of a collection tutorials on basic data structures and algorithms that are created using Kotlin. This project is useful if you are trying to get more fluency in Kotlin or need a refresher to do interview prep for software engineering roles.
How to run this project #
You can get the code for this and all the other tutorials in this collection from this github repo. Here’s a screen capture of project in this repo in action.
Once you’ve cloned the repo, type ./gradlew run in order to build and run this project from the
command line.
Importing this project into JetBrains IntelliJ IDEA #
- This project was created using JetBrains Idea as a Gradle and Kotlin project (more info). - When you import this project into Idea as a Gradle project, make sure not to check “Offline work” (which if checked, won’t allow the gradle dependencies to be downloaded). - As of Jun 24 2018, Java 10 doesn’t work w/ this gradle distribution (v4.4.x), so you can use Java 9 or 8, or upgrade to a newer version of gradle (4.8+).
Binary Trees #
Node data structure #
data class Node<T>(val value: T,
                   var leftNode: Node<T>?,
                   var rightNode: Node<T>?,
                   var depth: Int = 0) {
    fun link(left: Node<T>?, right: Node<T>?) = this.apply {
        linkLeft(left).linkRight(right)
    }

    fun linkLeft(left: Node<T>?) = this.apply { leftNode = left }

    fun linkRight(right: Node<T>?) = this.apply { rightNode = right }

    fun depth(value: Int) = this.apply { depth = value }

    /**
     * Nodes on the left are in yellow, and those on the right are blue.
     */
    override fun toString(): String {
        return StringBuffer().apply {
            append("{${value.toString().green()}")
            if (leftNode != null)
                append(", ${leftNode.toString().yellow()}")
            if (rightNode != null)
                append(", ${rightNode.toString().blue()}}")
        }.toString()
    }
}
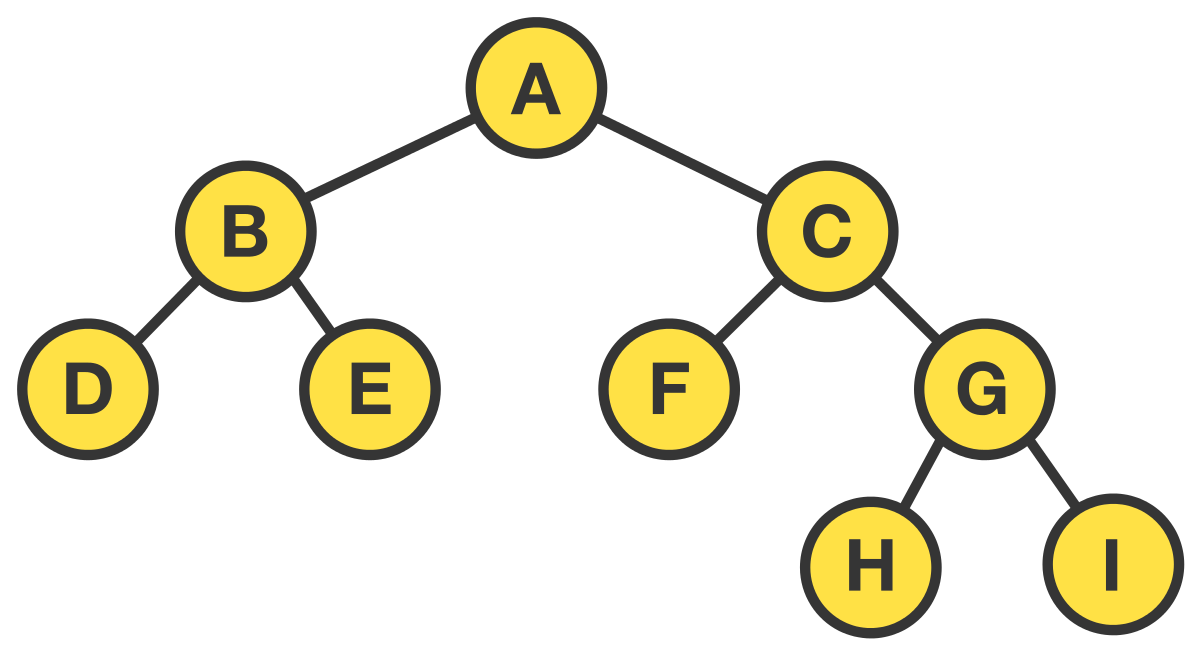
Building the tree #
The tree shown in the diagram above is built in code as follows.
/**
 * [Image of the generated tree](http://tinyurl.com/yckmlfkt)
 *        [A]
 *       /   \
 *     [B]    [C]
 *     / \    /  \
 *  [D]  [E] [F] [G]
 *               / \
 *             [H] [I]
 */
fun buildTree(): Node<Char> {
    val a = Node('a', null, null)
    val b = Node('b', null, null)
    val c = Node('c', null, null)
    val d = Node('d', null, null)
    val e = Node('e', null, null)
    val f = Node('f', null, null)
    val g = Node('g', null, null)
    val h = Node('h', null, null)
    val i = Node('i', null, null)

    a.link(b, c)
    b.link(d, e)
    c.link(f, g)
    g.link(h, i)

    return a
}
Pre-order, in-order, and post-order recursive traversal #
/**
 * A neat trick for pre-order traversals: starting from the root,
 * go around the tree counterclockwise. Print each node when you
 * pass its left side.
 */
fun <T> traversalPreOrder(node: Node<T>?, list: MutableList<T>) {
    if (node != null) {
        list.add(node.value)
        traversalPreOrder(node.leftNode, list)
        traversalPreOrder(node.rightNode, list)
    }
}

/**
 * A neat trick for in-order traversals: starting from the root,
 * go around the tree counterclockwise. Print each node when you
 * pass its bottom side.
 */
fun <T> traversalInOrder(node: Node<T>?, list: MutableList<T>) {
    if (node != null) {
        traversalInOrder(node.leftNode, list)
        list.add(node.value)
        traversalInOrder(node.rightNode, list)
    }
}

/**
 * A neat trick for post-order traversals: starting from the root,
 * go around the tree counterclockwise. Print each node when you
 * pass its right side.
 */
fun <T> traversalPostOrder(node: Node<T>?, list: MutableList<T>) {
    if (node != null) {
        traversalPostOrder(node.leftNode, list)
        traversalPostOrder(node.rightNode, list)
        list.add(node.value)
    }
}
BFS (breadth first search) using a Queue #
/**
 * Traverses the binary tree nodes in a sorted order.
 */
fun <T> breadthFirstTraversal(root: Node<T>): MutableList<Node<T>> {
    val queue = LinkedList<Node<T>>()
    val traversalList = mutableListOf<Node<T>>()

    // Add first node.
    queue.add(root)

    // Use queue to create breadth first traversal.
    while (queue.isNotEmpty()) {
        val currentNode = queue.poll()
        val depth = currentNode.depth

        // Add left node first.
        if (currentNode.leftNode != null)
            queue.add(currentNode.leftNode!!.depth(depth + 1))

        // Add right node next.
        if (currentNode.rightNode != null)
            queue.add(currentNode.rightNode!!.depth(depth + 1))

        // Add the node to the traversal list.
        traversalList.add(currentNode)
    }

    return traversalList
}
Notes on the implementation #
- BFS traversal of a binary tree results in a the nodes being visited in their sorted order.
- The trick in the
whileloop is leveraging the FIFO nature of the queue and allow the traversal of the tree from left node to right node, which results in a breadth first traversal. - A
depthfield in theNodeclass is what keeps track of the number of branches from the root to thisNode. - The
Dequeinterface supports both Stack and Queue ADTs (abstract data types). - There is no need to track if a node is unvisited, or visited, as you would expected when traversing a graph, due to the nature of the binary tree.
BFS (pretty print) #
/**
 * Traverses the binary tree nodes in a sorted order.
 */
fun <T> printBFSTraversal(root: Node<T>): String {

    val queue = LinkedList<Node<T>>()
    // Add first node.
    queue.add(root)

    val mapVisitedDepth = mutableMapOf<Int, MutableList<T>>()
    // Use queue to create breadth first traversal.
    while (queue.isNotEmpty()) {
        val currentNode = queue.poll()
        val depth = currentNode.depth

        // Add left node first.
        if (currentNode.leftNode != null)
            queue.add(currentNode.leftNode!!.depth(depth + 1))

        // Add right node next.
        if (currentNode.rightNode != null)
            queue.add(currentNode.rightNode!!.depth(depth + 1))

        // Decide whether to print crlf or not.
        mapVisitedDepth.computeIfAbsent(depth){ mutableListOf()}
            .add(currentNode.value)
    }

    val outputString = StringBuilder()

    for (entry in mapVisitedDepth) {
        outputString.append(entry.value.joinToString(", ", postfix = "\n"))
    }

    return outputString.toString()
}
Notes on implementation #
- This is almost identical to the code above. The main difference here is that a
mapVisitedDepthMapis used in order to keep track of the depth of each traversed node, which can then be used to pretty print the output where a CRLF is added at the start of each new depth.
DFS (depth first search) using a Stack #
fun <T> depthFirstTraversal(root: Node<T>): MutableList<Node<T>> {
    val stack = LinkedList<Node<T>>()
    val traversalList = mutableListOf<Node<T>>()

    // Add first node.
    stack.push(root)

    // Use stack to create breadth first traversal.
    while (stack.isNotEmpty()) {
        val currentNode = stack.pop()
        val depth = currentNode.depth

        // Push right child to stack FIRST (so this will be processed LAST).
        if (currentNode.rightNode != null)
            stack.push(currentNode.rightNode!!.depth(depth + 1))

        // Push left child to stack LAST (so this will be processed FIRST).
        if (currentNode.leftNode != null)
            stack.push(currentNode.leftNode!!.depth(depth + 1))

        // Add to traversal list.
        traversalList.add(currentNode)
    }

    return traversalList
}
Notes on the implementation #
- The trick in the
whileloop is to leverage the LIFO nature of stack, in order to push the children on the right on top of the stack first, before the children on the left. Since the algorithm pops these items off the top of the stack, whatever was pushed last will get processed sooner (that what was pushed first). And this is what results in a depth first search. - A
depthfield in theNodeclass is what keeps track of the number of branches from the root to thisNode. - The
Dequeinterface supports both Stack and Queue ADTs (abstract data types).
Console output from running the code #

Resources #
CS Fundamentals #
- DFS and BFS for Binary Tree Arrays
- Brilliant.org CS Foundations
- Radix sort
- Hash tables
- Hash functions
- Counting sort
- Radix and Counting sort MIT
Data Structures #
Math #
- Khan Academy Recursive functions
- Logarithmic calculator
- Logarithm wikipedia
- Fibonacci number algorithm optimizations
- Modulo function
Big-O Notation #
- Asymptotic complexity / Big O Notation
- Big O notation overview
- Big O cheat sheet for data structures and algorithms
Kotlin #
- Using JetBrains Idea to create Kotlin and gradle projects, such as this one
- How to run Kotlin class in Gradle task
- Kotlin
untilvs.. - CharArray and String
Markdown utilities #
👀 Watch Rust 🦀 live coding videos on our YouTube Channel.
📦 Install our useful Rust command line apps usingcargo install r3bl-cmdr(they are from the r3bl-open-core project):
- 🐱
giti: run interactive git commands with confidence in your terminal- 🦜
edi: edit Markdown with style in your terminalgiti in action
edi in action