Build a Chrome Extension using Manifest V3
![]()

- Introduction
- Step 1: Create a new Chrome Extension
- Step 2: Build and load the Chrome Extension
- Step 3: Add functionality
- Step 4: Publish it
- Next steps: Contribute to the Shortlink project
Introduction #
In this tutorial we will create a new Chrome Extension using Manifest V3 that allows us to create our own names for a URL or a set of URLs. This is useful when you have a set of URLs that you want to open at once, or you want to create a name for a URL that is hard to remember. Or if you just don’t want to use bookmarks. We will also save these shortlinks to the Chrome Sync key-value pair store. This extension will also allow the user to type commands when it is activated (in its popped up state). And we will use Typescript and React to build it.
Before we get started, here are some good references to take a look at:
- Official Chrome docs on writing an extension
- Template to build a Chrome extension without having to configure Typescript and React
🚀 Please star and fork / clone the Shortlink repo 🌟 Install the Chrome Extension 🛠️
Step 1: Create a new Chrome Extension #
The first thing to is to create a new repo on GitHub using this template repo.
You can do this in two ways.
- Using github.com and a web browser. Here are the instructions on how to do this.
- Using the GitHub CLI. You must have the GitHub CLI installed and be
logged in to github.com (using
gh auth login).# More info: https://cli.github.com/manual/gh_repo_create gh repo create shortlink --public --template r3bl-org/chrome-extension-typescript-react-template # More info: https://cli.github.com/manual/gh_repo_clone gh repo clone shortlink
Step 2: Build and load the Chrome Extension #
At this point we have a shortlink git repo on our local machine that is setup to build a Chrome
Extension. You can run the following command to build it.
npm install
npm run build
This will generate a dist/ directory that contains the Chrome Extension. You can load this into
Chrome by:
- Type
chrome:extensionsin the URL bar. - Turn on “Developer Mode”.
- Then click on “Load unpacked” and select the
dist/directory. Your extension will be loaded into Chrome.
Step 3: Add functionality #
In our extension we will ask for the minimum of
permissions from the user.
This ensures that our extension doesn’t have access to anything more than it needs. All of this is
specified in the public/manifest.json file. Here’s an example of what this file might look like
when we are done building our extension.
{
  "manifest_version": 3,
  "name": "R3BL Shortlink",
  "description": "Make go links",
  "version": "2.0",
  "icons": {
    "16": "icon16.png",
    "32": "icon32.png",
    "48": "icon48.png",
    "128": "icon128.png"
  },
  "action": {
    "default_title": "Click to make go link for URL",
    "default_popup": "popup.html",
    "default_icon": {
      "16": "icon16.png",
      "32": "icon32.png",
      "48": "icon48.png",
      "128": "icon128.png"
    }
  },
  "omnibox": {
    "keyword": "go"
  },
  "background": {
    "service_worker": "js/background.js"
  },
  "commands": {
    "_execute_action": {
      "suggested_key": {
        "default": "Alt+L",
        "mac": "Alt+L"
      },
      "description": "Make a go link for URL in address bar"
    }
  },
  "permissions": ["activeTab", "tabs", "storage", "clipboardWrite"]
}
Now that we have our permissions sorted, we can start by adding functionality to the extension. When
we activate the extension by clicking its icon in the Chrome toolbar or by pressing the shortcut
Alt+l the popup.tsx file will be run which itself is loaded by popup.html.
You can learn more about activating the extension and the popup in the
chrome.browserActiondocs.
This popup.tsx file will be the entry point for our extension. It is the main function in a node
program or the App top level component in a React app. It sets up the UI and handles the user
input events (key presses).
This is what the UI looks like on Linux on my machine:
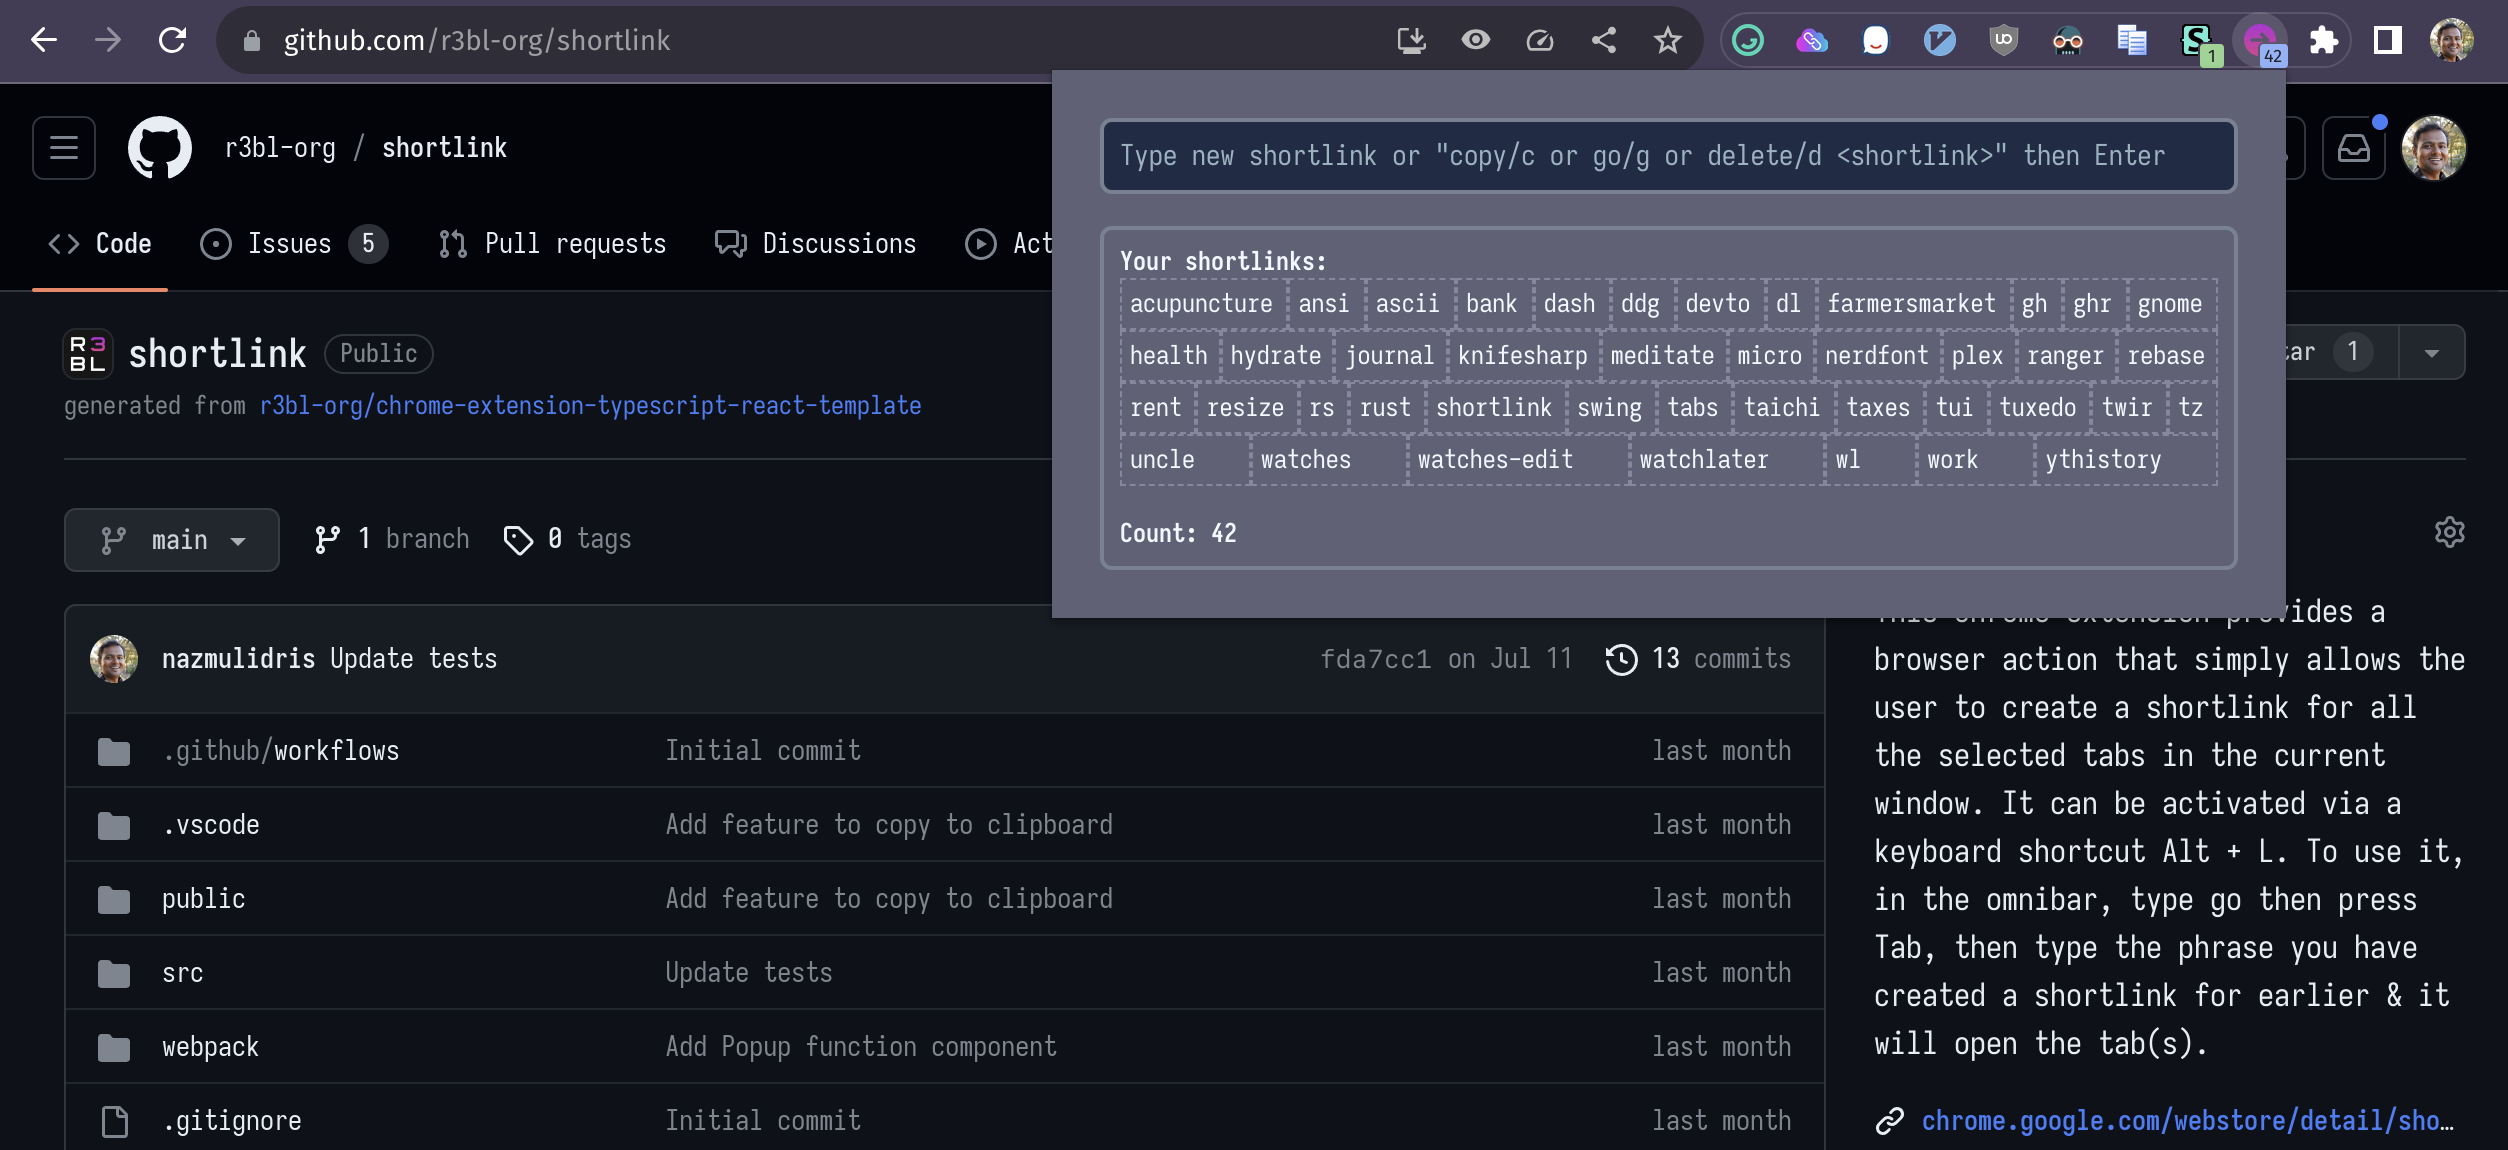
This is what the file looks like in the real Shortcut extension:
popup.tsx. If you
go through this code, these are some of the things you will notice:
- The
main()function just sets up the main React componentPopupand mounts it to the DOM (divwith idroot). - There are some
useEffect()hooks which ensures that whenchrome.storagechanges, the global state is updated and the component is re-rendered. Learn more aboutchrome.storagein the API reference here. Another hook is responsible for painting the badge on the extension icon in the toolbar (when theShortlink[]in the state changes). - The
Popupfunction component returns some JSX that is used to render the global state, which are two things:Shortlink[]andstring. TheShortlink[]is used to render the list of shortcuts and thestringis used to render the input field. - The
handleOnChange()andhandleEnterKey()function is where the user input that is typed is interpreted into a command and then executed.
There are some other files of note. Please take a look at their linked source code.
command.ts: The main logic for parsing astringinto a command is handled by this file. TheparseUserInputTextIntoCommand()function does all the work of converting a givenstringinto aCommand, and has a very Rust “vibe”. Please check out how this works. It makes it very easy to add or change commands in the future.storage.ts: This is where all the functions to manipulate the storage that syncs w/ Chrome accounts is located. Functions that handle shortlinks to be deleted, or added, or updated can all be found here. The Chrome storage API is async which is why the code in this file is written in the way that it is.omnibox.ts: This file works w/background.tsto handle the omnibox functionality. The omnibox is the address bar in Chrome. When the user typesgoand then a space, the omnibox will be activated and the user can type in a shortcut. When the user presses Enter, thebackground.tsfile will be run and the shortcut will be expanded to the full URL.
Step 4: Publish it #
Please read this guide on how to publish the
extension. You will have to get a developer account, and then upload the extension binaries. There’s
a make-distro-zip.sh script provided in this repo that will create a zip file that you can upload
to the Chrome Web Store.
As part of publishing a version you have to provide justification for why you are requesting the permissions that you are. The fewer the permissions that you use, the better for the end user, and also for the review process to take less time.
Next steps: Contribute to the Shortlink project #
🚀 Please star and fork / clone the Shortlink repo 🌟 Install the Chrome Extension 🛠️
If you would like to get involved in an open source project and like Chrome extensions, please feel free to contribute to the Shortlink repo. There are a lot of small features that need to be added. And they can be a nice stepping stone into the world of open source contribution 🎉.
👀 Watch Rust 🦀 live coding videos on our YouTube Channel.
📦 Install our useful Rust command line apps usingcargo install r3bl-cmdr(they are from the r3bl-open-core project):
- 🐱
giti: run interactive git commands with confidence in your terminal- 🦜
edi: edit Markdown with style in your terminalgiti in action
edi in action