Building a real world app using React, Redux, Firebase, and Typescript
![]()
Introduction #
This tutorial is mostly about Redux. And it’s based on this tutorial which goes into details around the starter project that I created to tie together React, Firebase, and Material Design to create a lightweight but real world starter project.
Here’s the code on GitHub for this project. The core technologies used in this starter project are:
- Redux
- React
- Firebase
- ES6
- Typescript, Typescript with NodeJS
- Material UI for React
- Flexbox layout
- Socket.IO
Please note that is not for beginners, but is more for someone who knows these technologies and wants to put them together into real world applications. If you want to get started with the basics, here are some goodresources:
What does this project actually do?
To see it in action, see it deployed on heroku. This project is a simple todo list app that stores its data in Firebase. It uses Redux to manage the internal state of the application. And it uses Material Design and Flexbox layout for the UI, along with React. Additionally, it supports signed in users, so that all the data is stored on the user’s behalf based on their social identity (anonymous auth and Google sign in is supported via Firebase).
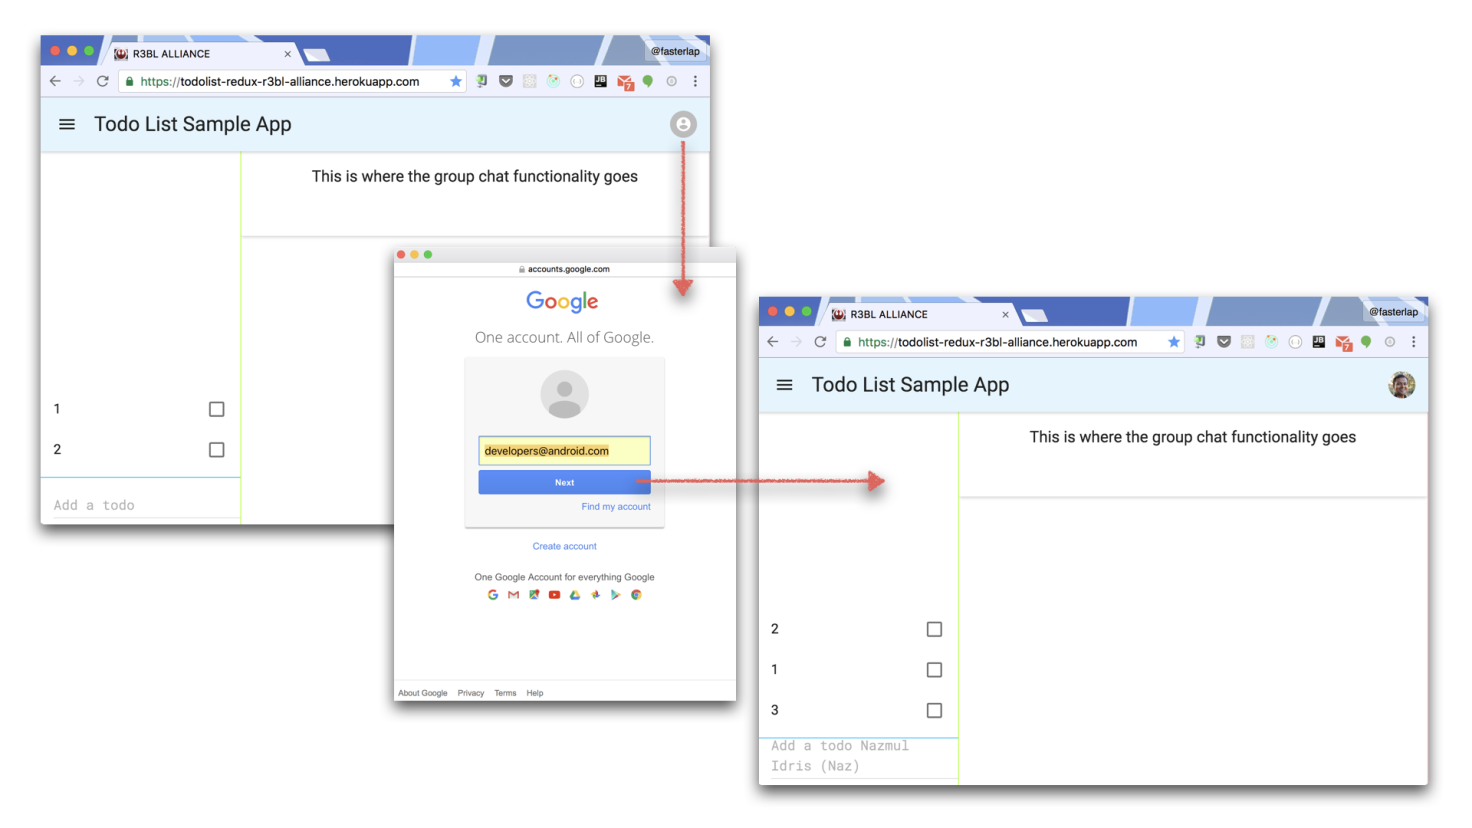
When the app first starts up, you will be able to create todo list items. These are saved for the anonymous user that’s automatically created when the app launches. This is explained in more detail below in the Firebase Auth section. When you click on the user icon on the top right hand corner of the app, you will be asked to connect the app using your Google profile (via OAuth 2.0), which is handled by Firebase Auth as well. Once you provide your authorization, it will copy the todo data to a new account that is permanent and tied to your social identity. If you then sign in to this app from any number of machines, the same todo data will be available everywhere. As you make changes to this data (in real time) you will see these changes appear everywhere that you have the app running (as long as you are online on those machines).
Setting up your environment #
Please refer to this
non-Reduxtutorial
to get your environment setup. The biggest change in the Redux version of the project compared to
the non-Redux version
here is that I’ve
changed webpack settings to make Typescript work in all the source files in the /client folder.
Your map of the code #
You will find the following packages in the src folder:
-
client– this folder holds all the code related to the web app-
container– this folder holds all the related to the internal state and lifecycles of the web app itself. -
ui– this folder holds all the React UI code.
-
-
global– this folder holds the code that is shared between the web client app and the web server app. -
server– this folder holds all the server code (spawns Websocket, HTTP server, etc).
Note that Typescript now works in any of the client/ folders. So you can create TSX files (React
Files that use Typescript). An example is provided in test.tsx that you can check out for yourself
in the code.
Redux #
In the non-Redux version of this project, we used Node event emitters and the observer-observable pattern to connect components of the application together (loosely). This pattern is still used in this Redux version of the project, however, it’s restricted to Socket.IO and Firebase. For internal state management of the application, we use Redux.
There are some key concepts that are important to grok when using Redux. The idea is to manage the entire state of your application in a single place. This means that the entire object model that comprises the representational state (in its entirety) of your application at any given moment in time is in one place. And it’s immutable.
You might be thinking, if it’s immutable, then how do I change it? In order to discretely change state from one point to another, you have to apply actions to your object model or Redux state (which is kept in a Redux store). What is an action? An action simply has a name and a payload. These actions are dispatched to the Redux store, in order to make changes to the state. Every time an action is applied, an entirely new state is created and stored in the Redux store. This new state is then propagated by Redux to all the objects that are interested in these state changes (which in this case are Redux components).
There is another thing that Redux introduces, and that is the reducer. It’s more like a state mutator. The way reducers work is that you give them the current state and the action, and they will do some work to mutate this state and give you an entirely new state! There are a few constraints in what these reducers can’t do (eg: they can’t call network operations or do anything outside the bounds of the local execution environment).
There are many advantages to using Redux, the most important of which is greater reliability of your application’s runtime behavior. It helps you create more stable apps and allows you to track changes that are being made to the application state in a single place. This makes it easier to see what is happening to your app. The notion of immutable state is something that takes a little getting used to.
Think of it this way, you don’t just change the state of your application. Instead,
-
You request that a change be made by dispatching an action (which contains the type/name of your action and the payload object that has data for this change) to the Redux store.
-
Then Redux applies the appropriate reducer to mutate this state and produce a new state.
-
This new state is then propagated by Redux to all the interested parties that have registered interest in state changes (these are typically Redux components).
So in order to setup Redux, you have to do the following:
-
Create a Redux store
-
Initialize it with an init state object
-
Initialize it with a main reducer
Here’s code from context.js that does just this:
initReduxStore() {

  try {
    this.reduxStore = createStore(
      reducers.reducer_main,
      null,
      window.devToolsExtension && window.devToolsExtension()
    );
  } catch (e) {
    this.reduxStore = createStore(
      reducers.reducer_main,
      null
    );
  }

  // explicitly INIT Redux!
  this.reduxStore.dispatch(actions.action_init());
This is what the code for the actions looks like:
const TYPES = {
  SET_STATE_USER: "SET_STATE_USER",
  SET_STATE_DATA: "SET_STATE_DATA",
  ADD_TODO: "ADD_TODO",
  TOGGLE_TODO: "TOGGLE_TODO",
  REDUX_INIT: "REDUX_INIT",
}

function action_init(): ReduxActionIF {
  return {
    type: TYPES.REDUX_INIT,
    payload: null,
  }
}
This is what the code for the reducer looks like:
function reducer_main(state: ReduxStateIF, action: ReduxActionIF): ReduxStateIF {
  switch (action.type) {
    case actions.TYPES.REDUX_INIT:
      return initialState
    case actions.TYPES.ADD_TODO:
      return add_todo(state, action)
    case actions.TYPES.TOGGLE_TODO:
      return toggle_todo(state, action)
    case actions.TYPES.SET_STATE_DATA:
      return set_data(state, action)
    case actions.TYPES.SET_STATE_USER:
      return set_user(state, action)
  }
}
Here’s an example of a reducer that toggles a selected todo list item’s done state:
function toggle_todo(state: ReduxStateIF, action: ReduxActionIF) {
  try {
    const index: number = action.payload
    let data_copy: DataIF = lodash.cloneDeep(applicationContext.getData())
    let todoObject: TodoIF = data_copy.todoArray[index]
    todoObject.done = !todoObject.done

    const retval = {
      user: state.user,
      data: data_copy,
    }
    return retval
  } catch (e) {
    console.log("_modifyTodoItem had a problem ...")
    console.dir(e)
  }

  return state
}
When you want to use it in React, you have to:
-
Connect the Redux store to the React component hierarchy using a Provider tag.
-
Bind the React component to the state or portions of the state that your React components are driven by (this is done using the @connect annotation for ease of use).
-
You have to make all the actions that can be applied by your React components available to @connect as well. This makes it so that you don’t have to do the heavy lifting of accessing the Redux store and then manually dispatching an action. This binding is done for you so that you can just call the action object with the desired payload and it automatically dispatches it to the Redux store.
Here’s code to connect React to Redux. The following snippet is from main.js.
ReactDOM.render(
  <Provider store={applicationContext.getReduxStore()}>
    <App />
  </Provider>,
  document.getElementById("app")
)
The following snippet is from app.js.
@connect(
  (state) => {
    if (lodash.isNil(state)) {
      return {
        data: null,
        user: null,
      }
    } else
      return {
        data: state.data,
        user: state.user
      }
  },
  (dispatch) => bindActionCreators(actions, dispatch, applicationContext)
)
This code will bind the actions to the redux store’s dispatcher. You can learn more about how this works by looking at the bindActionCreators implementation in context.ts. Here is how you use these actions in React, by simply getting them out of props.
render() {

  const {
    data,
    user,
    action_add_todo_text,
    action_toggle_todo_index
  } = this.props;

  const todoArray = lodash.isNil(data) ? null : data.todoArray;

  ...
}
Whew! This probably sounds really complicated, and it is at first. However, this boilerplate stuff is handled on your behalf and it’s not really verbose. In the case of using Event emitters to manage application state, one disadvantage is that we would have to create listeners when a React component mounts and then detach them when it unmounts. We don’t have to do any such wiring. Since it’s all handled by Redux. Also, in the Event emitter example, we had to explicitly create React state objects to handle the data that we get via event emitters. In Redux, we don’t have to do this, since that is what the Redux state does for us!
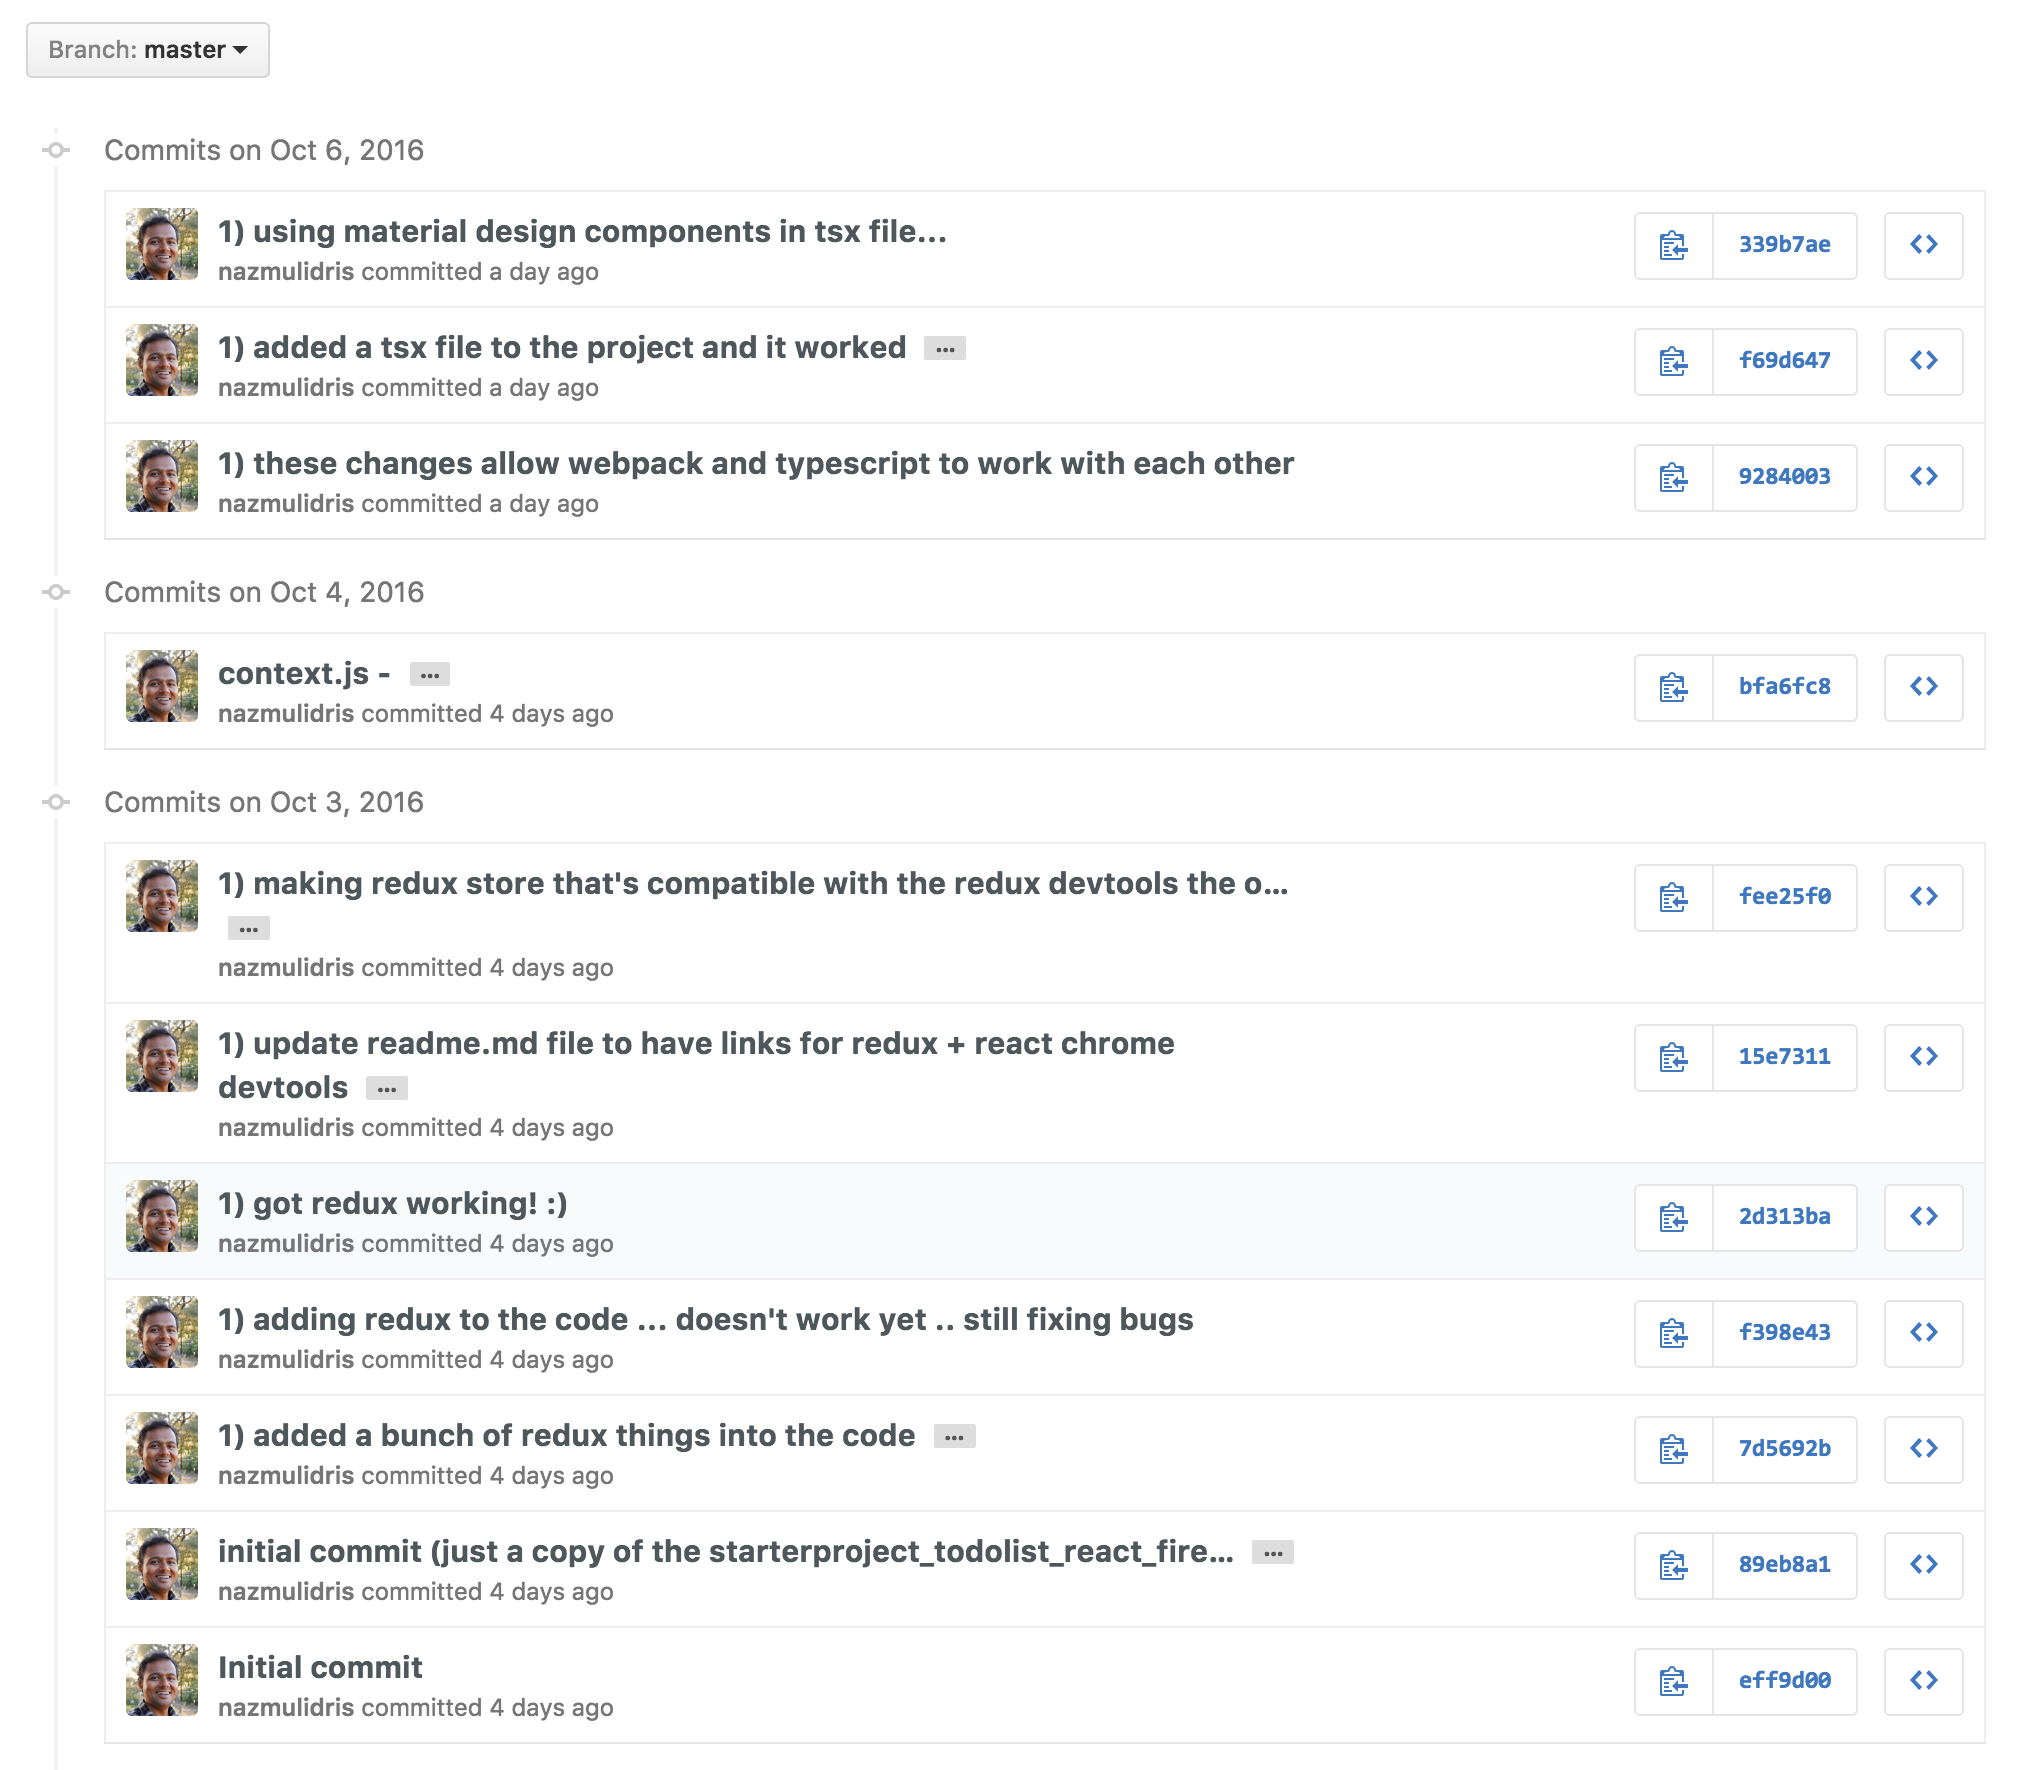
I encourage you to review the non-Redux and Redux versions side by side so that you get a sense for how things are different in the Redux example. In fact, if you go back in version history in the Redux example, it actually starts off without Redux and with every new check-in, the project is Redux-ified. Please review this commit history to see this.
Misc #
Lodash is pretty awesome. It’s used in this project, learn more about it here.
If you use Chrome, the React and Redux Dev Tool extensions are very useful:
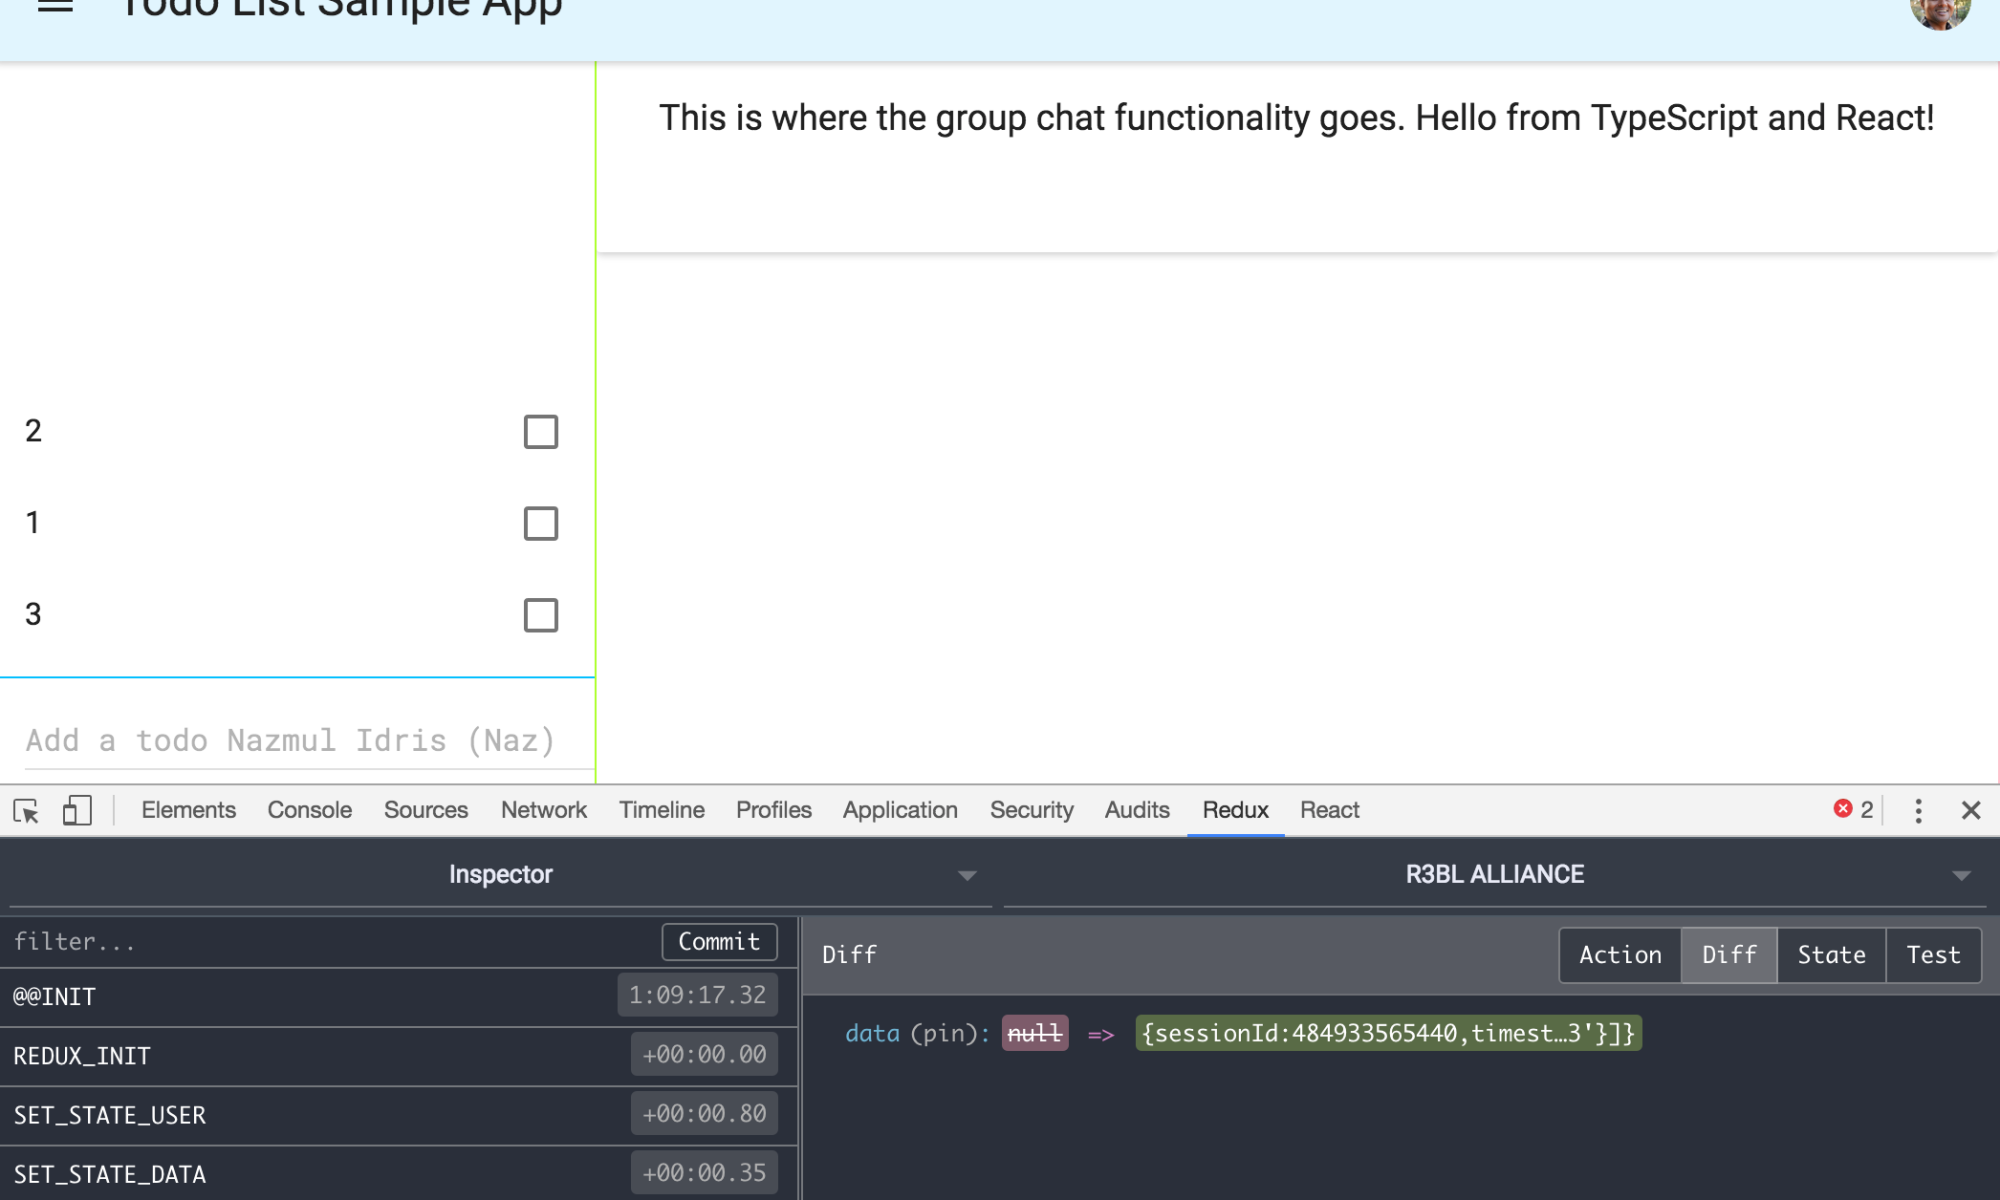
The following is what the Redux chrome dev tools extension looks like. It is invaluable in debugging and it walks you thru all the state changes that happen and the actions that caused them. And it gives you Diff views or absolute State views of things, which is very useful for debugging and understanding how your application changes it’s internal state!
Getting the code #
You can get the code on GitHub.
👀 Watch Rust 🦀 live coding videos on our YouTube Channel.
📦 Install our useful Rust command line apps usingcargo install r3bl-cmdr(they are from the r3bl-open-core project):
- 🐱
giti: run interactive git commands with confidence in your terminal- 🦜
edi: edit Markdown with style in your terminalgiti in action
edi in action