How to use glass pane for animation (SwingX and Timingframework)
![]()
Introduction #
I needed to perform animations in the desktop app framework that I’m building for ScreamingToaster. I needed to build animations that move various components around on the screen, and other animations that pop up components on top of existing components, etc. After creating a few of these effects, I realized that I was doing the same thing over and over again, which is why I decided to write this tutorial to encapsulate this pattern, in the hopes that I will help others doing the same thing.
The strategy outlined here is just a suggestion on how to perform animation using a glass pane. There are many more strategies that you can select, depending on your requirements. However, I feel that this is one of the simplest and most effective approaches that have worked well for me, and I use it all the time in creating the user interface for applications in my desktop app container framework for ScreamingToaster. If you look at some of the animations on the video posted on this website, they all use this strategy.
The following is a list of approaches that you can take to create custom components:
| Strategy | Cost |
| Create your own components that implement paint() methods, or override the paint() method on existing components | Medium/High level of effort, since you have to generate your own paint method |
| Use SwingX API to install your own custom painters | Low level of effort, since you can mix and match a variety of painters that are provided for you. It’s easy to write painters as well |
| Use the glass pane to perform custom painting on top of your existing components | Low level of effort, since you can just paint what you need, instead of re-doing painting code for various components |
| Implement your own look and feel | High level of effort, unless you just tweak with a few UIDelegates |
The following is a list of approaches that you can take to create animations:
| Strategy | Cost |
| Create your animations in a custom paint() method | Medium/High level of effort, since you may have to implement the whole thing from scratch. You can speed things up (reduce your coding effort) by drawing over existing components using super.paint() |
| Use the glass pane to draw the animation sequences on | Low/Medium level of effort, since you may just have to paint on top of existing components |
| Implement your own look and feel | High level of effort |
The easiest approach is to performing animations is using the glass pane. This tutorial will outline a strategy to using the glass pane for performing your own custom animation on components, to add special effects like Spring and Glow, and to even place custom components on top of existing components to show error conditions and such, and have components fly down and move up.
Background information #
For more information on glasspane and RootPaneContainers refer to these links:
-
The Java Tutorial – How to use Root Panes
-
Java 6 javadocs on JRootPane
For more information on SwingX, refer to these links:
-
SwingLabs – SwingX toolkit
-
Download SwingX here – Hudson Weekly Builds
I’m planning on writing more tutorials on SwingX and how to use painters… check back in a few days/weeks and I should have them uploaded on the site.
For more information on the Timingframework for animation, refer to these lniks:
-
Timingframework tutorial – Timing is Everything
-
Timingframework homepage – timingframework.java.net
-
Timingframework downloads – java.net downloads
Getting started #
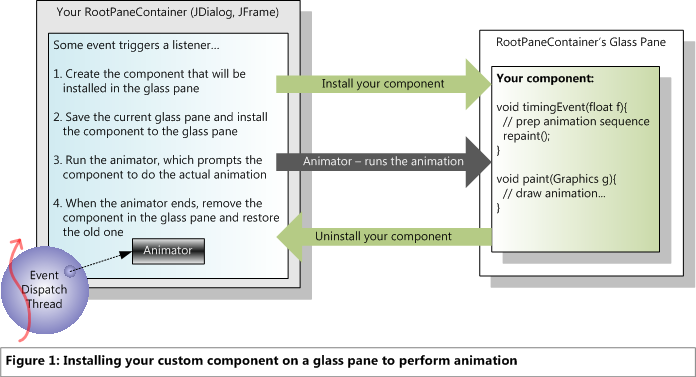
The basic idea is to have all animation effects delegated to a component that’s placed on the glass pane, on top of your container (dialog, frame, etc). When the appropriate event triggers the animation to being, the custom component has to be installed as the glass pane of your RootPaneContainer and then your animator can be started which runs the animation, and when it’s complete, the glass pane has to be unistalled. The following diagram depicts this sequence of events:
Implementation details #
You have to implement 2 things:
-
The event listener that will trigger the animator to start – and the implementation of Animator’s TimingTarget interface. This event listener will be bound to some event source in your container/RootPaneContainer. You can create and initialize your custom component here.
-
The custom component that will be installed on the RootPaneContainer’s glass pane. This component will be created and initialized by your container/RootPaneContainer.
#1 implementation of the event listener that will trigger the animator to start #
In your event listener, be sure to perform the following in your TimingTarget implementation:
-
Create the Animator and it’s TimingTarget object.
-
In the TimingTarget implementation, do the following:
-
begin() – create your custom component, initialize it, and install it on the RootPaneContainer
-
timingEvent(float) – delegate to your custom component (which will cause a repaint)
-
end() – uninstall the custom component from the RootPaneContainer.
-
Start the Animator after you’ve configured it with the appropriate Interpolator, timing resolution, etc.
Here’s is some sample code below of an Animator that you could create in an event handler in your container:
RootPaneContainer container = ...;
AnimCompGlassPane component = new AnimCompGlassPane();
component.init(...);
component.installOnContainer(container);

Animator animator = new Animator(
  ANIMATION_LENGTH, ANIMATION_REPEATS, Animator.RepeatBehavior.REVERSE,
  new TimingTargetAdapter() {
    @Override public void begin() {
   component.startAnimation();
 }


@Override public void timingEvent(float v) {
   component.setAnimationPhase(v);
 }

 @Override public void end() {
   component.endAnimation();
   component.uninstallFromContainer();
 }
 });

animator.setInterpolator(new SplineInterpolator(0.0f, 0.99f, 0.01f, 1.0f));
animator.setResolution(ANIMATION_RESOLUTION);
animator.start();
#2 implementation of the custom component that performs the animation #
In your custom component, that actually performs the painting for the animation, be sure to perform the following:
-
Provide an install(RootPaneContainer) method that installs this component on the glass pane of the RootPaneContainer after saving off the old component that’s in the glass pane. There is only one glass pane per container, so be sure to save off an existing one and restore it once your animation is complete – so be careful not to clobber existing glass panes.
-
Provide an uninstall() method that removes this component from the RootPaneContainer’s glass pane and restores the original glass pane component.
-
Provide a method that will be called by timingEvent(float) of the TimingTarget implementation. This method should store the current animation stage (which is a float between 0f and 1f that signifies how much of the animation is complete), and it should call repaint().
-
Provide an implementation of paint(Graphics) method that performs your custom painting code. It should use the float value received in the method above to determine what stage of the animation to paint.
Here is some sample code, that may be a partial implementation of your animated component that goes on the glass pane:
private RootPaneContainer _rootPaneContainer;
private Component _oldGlasspane;
private float _animPhase;

public void installOnContainer(RootPaneContainer container){
  _rootPaneContainer = container;
  _oldGlasspane = _rootPaneContainer.getGlassPane();
  _rootPaneContainer.setGlassPane(this);
  setVisible(true);
 requestFocusInWindow();
}

public void uninstallFromContainer(){
 setVisible(false);
 _rootPaneContainer.setGlassPane(_oldGlasspane);
 _rootPaneContainer = null;
 _oldGlasspane = null;
}

public void startAnimation(){...}

public void setAnimationPhase(float v){
 _animPhase = v;
 repaint();
}

public void endAnimation(...);

public void paint(Graphics g){
 super.paint(g);
 // do something with _animPhase and paint...
}
Extras #
When the glass pane is installed on your RootPaneContainer, you should request that it gets keyboard focus. This way, you won’t see any strange artifacts of keypresses moving things around underneath the component in the glasspane. You can also install a sink that absorbs all key press and mouse events so that these aren’t passed on to components other that what’s on your glass pane. You can also choose to respond to mouse events or key presses by removing the glass pane (kick off the animation which hides the component in the glass pane for example). The same pattern used in the #1 would apply here!
Summary #
The strategy outlined here is just a suggestion on how to perform animation using a glass pane. There are many more strategies that you can select, depending on your requirements. However, I feel that this is one of the simplest and most effective approaches that have worked well for me, and I use it all the time in creating the user interface for applications in my desktop app framework for ScreamingToaster. If you look at some of the animations on the video posted on this website, they all use this strategy.
Related links #
- Timingframework – http://timingframework.java.net
- SwingX - http://swinglabs.org
👀 Watch Rust 🦀 live coding videos on our YouTube Channel.
📦 Install our useful Rust command line apps usingcargo install r3bl-cmdr(they are from the r3bl-open-core project):
- 🐱
giti: run interactive git commands with confidence in your terminal- 🦜
edi: edit Markdown with style in your terminalgiti in action
edi in action