SwingX Tutorial - Busy Label (JXBusyLabel)
![]()
Introduction #
SwingX introduces a lot of new components to Swing, and this tutorial will cover the busy label. The latest build of SwingX (after 0.9.1 milestone release) has some significant, and much needed, changes implemented by Jan Haderka.
What is a busy label? #
Here’s an example of a busy icon that you will find in all kinds of apps:

The icon is meant to depict a task that is currently executing, that is of indeterminate length. The task may take 10 minutes or 10 seconds, there’s no way of knowing, and the user can’t really have an expectation of how long to wait.
SwingX provides an implementation of this functionality in the form of JXBusyLabel and BusyPainter. You can use the busy label just like you would a normal JXLabel, except that you can add a Painter to it, which controls the painting and animation of the busy label itself.
SwingX milestone 0.9.1 #
If you are using v0.9.1 milestone release, then you will still have JXBusyLabel, but a lot of the functionality described in this tutorial will not be available to you. For that you should download the latest build of the SwingX API. Not to worry, a build that works is included in the project files that you can download at the end of this tutorial.
Source code example #
In the following example, I’m going to create 2 JXBusyLabel components, that I will place in a
JXPanel. One will work with older SwingX releases (the simple label) and the complex label will
require newer SwingX release (after 0.9.1). Here’s what it looks like:
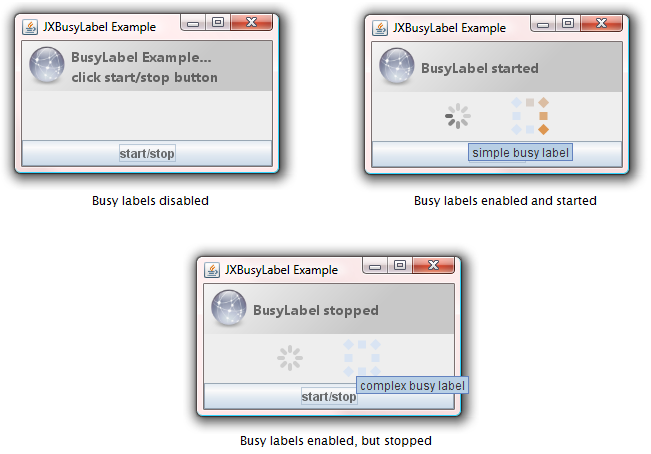
This example creates 2 busy labels, one simple, and the other complex. The simple busy label will work with older versions of SwingX (0.9.1), but the complex one requires later builds. Both the busy labels start out disabled, and as you can see from the screenshot, they blend into the background when they are disabled. When you click on the “start/stop” button, it enables the labels, and calls setBusy(true) on them. This causes them to start spinning and getting animated. When you click on the button again, the setBusy(false) method is called, stopping the animation; they are still enabled, just not animated.
Simple busy label #
Here’s the code to create a simple JXBusyLabel:
public JXBusyLabel createSimpleBusyLabel(){
  JXBusyLabel label = new JXBusyLabel();
  label.setToolTipText("simple busy label");
  return label;
}
The code is very straightforward. It’s just like creating a simple JLabel. Note that it’s not possible to set the size of this JXBusyLabel using this constructor. In fact, this is one of the reasons you should use the latest build of SwingX, which adds a new constructor and lots more functionality to this component. Using this code results in a busy label that looks like this:

Complex busy label #
Here’s the code to create a more complex JXBusyLabel:
public JXBusyLabel createComplexBusyLabel() {
  // this will not work in the 0.9.1 release of
  // SwingX (need later builds)


  JXBusyLabel label = new JXBusyLabel(new Dimension(38, 38));
  BusyPainter painter = new BusyPainter(
      new Rectangle2D.Float(0, 0, 8.0f, 8.0f),
      new Rectangle2D.Float(5.5f, 5.5f, 27.0f, 27.0f));
  painter.setTrailLength(4);
  painter.setPoints(8);
  painter.setFrame(-1);


  painter.setBaseColor(Colors.LightBlue.color());
  painter.setHighlightColor(Colors.Orange.color());


  label.setPreferredSize(new Dimension(38, 38));
  label.setIcon(new EmptyIcon(38, 38));
  label.setBusyPainter(painter);


  label.setToolTipText("complex busy label");


  return label;
}
There are a couple of things to note about this code:
-
When you create the JXBusyLabel, you can pass a Dimension object to it, to specify the size of the busy label.
-
In order to change the default look of the busy label, you have to leverage the BusyPainter class, which actually controls what the busy label looks like (background and highlight colors, shape of the label innards, etc), and how it animates (animation speed, etc). The good news is that you don’t have to code this by hand! Jan Haderka has been gracious enough to provide a program that allows you to configure all of this visually, and then it just spits out the code you need to insert in your program! Here’s a link to his program (JNLP launcher). Read more about this utility on his blog post. I recommend that you play with Jan’s program and try different things; you will be surprised the different kinds of busy labels you can come up with… it’s limited by your imagination.
-
You can change the colors used by the busy painter using setBaseColor() and setHighlightColor(). The base color is the “background” color of the busy label, and the highlight color is what gets painted over it periodically. So if you use a base color of light blue, and highlight color of orange, you get something like this:

Rest of the code #
In addition to the busy labels, there’s another JXLabel used in this example that uses a painter and an icon:

Here’s the code that makes this possible:
public JXLabel createLabel() {
  JXLabel label = new JXLabel();
  label.setBorder(BorderFactory.createEmptyBorder(5, 5, 5, 5));
  label.setFont(new Font("Segoe UI", Font.BOLD, 14));
  label.setText("BusyLabel Example...click start/stop button");
  label.setIcon(Images.NetworkDisconnected.getIcon(40, 40));
  label.setHorizontalAlignment(JXLabel.LEFT);
  label.setBackgroundPainter(getPainter());
  return label;
}


/** this painter draws a gradient fill */
public Painter getPainter() {
  int width = 100;
  int height = 100;
  Color color1 = Colors.White.color(0.5f);
  Color color2 = Colors.Gray.color(0.5f);


  LinearGradientPaint gradientPaint =
      new LinearGradientPaint(0.0f, 0.0f, width, height,
                              new float[]{0.0f, 1.0f},
                              new Color[]{color1, color2});
  MattePainter mattePainter = new MattePainter(gradientPaint);
  return mattePainter;
}
There are a few things to note about this code:
-
I used HTML to set the text of this label, so that I could insert a line break.
-
The painter used to render the background of this label uses a simple 2 stop linear gradient.
-
I used an EmptyBorder around the label to give it more space around the text and image.
Complete source listing #
import org.jdesktop.swingx.*;
import org.jdesktop.swingx.icon.*;
import org.jdesktop.swingx.painter.*;
import javax.swing.*;
import java.awt.*;
import java.awt.event.*;
import java.awt.geom.*;
/**
 * BusyLabelExample
 *
 * @author Nazmul Idris
 * @version 1.0
 * @since Feb 2, 2008, 2:43:30 PM
 */
public class BusyLabelExample {
/** simple main driver for this class */
public static void main(String[] args) {
  SwingUtilities.invokeLater(new Runnable() {
    public void run() {
      new BusyLabelExample();
    }
  });
}
/**
* creates a JFrame and calls {@link #doInit} to create a
* JXPanel and adds the panel to this frame.
*/
public BusyLabelExample() {
  JFrame frame = new JFrame("JXBusyLabel Example");
  // add the panel to this frame
  frame.add(doInit());
  // when you close the frame, the app exits
  frame.setDefaultCloseOperation(JFrame.EXIT_ON_CLOSE);
  // center the frame and show it
  frame.setLocationRelativeTo(null);
  frame.pack();
  frame.setVisible(true);
}
/** creates a JXLabel and attaches a painter to it. */
private Component doInit() {
  JXPanel panel = new JXPanel();
  panel.setLayout(new BorderLayout());
  // create a busylabel
  final JXBusyLabel busylabel1 = createSimpleBusyLabel();
  final JXBusyLabel busylabel2 = createComplexBusyLabel();
  busylabel1.setEnabled(false);
  busylabel2.setEnabled(false);
  // create a label
  final JXLabel label = createLabel();
  // create a button
  JButton button = new JButton("start/stop");
  button.addActionListener(new ActionListener() {
    public void actionPerformed(ActionEvent e) {
      if (!busylabel1.isEnabled()){
        busylabel1.setEnabled(true);
        busylabel2.setEnabled(true);
      }
      if (busylabel1.isBusy()) {
        label.setText("BusyLabel stopped");
        busylabel1.setBusy(false);
        busylabel2.setBusy(false);
      }
      else {
        label.setText("BusyLabel started");
        busylabel1.setBusy(true);
        busylabel2.setBusy(true);
      }
    }
  });
  // set the transparency of the JXPanel to 50% transparent
  panel.setAlpha(0.7f);
  // add the label, busylables, and button to the panel
  panel.add(label, BorderLayout.NORTH);
  JXPanel busylabels = new JXPanel(new FlowLayout(FlowLayout.CENTER, 40, 5));
  busylabels.add(busylabel1);
  busylabels.add(busylabel2);
  panel.add(busylabels, BorderLayout.CENTER);
  panel.add(button, BorderLayout.SOUTH);
  panel.setPreferredSize(new Dimension(250, 125));
  return panel;
}
public JXBusyLabel createSimpleBusyLabel(){
  JXBusyLabel label = new JXBusyLabel();
  label.setToolTipText("simple busy label");
  return label;
}
public JXBusyLabel createComplexBusyLabel() {
  // this will not work in the 0.9.1 release of SwingX (need later builds)
  JXBusyLabel label = new JXBusyLabel(new Dimension(38, 38));
  BusyPainter painter = new BusyPainter(
      new Rectangle2D.Float(0, 0, 8.0f, 8.0f),
      new Rectangle2D.Float(5.5f, 5.5f, 27.0f, 27.0f));
  painter.setTrailLength(4);
  painter.setPoints(8);
  painter.setFrame(-1);
  painter.setBaseColor(Colors.LightBlue.color());
  painter.setHighlightColor(Colors.Orange.color());
  label.setPreferredSize(new Dimension(38, 38));
  label.setIcon(new EmptyIcon(38, 38));
  label.setBusyPainter(painter);
  label.setToolTipText("complex busy label");
  return label;
}
public JXLabel createLabel() {
  JXLabel label = new JXLabel();
  label.setBorder(BorderFactory.createEmptyBorder(5, 5, 5, 5));
  label.setFont(new Font("Segoe UI", Font.BOLD, 14));
  label.setText(
          "<html>BusyLabel Example...click start/stop button</html>");
  label.setIcon(Images.NetworkDisconnected.getIcon(40, 40));
  label.setHorizontalAlignment(JXLabel.LEFT);
  label.setBackgroundPainter(getPainter());
  return label;
}
/** this painter draws a gradient fill */
public Painter getPainter() {
  int width = 100;
  int height = 100;
  Color color1 = Colors.White.color(0.5f);
  Color color2 = Colors.Gray.color(0.5f);
  LinearGradientPaint gradientPaint =
      new LinearGradientPaint(0.0f, 0.0f, width, height,
                              new float[]{0.0f, 1.0f},
                              new Color[]{color1, color2});
  MattePainter mattePainter = new MattePainter(gradientPaint);
  return mattePainter;
}
}//end class BusyLabelExample
There are a few things to note about this code:
-
A JXPanel is used to contain all the components (labels, buttons, etc). and it’s transparency is set to 70% opaque, 30% clear. That’s why the sample program has a very muted/soft look to it.
-
Be sure to launch your program in the Swing EDT and not the thread that’s running through your main() method.
-
A call to JFrame’s setLocationRelativeTo(null) centers the JFrame on your computer screen.
Source code download #
To download the IDEA projects for this tutorial’s source code example, click here.
👀 Watch Rust 🦀 live coding videos on our YouTube Channel.
📦 Install our useful Rust command line apps usingcargo install r3bl-cmdr(they are from the r3bl-open-core project):
- 🐱
giti: run interactive git commands with confidence in your terminal- 🦜
edi: edit Markdown with style in your terminalgiti in action
edi in action