Getting started with React Native
![]()
- Introduction
- What you will learn in this tutorial
- Setup your dev environment
- Layout using Flexbox
- Best practices on styling
- Javascript and Flow
- In App Navigation
- Platform specific differences
- React Native resources
- React, Redux, and native Android resources
Introduction #
React Native is a pretty amazing piece of technology from Facebook. It combines the best of web development and native development into one compelling package that holds the promise to have your mobile cake and eat it too! The React Native (RN) tagline is “Learn once, write anywhere: Build mobile apps with React.” And that is a very truthful statement, and it sets the expectations for what it is, and what it isn’t.
For this tutorial, I am going to assume that you have some basic idea of what React Native is (from Facebook’s website) and take it from there.
In short, it allows you to write JavaScript (JS) code to create native mobile apps. All the view hierarchies / UI components in RN are native components and they are really flat hierarchies (which is wonderful). Essentially instead of a DOM, RN creates it’s own equivalent using native components. The objects in this RN DOM can be manipulated by JS code, which can be the same for iOS or Android, and they can be different. It does all kinds of optimizations to ensure that the view hierarchy is repainted efficiently when underlying views change; if you’re curious about the specifics of how this works you can check out things like virtual DOM and incremental DOM.
You have a tremendous amount of flexibility in using one codebase, or diving up your codebase to have very little overlap between your iOS and Android code. You can also leverage native components that you or others write in either iOS and Android. And you can use npm to load libraries into your codebase. Sounds too good to be true? It’s not - the price you have to pay for all this magic is having to learn a new way of doing things, especially if you have invested a lot of time and energy into iOS and / or Android development.
What you will learn in this tutorial #
This tutorial will walk you thru the creation of a demo app that works on both Android and iOS.
I will walk you thru the different aspects of this project in the sections below:
- Starting with app layout and styling using Flexbox.
- Getting into deeper aspects of application design (such as navigation).
- Loading resources from the network and locally.
- Platform specific differences you need to be aware of.
What I will not cover in this tutorial:
- What Flexbox or CSS is.
- How to integrate Redux into native Android development. I have tutorials on native Android and Redux here.
Here’s what the app looks like on Android:

RN is a pretty vast expanse of technology that will take some time to learn and then master. This tutorial gets you up to speed with some bare essentials for what you will need. There will be other tutorials that go into much more complex examples and do deeper dives into many different topics. Here’s the github link for this project - https://github.com/r3bl-alliance/react-native-learning
Here’s the video of the app running in iOS:

Setup your dev environment #
If you haven’t done so already, please follow the instructions on the RN website to get started
here -
https://facebook.github.io/react-native/docs/getting-started.html.
The instructions are very straightforward, you will need node and then install a react-native-cli
npm package. Then you are good to go. The current release of the CLI tools makes deployment to
Android even easier (as there’s no need to do the adb reverse command anymore. I use
Webstorm as my IDE of choice, as I’m a JetBrains user and I
can re-use my IntelliJ IDEA and Android Studio settings (including custom kemaps, coding styles,
themes, etc).
Get the project from Github #
Here’s the github link for this project -
https://github.com/r3bl-alliance/react-native-learning.
Once you get the project cloned on your development machine, then make sure to run npm install in
the root folder where you cloned this repo to. Then open up the project in your favorite IDE.
Layout using Flexbox #
RN uses CSS Flexbox to do layouts. If you’re familiar with Android layout managers, this is the equivalent of their function, only done using CSS standards. These are 2 excellent resources on Flexbox to get you started:
-
https://developer.mozilla.org/en-US/docs/Learn/CSS/CSS_layout/Flexbox
-
https://developer.mozilla.org/en-US/docs/Web/CSS/CSS_Flexible_Box_Layout/Using_CSS_flexible_boxes
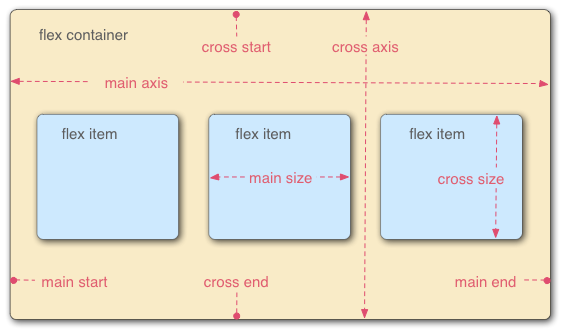
The key thing to remember when doing Flexbox layouts is that everything happens on the main axis or the cross axis. The code in github takes you thru many examples of Flexbox layouts that are relevant to designing apps (things like hero images, headers, text styling, horizontal and vertical layout, and spacing).
When you think about laying out screens, it’s best to start with looking at all the elements in the screen as being laid out on the main or cross axis and then thinking about nesting these elements. Here’s an example of a screen:
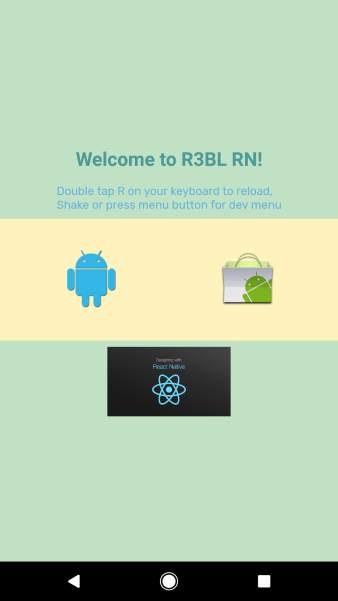
There’s a main container, which has flex:1, and it has flexDirection:'column'. What this does is
that it adds the text fields and button bar and image in a vertical list (from top to bottom). It
also has a directive to justifyContent:'center' and alignItems:'center'. justifyContent controls
the way in which items are laid out in the main axis (in this case it centers all the items in a
vertical, top to bottom direction main axis). And alignItems controls how items are laid out in the
cross axis (in this case it centers all the items horizontally across the main axis which is
vertical).
Take a look at the mainview_style.v_container style below to get an idea of this. There are
helpful comments as well, to make sense of what these Flexbox directives mean.
Another interesting bit of code is the Flexbox styles that are used to layout the icons (Android and
Google Play) in the center of the screen (centered horizontally). If you look at the
mainview_style.h_container you will see the code that does this.
const mainview_style = StyleSheet.create({
  v_container: {
    flex: 1,
    flexDirection: "column", // main axis
    justifyContent: "center", // main axis
    alignItems: "center", // cross axis
    backgroundColor: "#c1e1c5",
  },
  welcome: {
    flex: -1, // shrink to min height and width if needed
    fontSize: 20,
    color: "#006b7699", // #RGBA supported
    fontFamily: "Rubik-Regular", // list of families https://goo.gl/fsrJsK
    fontWeight: "500", // weights are between 100 and 900
    margin: 8,
  },
  instructions: {
    flex: -1,
    margin: 8,
    fontFamily: "Rubik-Regular",
    fontSize: 12,
    color: "rgba(33, 150, 243, 0.6)", // different ways to provide color
  },
  h_container: {
    flex: -1,
    flexDirection: "row",
    justifyContent: "space-around",
    alignSelf: "stretch", // overrides container alignItems
    backgroundColor: "#fef3bd",
    padding: 16,
  },
  image: {
    flex: -1,
    margin: 8,
    height: 100,
    width: 75,
    resizeMode: "contain", //'cover' | 'contain'
  },
  image2: {
    flex: -1,
    height: 100,
    width: 150,
    resizeMode: "contain", //'cover' | 'contain'
  },
})
A few more things to note in the code above:
-
There’s a reference to a custom font called
Rubik-Regularthat is loaded (more on this at the end of this document). -
There are lots of interesting ways in which you can size images in RN. The
Imagecomponent has lots of useful options to help you size images. The main ones that I’ve found useful arecoverandcontain. In theStyles.jsclass, try making changes in themainview_styleobject and switchcontaintocoverand see what happens.
Best practices on styling #
You will notice that all the styles that are used in the code in github are all stored in a single
file -
Styles.js.
This was a conscious choice on my part. It is easier to declare these styles inline in the code, but
the disadvantage of doing so is that you have styling all over the place and it’s difficult to make
sweeping changes in styling in your codebase.
Also, if you share this Styles.js file with a designer who’s familiar with CSS, they should be
able to make changes to this one file and radically change the UI, since all the layout, graphics,
padding, colors, etc are stored in this single file! This is also a great way to engage with
designers on your project, since RN holds the promise of changing the traditional approach to the
way in which developers and designers interact through wireframes, clickable prototypes, etc.
Javascript and Flow #
RN projects are enabled to work with Flow static type checking out of the box. I’m a huge proponent of type checking. Typescript can be clunky to use due to the tooling around it. Flow is pretty much invisible for the most part. The tooling isn’t great at this point, but it’s not bad. If you look at the TypeAliases.js code, you will find how I’m lightly using type aliases. In future tutorials, featuring real-world apps, I will lean on this much more heavily. For Webstorm users, here’s more info on Flow and Webstorm.
In App Navigation #
In app navigation is important for most apps. And RN has multiple ways of handling this. There are 2 main ways in which to achieve this. In this tutorial, I will cover the legacy and cross platform way of doing things. In a future tutorial (and a different github project) I will cover the new and also cross platform way of doing things. For your reference, here’s more information on both ways:
-
Legacy cross platform navigation - Navigator
-
Modern cross plaform navigation - React Navigation
What is in app navigation for? It is to provide you with a mechanism of switching to and between different ‘screens’ in your app. There is a router that basically manages which views are displayed at any given moment, and how transitions between these screens happen. This tutorial is really simple and I chose not to muddy the waters by bringing in Redux (this will happen in a future tutorial on a different project on github).
There are a few basic things you have to keep in mind with navigation:
-
List of pre-defined routes (these describe the different screen destinations in your app).
-
Wiring up calls to Navigator
push(...)andpop()which trigger the Navigator to do it’s thing and switch up those screens and end up callingrenderScene(). You also have to pass the navigator object as props to the React components contained inside the Navigator component. -
render()function that uses the Navigator class. -
renderScene()function that actually performs the task of rendering differnet view hierarchies depending on the current route.
The
Router.js
class is an example that showcases these 4 things. I will go thru greater detail using this as an
example below.
1) Pre-defined routes in Router.js #
The Router.js class defines the following pre-defined routes in the routes object.
const routes = [
  {
    name: "main view",
    index: 0,
  },
  {
    name: "flexbox view 1",
    index: 1,
  },
  {
    name: "flexbox view 2",
    index: 2,
  },
]
Pre-defined routes are just JSON objects that you create which hold some data about each destination
or screen in your app. You can decide what key-value pairs are stored in these objects, as long as
you make sure to use these key-value pairs in the renderScene() method later. In this case, I’m
using index and name as the main data that I’m storing that represents each route. I have 3
‘screens’ that I wish for the app to show the user and they are the
MainView.js,
FlexboxView1.js,
and
FlexboxView2.js.
The Router.js class also passes the Navigator object as props to all the React components that it
manages (in this case to MainView.js, FlexboxView1.js, and FlexboxView2.js).
renderScene(route, navigator) {
  _navigator = navigator;
  _route = route;
  switch (route.index) {
    case 0:
      return (
        <MainView navigator={navigator} title={route.name}/>
      );
    case 1:
      return (
        <FlexboxView1 navigator={navigator} title={route.name}/>
      );
    case 2:
      return (
        <FlexboxView2 navigator={navigator} title={route.name}/>
      );
  }

};
2) Wiring up calls to Navigator push(…) and pop() in MainView.js, FlexboxView1.js, and FlexBoxView2.js #
In this app, the user is presented with the MainView.js first which allows them to press one of 2
touchable areas (that are on top of images). The following code is in the render() method of
MainView.js:
-
Android image - this takes the user to FlexboxView1.js. The way this is achieved is that the
onPresshandler for the TouchableHighlight pushes a new route into the navigation stack (index:1). -
Google Play image - this takes the user to FlexboxView2.js. The way this is achieved is that on the
onPresshandler for the TouchableHighlight pushes a new route into the navigation stack (index:2).
<View style={mainview_style.h_container}>

  <TouchableHighlight
    activeOpacity={1}
    underlayColor='#c1e1c5'
    onPress={() => {
      this.props.navigator.push({index: 1});
    }}>
    <Image source={imageUrl2} style={mainview_style.image}/>
  </TouchableHighlight>

  <TouchableHighlight
    activeOpacity={1}
    underlayColor='#c1e1c5'
    onPress={() => {
      this.props.navigator.push({index: 2});
    }}>
    <Image source={imageUrl3} style={mainview_style.image}/>
  </TouchableHighlight>

</View>

...

MainView.propTypes = {
 navigator: React.PropTypes.object.isRequired,
};
The calls to push() are just part of the equation. Calls to pop() have to be made as well. There
are 3 places where this happens:
-
Android BackButton listener
-
FlexboxView1 render() method
-
FlexboxView2 render() method
Here’s the code for the AndroidBack button listener (which isn’t activated on iOS, which is why we
have FlexboxView1 and FlexboxView2 handle their own calls to pop()). This code is in the
Router.constructor() method.
BackAndroid.addEventListener("hardwareBackPress", () => {
  // debug msg
  let msg = "back press"
  let length = _navigator.getCurrentRoutes().length
  if (!_.isNil(_navigator)) {
    msg = `${msg} length=${length}`
  }
  if (!_.isNil(_route)) {
    msg = `${msg} index=${_route.index}, name=${_route.name}`
  }
  ToastAndroid.show(msg, 10000)

  // actual code
  if (length === 1 || length === routes.length) {
    return false
  }
  _navigator.pop()
  return true
})
Here’s the code for calling pop() in FlexboxView1.render() function:
<TouchableHighlight
  activeOpacity={1}
  underlayColor="#c1e1c5"
  onPress={() => {
    this.props.navigator.pop()
  }}
>
  <Text style={flexboxview1_style.text1}>{msg1}</Text>
</TouchableHighlight>
Here’s the code for calling pop() in FlexboxView2.render() function:
<TouchableHighlight
  activeOpacity={1}
  underlayColor="#c1e1c5"
  onPress={() => {
    this.props.navigator.pop()
  }}
>
  <Text style={flexboxview2_style.text1}>{msg1}</Text>
</TouchableHighlight>
Note that in both cases, the navigator object is passed as a props to the from Router.js.
3) render() function in Router.js #
The render() function simply delcares that we are using the Navigator component in the JSX. It also
wires up the Navigator component to our list of pre-defined routes, and our renderScene()
function. Here’s the code:
render() {
  return (
    <Navigator
      style={styles.router_style.container}
      initialRoute={routes[0]}
      initialRouteStack={routes}
      renderScene={this.renderScene}
    />
  );
}
4) renderScene() function in Router.js #
This function simply provides conditional logic that takes the given route object and then actually loads a React component when this route is set. Note that two very important objects are passed as parameters to this function: route, and navigation. I store these in class scope variables since they are used elsewhere in the class (eg by the Android BackButton listener). Here’s the code:
renderScene(route, navigator) {
  _navigator = navigator;
  _route = route;
  switch (route.index) {
    case 0:
      return (
        <MainView navigator={navigator} title={route.name}/>
      );
    case 1:
      return (
        <FlexboxView1 navigator={navigator} title={route.name}/>
      );
    case 2:
      return (
        <FlexboxView2 navigator={navigator} title={route.name}/>
      );
  }
};
Platform specific differences #
In this github project, I’ve used classes that are cross platform between iOS and Android, with one exception (the Android BackButton). RN doesn’t require you to doing use a single codebase for both platforms, you can choose to do whatever works for your project. Eg: instead of using Navigator, you can use NavigatorIOS which is a platform specific component and won’t work on Android. Navigation and BackButton aren’t the only two differences that you have to be aware of as you deploy your app onto Android and iOS. I’ve compiled a short list for this github project. In future tutorials, I will take you thru many more examples of this.
Fonts #
Here is an excellent article that covers how custom fonts can be loaded into your RN project. In this github project I’ve loaded a custom font called Rubik-Regular. In order to use this font, here’s the JSX code that you can write:
<Text style={{ fontFamily: "Rubik-Regular" }}>Hello</Text>
Finally, keep in mind that fonts that come out of the box in RN on iOS and Android are totally different. Here’s an article that goes into what fonts are available and where. This is why I choose to include my own custom font, so that it would be available on both the iOS and Android apps that are generated.
BackButton #
The Android BackButton doesn’t exist on iOS. For the Android app, I use the BackButton listener in
the Router.js constructor. Since BackButton functionality isn’t available for the iOS app, I
provided a way for the user to navigate back to the homescreen by clicking on the
Flexbox View (tap to go back) Text component.
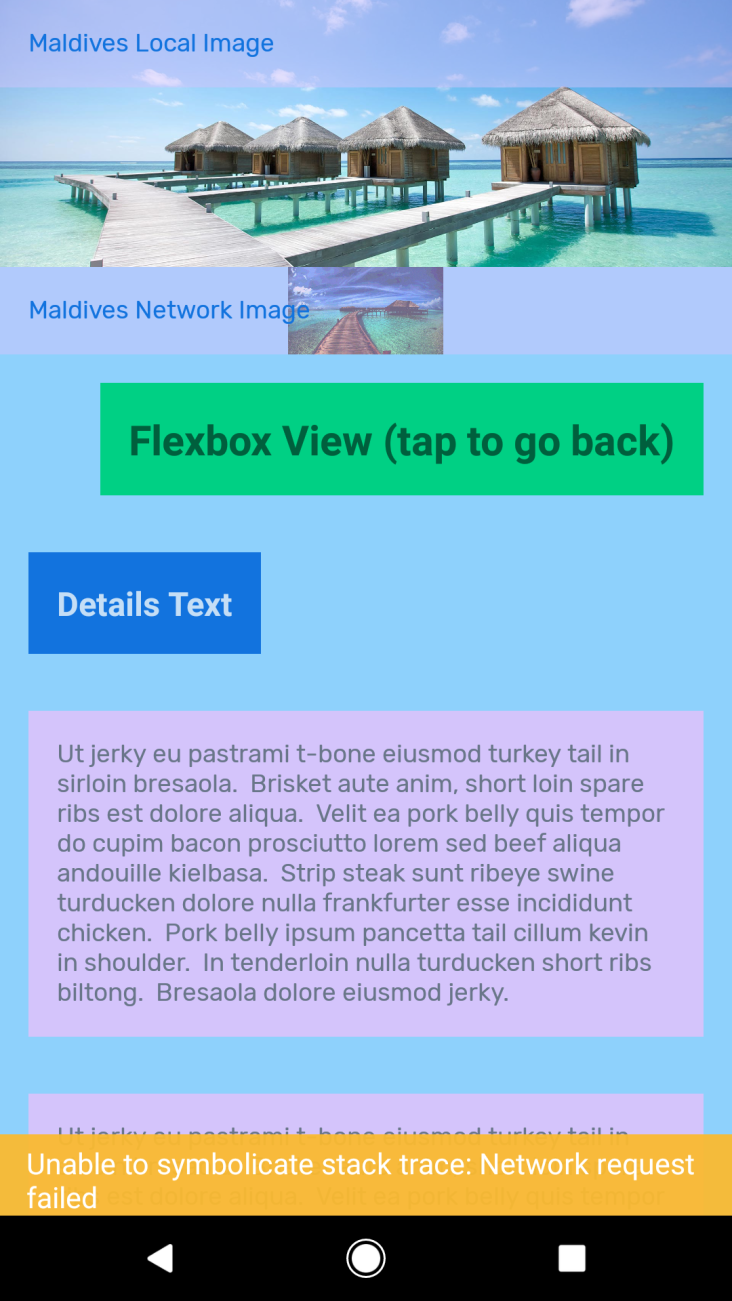
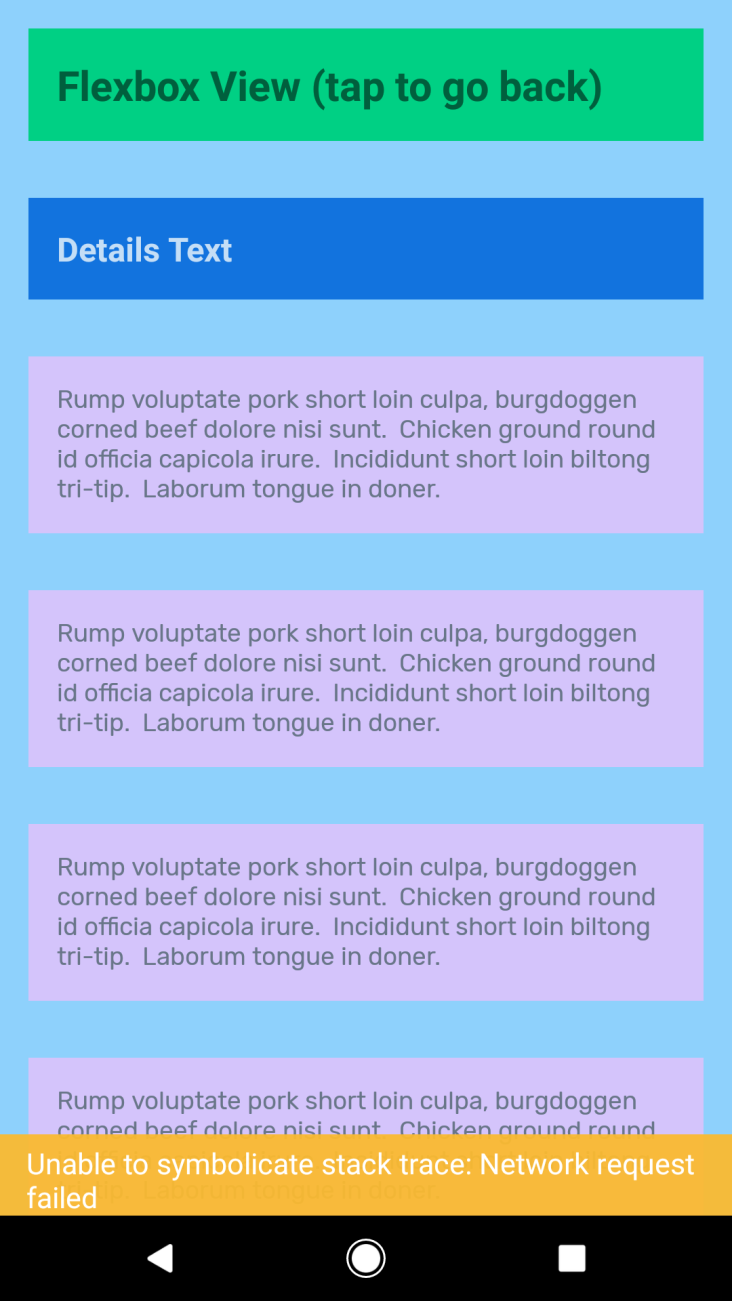
Image loading #
RN has some very powerful image loading mechanisms, whether it’s loading an image from the network
or from local storage (on the phone). It also supports some very useful and flexible sizing options,
such as cover and contain. But the biggest thing to keep in mind for cross platform
functionality is that images loaded over the network on iOS must have https in the URI, or they
won’t work. This is a key difference between Android and iOS image loading.
React Native resources #
-
This is a good resource that you can follow for keeping up to date with changes in RN - http://reactnative.cc/
-
This is another video lecture course online on React Native on shoutem.com.
-
This a great facebook community on React Native.
React, Redux, and native Android resources #
- How to integrate Redux into native Android development. I have tutorials on native Android and Redux here.
👀 Watch Rust 🦀 live coding videos on our YouTube Channel.
📦 Install our useful Rust command line apps usingcargo install r3bl-cmdr(they are from the r3bl-open-core project):
- 🐱
giti: run interactive git commands with confidence in your terminal- 🦜
edi: edit Markdown with style in your terminalgiti in action
edi in action